Wheat Bucket Bag Kit
$19.99
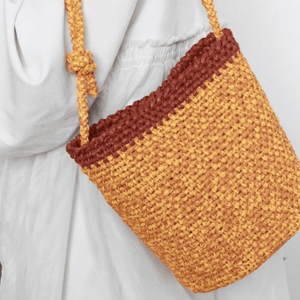
The Wheat Bucket Bag kit has quickly become a favorite around here; its streamlined, feather-light build suits the daily grind perfectly.
Distinct wheat-patterned stitches run around the edge, creating a look that is at once polished and softly organic.
Crocheting the piece is genuinely meditative: each round adds shape, and watching the curve emerge is both soothing and satisfying.
Description
Table of Contents for wheat bucket bag kit
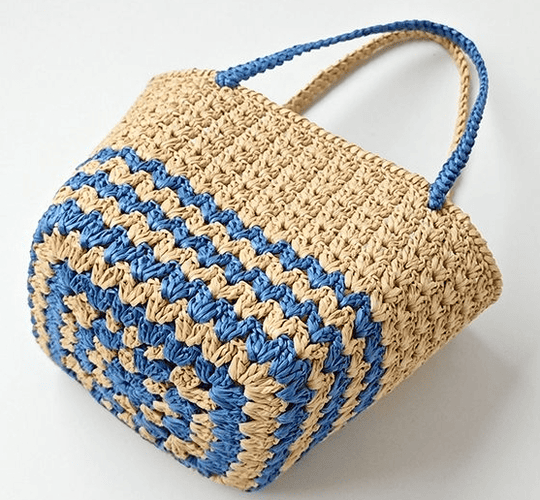
Wheat bucket bag kit: The moment we encountered the wheat bucket bag , we knew we had to make one. Its clean lines, plaited structure, and modern silhouette marry flair with function, and the stitch sequence turned out to be far less intricate than it looked.
In this step-by-step overview, we walk you through selecting yarn, shaping the body, and adding the handle so you can craft your own version.
Whether youve just mastered the chain stitch or can already whip up granny squares in your sleep, you are welcome to join the project.
Why we like the wheat bucket bag kit
Its feather-light but sturdy, standing upright even when empty, thanks to a raffia and a little stiffening.
The wheat stitch creates gentle ridges that catch the light yet behave, so the overall effect is tidy rather than flashy.
There is enough room for a tablet, wallet, and water bottle without sagging, and the open top makes packing and unpacking quick.
Best of all, the repetition is meditative; once you settle into rhythm, you may find yourself working yarn in the evening while podcasts play.
Wheat bucket bag kit
- Hook: 3.0 mm
- Yarn: Two contrasting colors
- Yarn needle
- Stitch marker
Basic tools required
- Scissors
- Vaseline
Abbreviations for wheat bucket bag kit
- ch = Chain stitch
- sc = Single crochet
- sl = Slip stitch
- st(s) = Stitch(es)
- dc = Double crochet
- tr = Treble crochet
- Q = Cluster stitch
- R = Round
Crochet bottom of wheat bucket bag
R1 (blue)
| Step | Instruction |
|---|---|
| 1 | Make 6 chain stitches (ch 6). |
| 2 | Insert your hook into the first chain stitch, yarn over, pull through to make a slip stitch (sl st). This forms a small ring. |
| 3 | Chain 3 (ch 3) – this counts as your first double crochet (dc). |
| 4 | Into the center of the ring, work 2 double crochets (dc), then chain 1 (ch 1). This completes your first group (3 dc + ch 1). |
| 5 | Repeat 3 dc + ch 1 into the ring until you have a total of 8 groups. |
| 6 | After the last ch 1, join with a slip stitch (sl st) into the top of the initial ch 3 to close the round. |
R2 (beige)
| Step | Instruction |
|---|---|
| 1 | Chain 3 (ch 3) – this counts as our first double crochet (dc). |
| 2 | In the same space, work 3 double crochets (3 dc). |
| 3 | Chain 1 (ch 1). |
| 4 | Repeat (4 double crochets [4 dc], chain 1 [ch 1]) a total of 7 times into the each small hole |
| 5 | Join with a slip stitch (sl st) into the top of the initial chain 3 (ch 3) to close round. |
R3 (blue)
| Step | Instruction |
|---|---|
| 1 | In the first space (hole), we work (1 cluster stitch + 1 chain stitch) 3 times. |
| 2 | We move to the next hole and again work (1 cluster stitch + 1 chain stitch) 3 times. |
| 3 | We repeat this process for a total of 7 spaces (holes). |
| 4 | After finishing the last space, we join with a slip stitch (sl st) if needed, to close the round neatly. |
R4 (beige)
| Step | Instruction |
|---|---|
| 1 | For the first edge, we work: |
| – 4 chains (ch) – counts as first treble crochet. | |
| – 2 treble crochets (2 tr), 1 chain (ch) in the starting space. | |
| – 2 double crochets (2 dc), 1 chain (ch). | |
| – 3 double crochets (3 dc), 1 chain (ch). | |
| – 2 double crochets (2 dc), 1 chain (ch). | |
| – 3 treble crochets (3 tr), 3 chains (3 ch) to form the first corner. | |
| 2 | For the second to fourth edge (repeat 3 times): |
| – 3 treble crochets (3 tr), 1 chain (ch). | |
| – 2 double crochets (2 dc), 1 chain (ch). | |
| – 3 double crochets (3 dc), 1 chain (ch). | |
| – 2 double crochets (2 dc), 1 chain (ch). | |
| – 3 treble crochets (3 tr), 3 chains (3 ch) to form the corner. | |
| 3 | To finish, we join with a slip stitch (sl st) into the top of the starting 4 chains (ch) to close the round neatly. |
R5 (blue)
| Step | Instruction |
|---|---|
| 1 | We start with 3 chains (ch) – this counts as the first stitch of the round. |
| 2 | In the same space, we work: cluster stitch (made with 3 unfinished double crochets [dc] pulled together), then chain 1 (ch), then another cluster. |
| 3 | Next, we repeat (cluster stitch, chain 1, cluster stitch) a total of 23 times, working into each space as we move around the round. |
| 4 | After completing the last repeat, we chain 3 (ch 3) to bring us to the correct height. |
| 5 | To finish, we join with a slip stitch (sl st) into the top of the starting chain 3 to close the round neatly. |
R6 (beige)
| Step | Instruction |
|---|---|
| 1 | We begin with 3 chains (ch) – this counts as our first stitch for height. |
| 2 | In the same space, we work: 1 cluster stitch , 1 chain (ch), and another cluster stitch (2 unfinished dc). |
| 3 | Next, we repeat (cluster stitch, 1 chain [ch], cluster stitch) a total of 31 times, working into each space around the round. |
| 4 | After completing the repeats, we make 1 chain (ch) to finish the round’s spacing. |
| 5 | Finally, we join with a slip stitch (sl st) into the top of the starting 3 chains (ch) to close the round neatly. |
Crochet body of wheat bucket bag
We use the same as round 6 method to crochet R7-R23. color have to change it, we make table for your reference.
| Round | Color | Instruction |
|---|---|---|
| R7 | Blue | We switch to blue yarn and crochet round 7. |
| R8 | Beige | We change to beige yarn and work round 8. |
| R9 | Blue | We pick up blue yarn again for round 9. |
| R10 | Beige | We switch back to beige yarn and crochet round 10. |
| R11 | Blue | We use blue yarn again for round 11.( use single crochet for slip stitch) |
| R12–R23 | Beige | We finish rounds 12 to 23 using beige yarn for a smooth and consistent look. |
Crochet opening of wheat bucket bag
|R24 :Crochet one round of single crochet (sc) evenly around the top edge, forming a tidy and stable border for the opening of the bag.
R25 : Work **one round of reverse single crochet , stitching from *right to left* to add a polished and decorative finish.
Crochet & sew strap
1 Begin by chaining two to establish the foundation for the strap.
2 Insert the hook from the back into the very next stitch.
3 Yarn over, draw up a loop so there are two on the hook, yarn over again, and pull through both.
4 Repeat along the row; this form gives a rope-like twist, ideal for straps.
5 When the desired length is reached, fasten off and sew each end to the bag sides.
Reference sources
1.Learn the most comprehensive guide for single crochet(sc)
Author:Sarah Stearns
Publication date: on June 15, 2021, updated:December 14, 2024
Title: How to single crochet (sc)for beginners
Summary as blow:
- Step-by-Step Single Crochet for Beginners
- Single Crochet into a Foundation Chain
- Single Crochet into another Row
- Single Crochet in the Round
- Increases and Decreases
- Working Single Crochet in Different Loops