


Duck Crochet Pattern The Most Comprehensive Step-By-Step Explanation
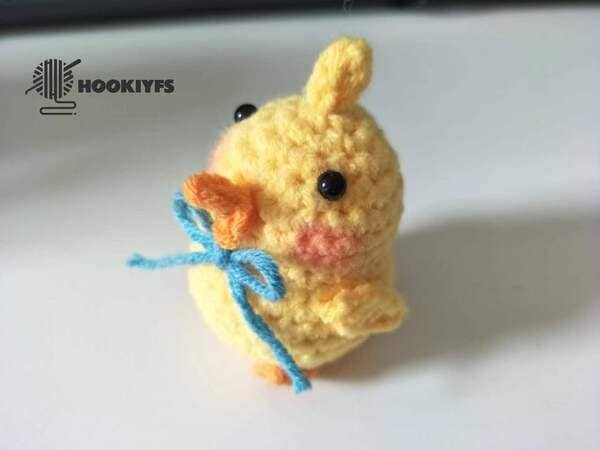
Table of Contents
Material kit of duck crochet
- Hook: 3.0mm
- Stuffing: (polyester fiberfill)
- Yarn(yellow&orange&blue )
- Yarn needle
- Safety eyes
- Marker
List of necessary tools
- Scissors
- Hot melt glue or glue
- Blush
Abbreviation for duck crochet
These are the required abbreviations for duck crochet
- ch = Chain stitch
- sc = Single crochet
- sl =Slip stitch
- inc = Increase (usually 2 stitches in the same stitch)
- dec =Decrease (typically done by crocheting two stitches together)
- st(s) =Stitch(es)
- mc =Magic circle (or magic ring)
- hdc=half double crochet
Best selling products
-

Raffia Cross Pattern Basket Handbag Kit
$19.99 -

Hexagonal Bucket Bag Kit
$29.99 -

Raffia Handbag Kit
$29.99 -

Hammock Bag Kit
$29.99 -

Wheat Bucket Bag Kit
$19.99
Buy duck crochet kit
Want to elevate your crochet collection? Our Duck Crochet Kit would best fit your needs! This all-encompassing kit is perfect for both beginners and seasoned crafters looking to hone their skills because it makes the process of crocheting an adorable duck plushie simple and enjoyable.
The materials contain everything required: high-grade yarn, a crochet giving, stuffing, safety eyes, a tapestry needle, and simple to follow step by step instructive material. There is no need to look around for additional materials since everything is in one place!
In addition to being a great project, this duck crochet kit also makes a perfect present for all ages and occasions, be it spring or winter festivities. It can also be done with children or enjoyed alone which makes the project even more fun. Not to mention, it is also a great way to practice new techniques and destress.
Why wait? Start needle and thread to create a soft, cuddly friend. Our duck crochet kit is out for grabs, best suited for hobbyists and animal lovers!
Get yours here : Duck Crochet Kit
Tips
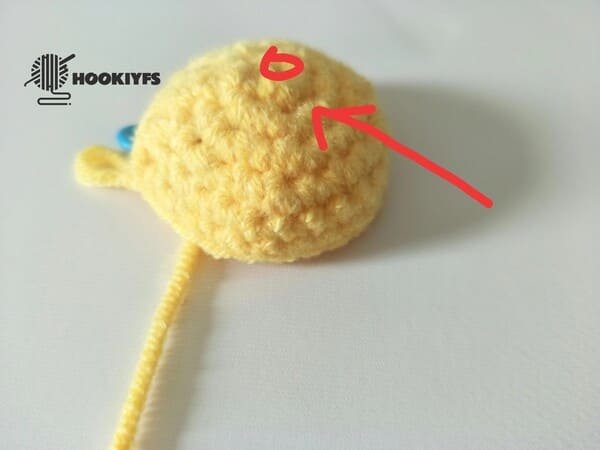
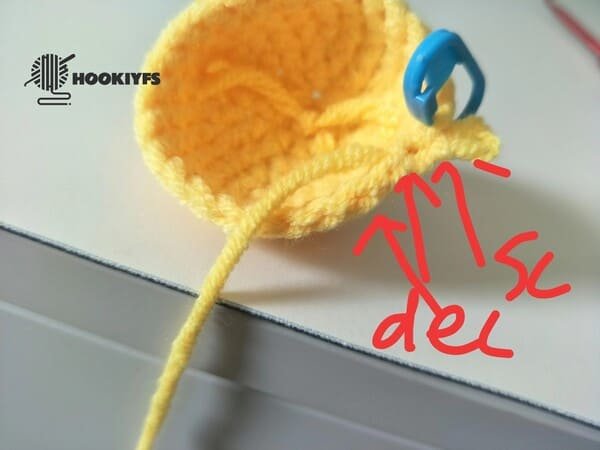
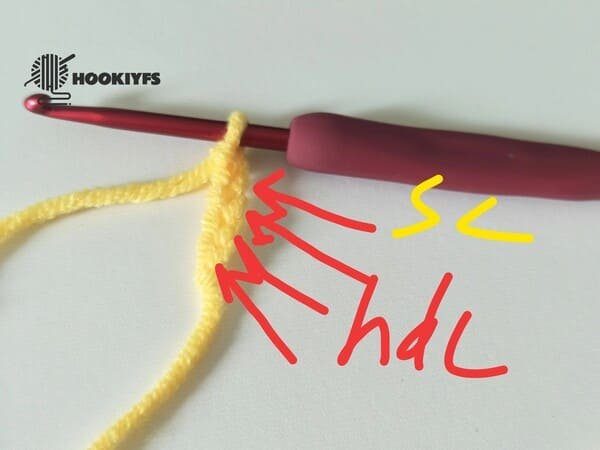
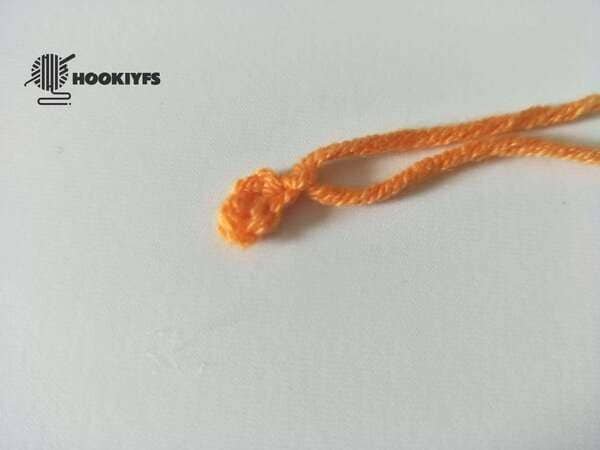
We need to count the rows of fabric to ensure that the items you are crocheting are in the correct order.
One raise shaped is one row (as shown in the picture)
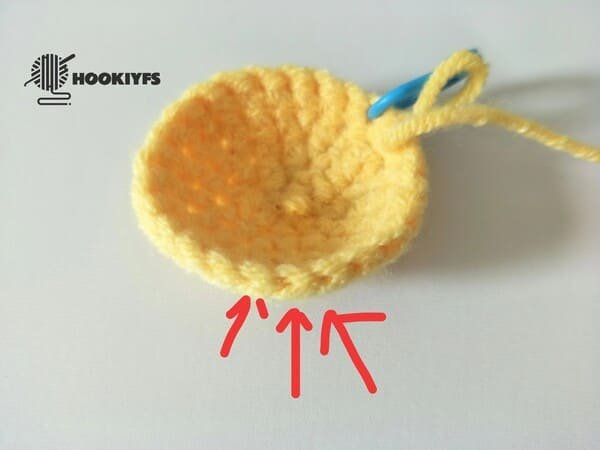
When each row is knitted, we need to count the number of stitches in this row.
A V shape represents one stitch.
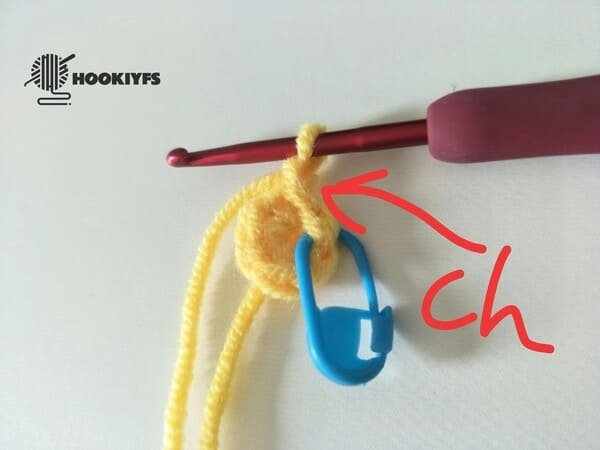
Before starting to crochet row, we need to crochet a chain stitch(ch ). Please don’t forget
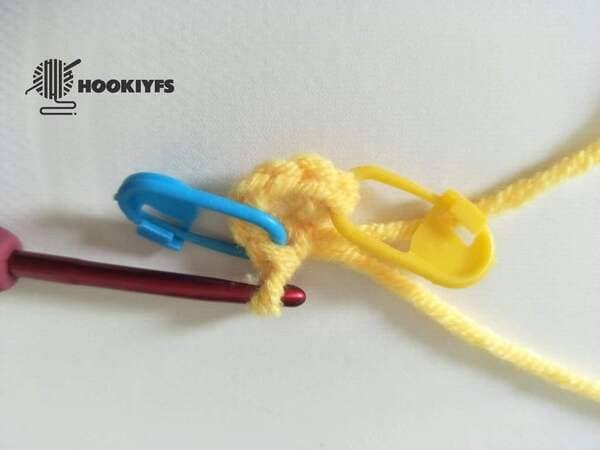
When the first stitch is completed, buckle the yellow mark button, and when the last stitch is completed, buckle the blue mark button.
The advantage of this is that we can count the number of stitches in each row of crochet.
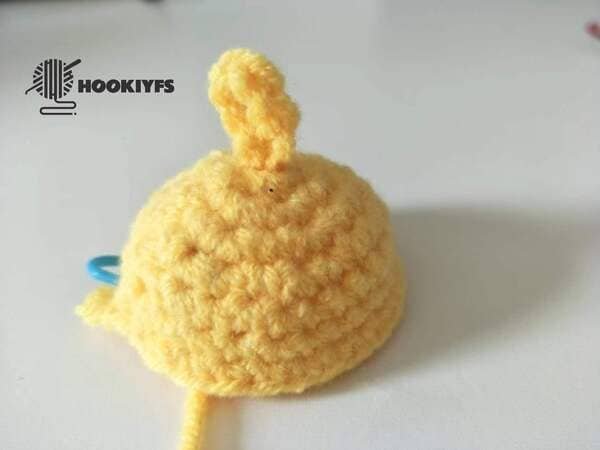
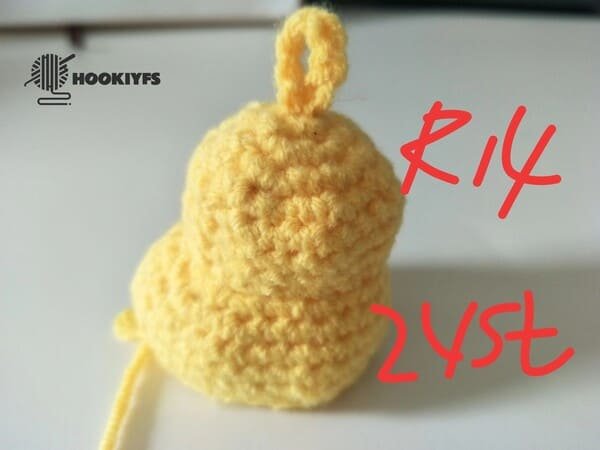
Crochet the body (use yellow yarn )for duck crochet
- R1: 6 sc into mc(6)
- R2: (inc)*6(12)
- R3:(sc,inc)*6(18)
- R4:(sc,inc,sc)*6(24)
- R5–R7:24sc(24)
- Hand carrying
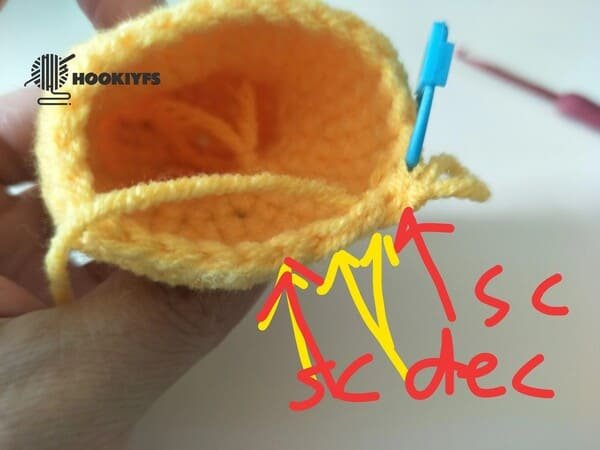
- R8:(sc,dec)*8(16)
- R9:(inc)*2,(sc,inc)*6,(inc)*2(26)
- R10:(sc,inc)*2,18sc,(sc,inc)*2(30)
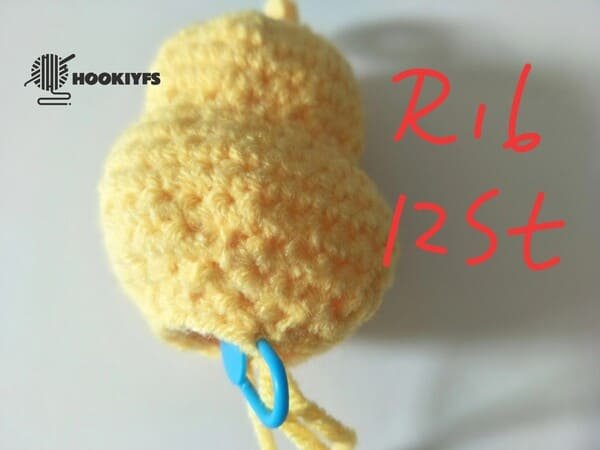
- R11-R13:30sc(30)
- R14:(3sc,dec)*6(24)
- R15:(sc,dec,sc)*6(18)
- R16:(sc,dec)*6(12)
- Fiberfill
- R17:dec*6(6)
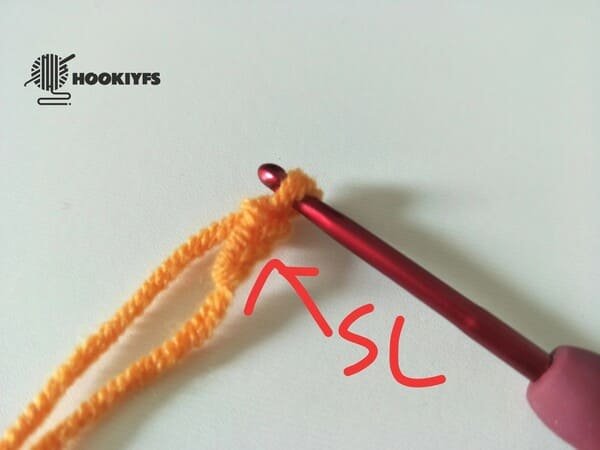
R1
6 single crochet into magic ring .
Want to learn magic ring , please click:How To Crochet Magic Ring ? l Step-By-Step l Video & Text &Photo
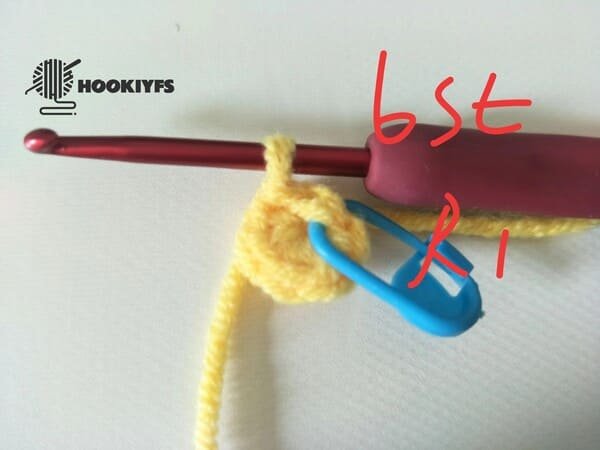
We get 6 stitches for row 1 after slip stitch.
Slip stitch :Insert the V shaped stitch of the first yellow mark button with a slip stitch. Now loop your yarn and bring two stitches out on the crochet at once. For getting out one loop our slip stitch is completed.
R2
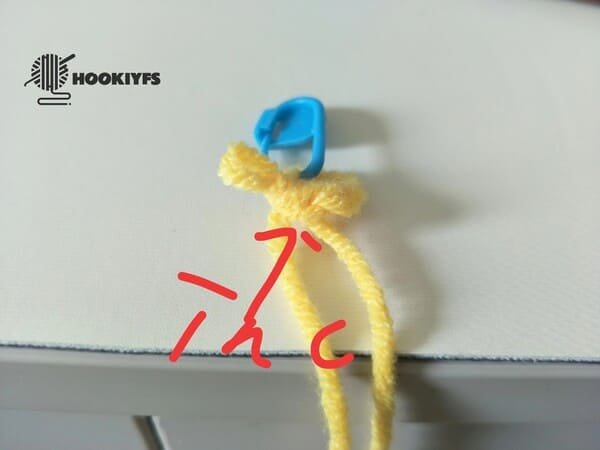
The fabric is put aside for our visual understanding.
Make the following stitches as instructed: increase in every stitch and repeat in increments of six.
Be aware of the last stitch in this round which is an inc.
We get 12 stitches for row 2 after slip stitch.
R3
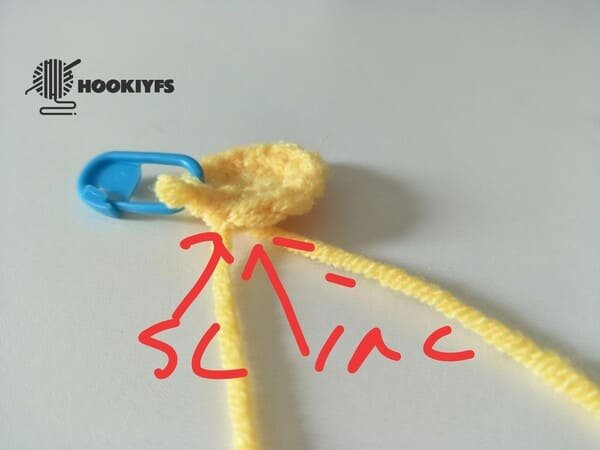
Crochet order: (sc,inc) repeat 6 times.
When there are two stitches left in this round, then crochet sc, inc again.
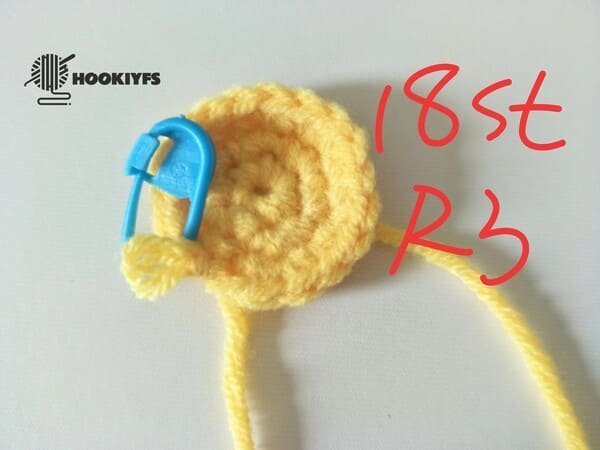
Count the total number of stitches after crocheting this round. 18 stitches.
Then crochet slip stitch, row 3 is completed.
R4
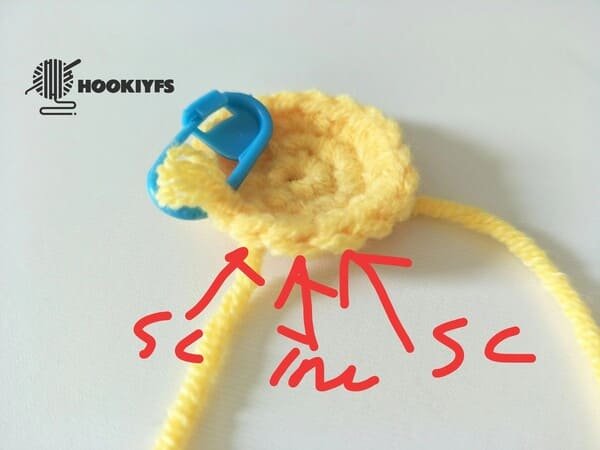
Crochet order: (sc,inc,sc) repeat 6 times.
When there are three stitches left in this round, then crochet sc, inc,sc again.
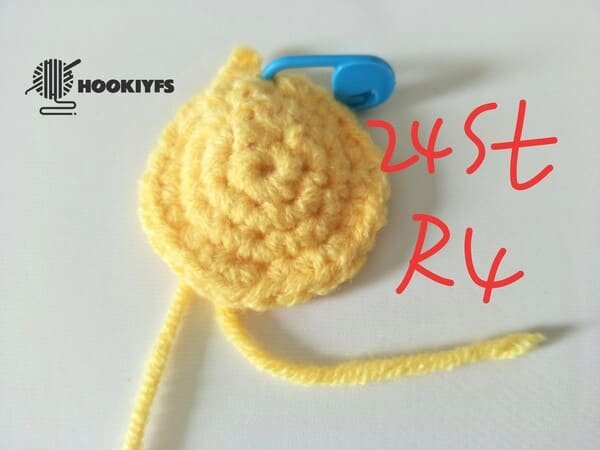
Count the total number of stitches after crocheting this round. 24 stitches.
Then crochet slip stitch, row 4 is completed.
R5
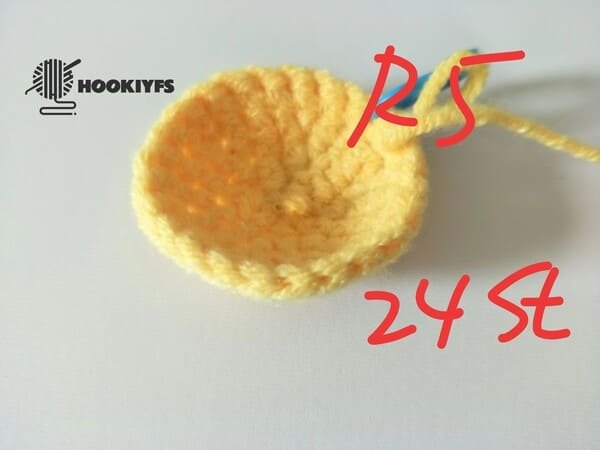
24 single crochet (sc) in each stitch.
Then crochet slip stitch, row 5 is completed.
R6
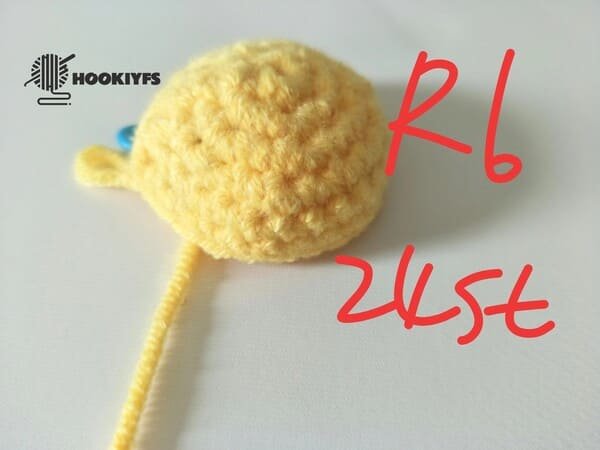
Same as row 5.
R7
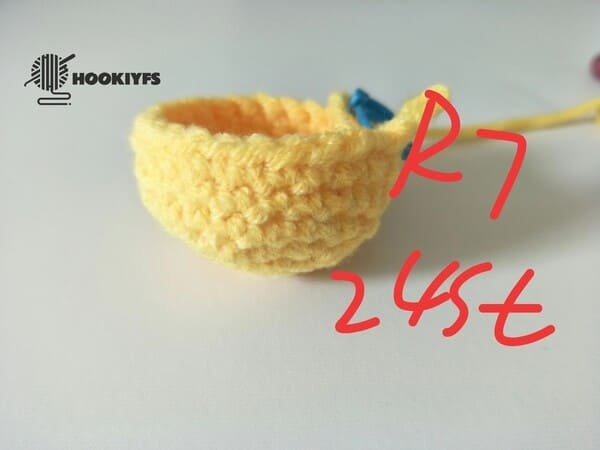
Same as row 6.
Hand carrying
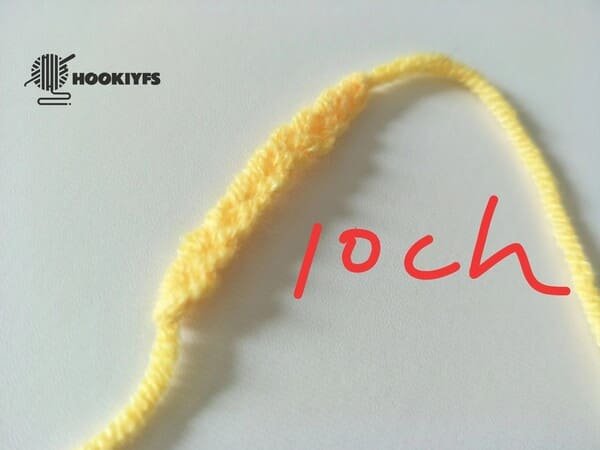
Crochet 10 chain stitches for hand carrying.
hand carrying sewing on the body for duck
R8
Crochet order: (sc,dec) repeat 8 times.
When there are three stitches left in this round, then crochet sc, dec again.
We use invisible dec method to crochet it, please also write this article:Single Crochet Decrease -Three Method In More Details Slowly For Beginner | Video&Text&Picture
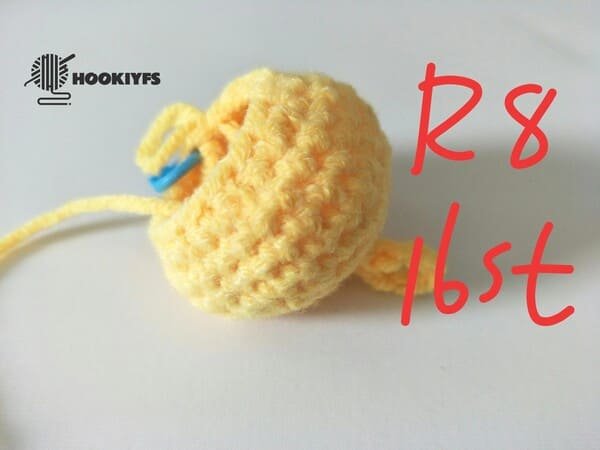
Count the total number of stitches after crocheting this round. 16 stitches.
Then crochet slip stitch, row 8 is completed.
R9
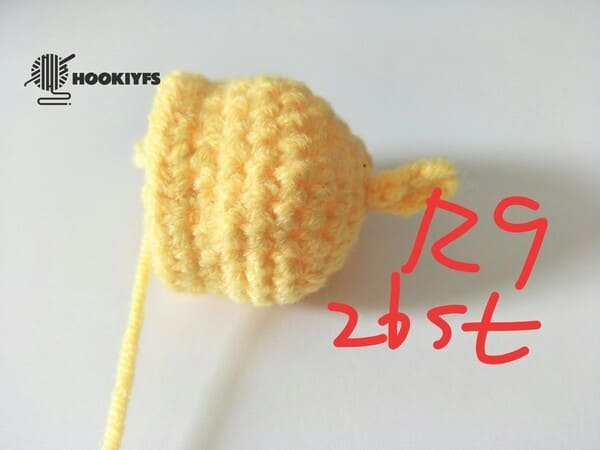
R9: (inc)*2, (sc, inc)6, (inc)2 (26)
as explained in detail below:
(inc)*2: Increase in the next 2 stitches (total of 4 stitches with 2 increases)
(sc, inc)*6: Single crochet in one stitch, then increase in the next pattern repeated for 6 total (12 stitches)
(inc)*2: Increase in the next two stitches (total of 4 stitches with 2 increases)
Then crochet slip stitch, row 9 is completed for 26 stitches.
R10
R10: sc, inc, sc, inc, 18 sc, sc, inc Sequentially combines a variety of single crochet and increase stitches until the total is balanced to 30 st
This crocheter should:
Complete the action “(single crochet, increase)” two times, resulting in four stitches.
Work 18 single crochets without performing any increases
Then do (single crochet, increase) two more times.
Total stitches at the end of the round: 30
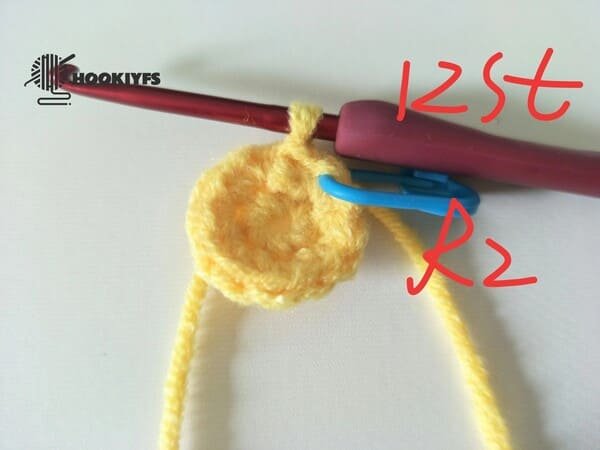
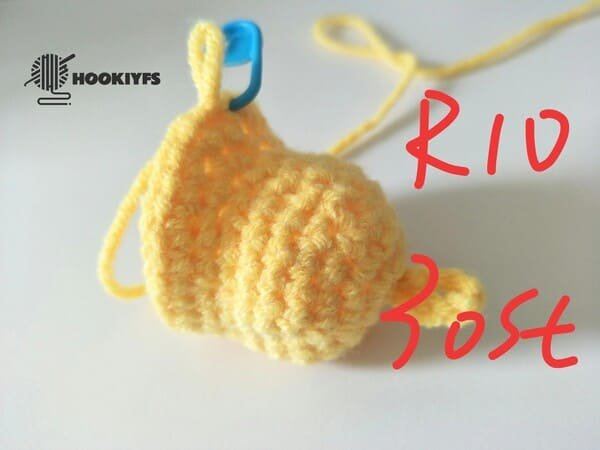
R11

In every stitch, work 30 single crochet so that each stitch has 30 sc.
Perform slip stitch; and that is the completion of row 11.
R12
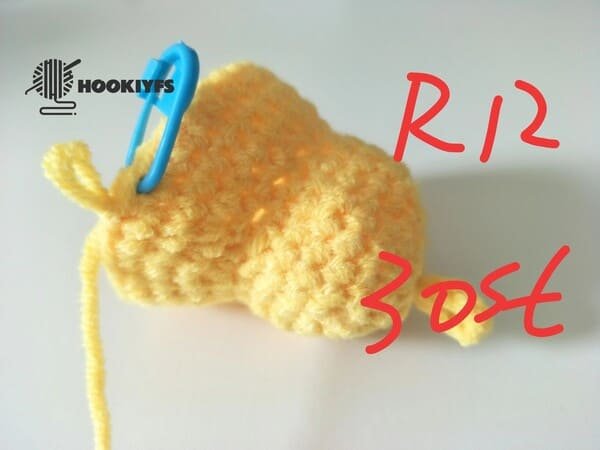
Same as row 11.
R13
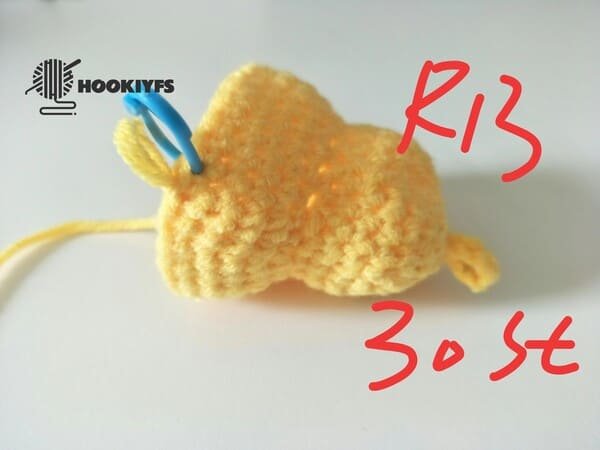
Same as row 12
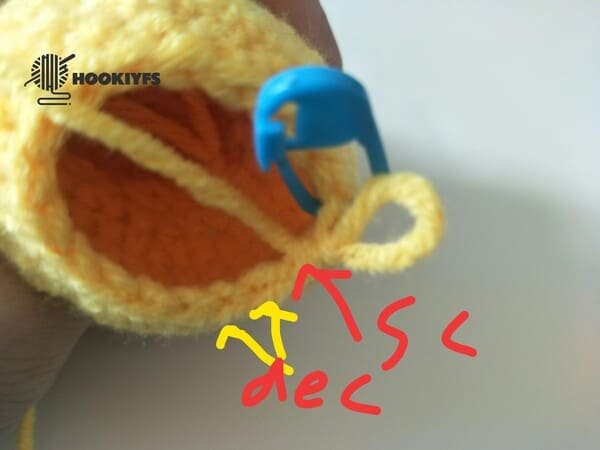
R14
Crochet order: (3sc,dec) repeat 6 times.
When there are five stitches left in this round, then crochet 3sc, dec again.
After completing the round, check how many stitches there are in total. There are 24 stitches.
Now perform a slip stitch. Row 14 is finished.
R15
With each stimulus, crochet the following order*: (sc,dec,sc ) repeat 6 times.
As we approach the end of the round, when four stitches remain, execute the stitch sequence sc, dec, sc once more.
After finishing the round, the total number of stitches is 18.
A slip stitch should now be performed. That concludes Row 15.
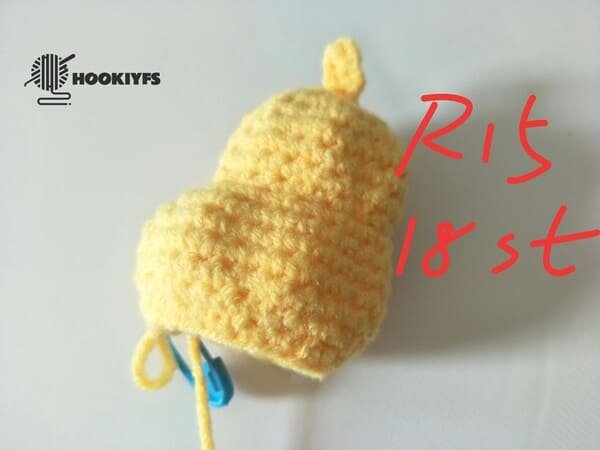
R16
In the case of an order, crochet (sc, dec) repeat 6 times.
In this round, when there are three stitches remaining, perform an sc, then perform dec again.
After finishing this round, count every stitch made; there should be a total of 12 stitches.
Then execute a slip stitch to complete row 15.
Fiberfill
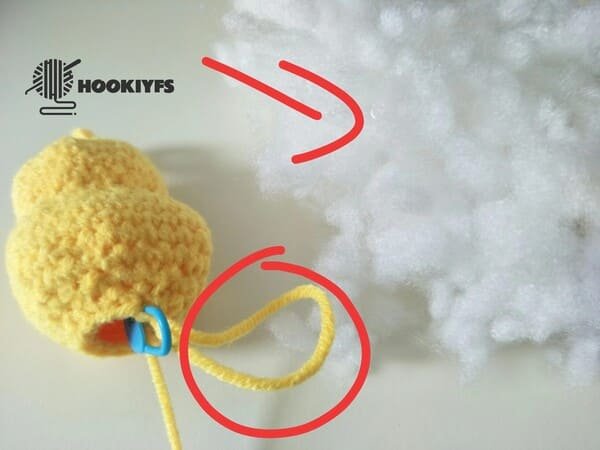
Add the fiberfill to hole of body.
Mixing a huge bulk all at once will not give the best results.Adding mini bulk of stuffing gradually helps to prevent lumps and also makes it easier to control the shape.
Using a blunt pencil, crochet hook or a chopstick, fill the bottom and sides of the duck with stuffing before the center section. This is the easiest way to get to the stuffing that is hardest to reach.
After putting a bit of stuffing, pause to see if the shape can be modified. For the body of the duck it needs to be round and not too many bulges which are unbalanced.
Too much stuffing will make the stitches strained and create gaps while not enough stuffing will make it lifeless and bulky. The perfect balance will be soft but hold shape.
Very little stuffing on top will allow the head to remain upright without excessive wobbling. Therefore, add just the right amount at the neck joint.
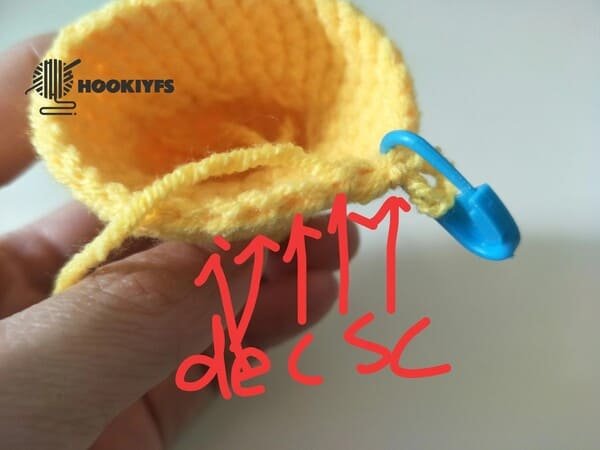
R17
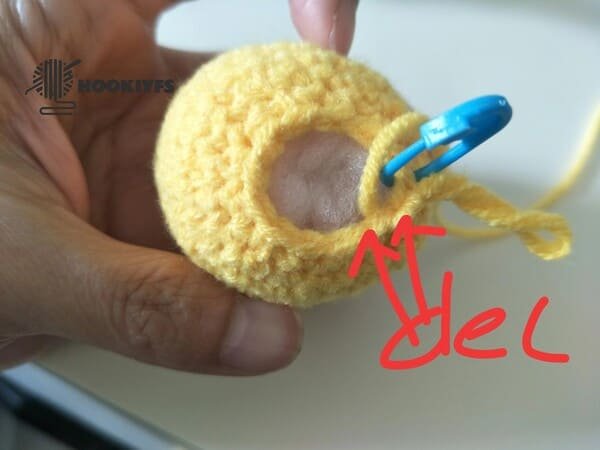
Crochet order* (dec) repeat 6 times.
Complete dec one more time when there are two stitches remaining in this round.
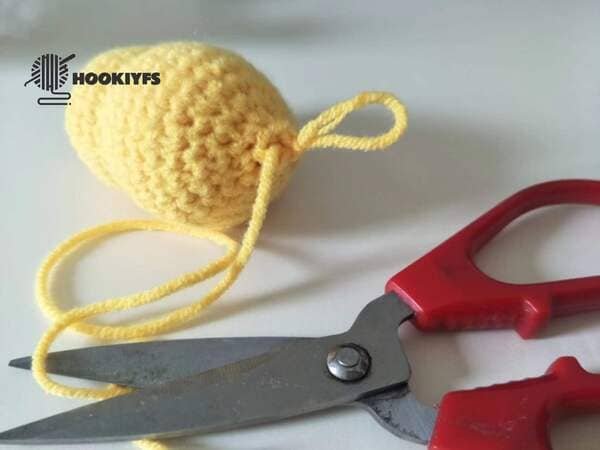
Leave the 10 cm yarn end, then cut again.
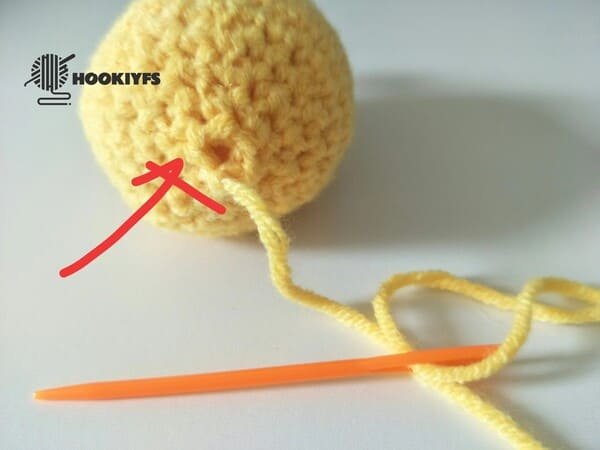
We found that after 6 stitches were decreased, there was still a very large hole in the fabric.
Positive of view
Back of view: by using the method of spacing out one stitch and picking up one stitch (sewing needle), the hole can be reduced to a very small size by closing it.
Crochet the wing(use yellow yarn )for duck crochet
- ch 5- in 2nd ch from hook (sc,3hdc)
Small wing crochet order:
Ch 5 – crochet five chains.
sc in 2nd ch from hook – Count a single crochet as a stitch in the first stitch past the hook.
3 hdc in next three stitches.
Then cut yarn end and use hook to bring out the yarn end.
We need crochet 2 pieces of wings.
Tie knot for wings.
Crochet the mouth (use ornge yarn )for duck crochet
- Upper mouth ch 3- in 2nd ch from hook (2sc)
- Lower mouth ch2-in 2nd ch from hook (1sl)
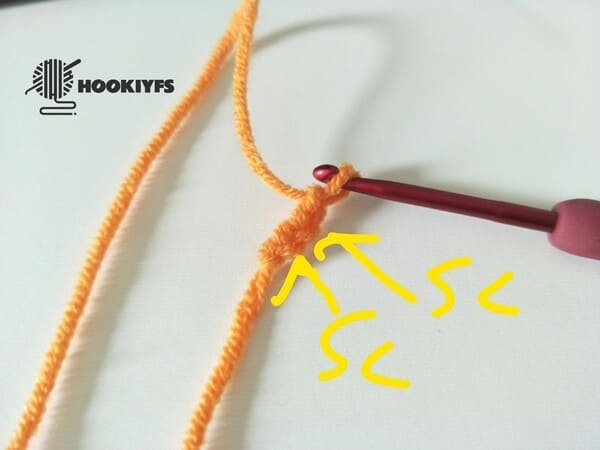
Upper mouth crochet order: First, do 3 chain stitches, then do 2 single stitches each in the the second hook.
After finishing, cut the yarn end.
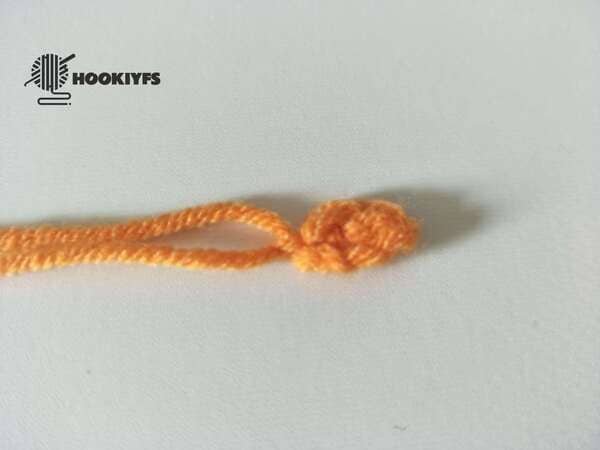
Upper mouth is completed.
For the lower mouth Crochet, we’ll need to do this in a sequential manner: we start row by doing two chain stitches; in the second hook, do slip stitch each.
When complete, don’t forget to cut the yarn end.
Lower mouth is completed.
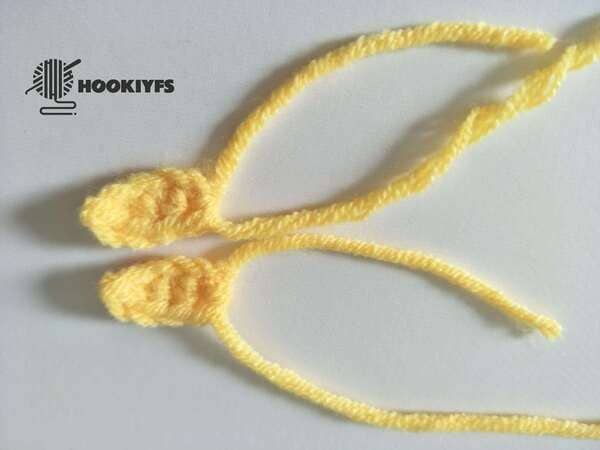
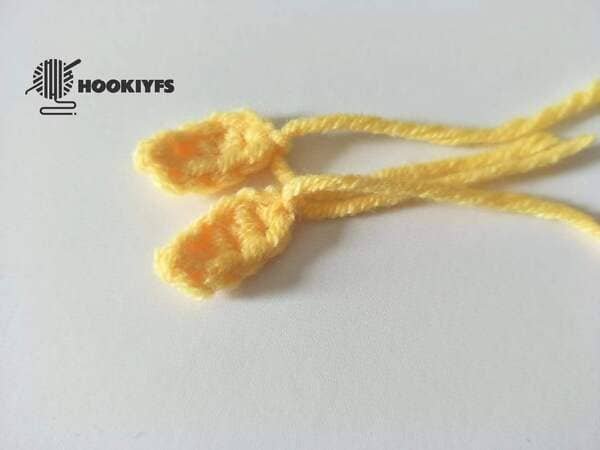
Sewing feet on the body
Feet :6 single crochet in to the magic ring ( use orange yarn end )-need crochet 2 pieces.
Glue the butterfly knot on the body for duck
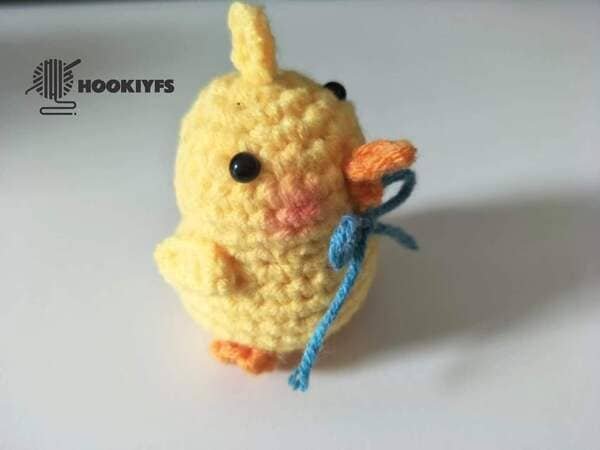
Use blue yarn to make butterfly knot for duck.
Glue the butterfly knot on the body of row 8.
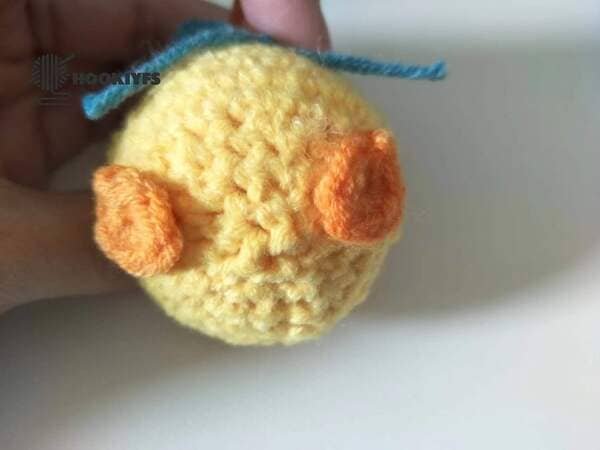
Glue the wings on the body for duck crochet
Glue the wings on the body for R9-R12.
The other one is glued to the corresponding side of the body
Safety eyes and mouth and apply blush for duck crochet
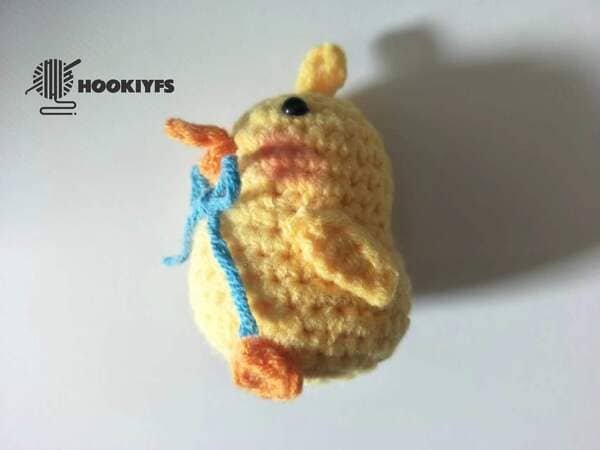
Sewing mouth: sewing the mouth on the body of R5.
Safety eye:glue it to R3, leaving 4 stitches empty in the middle.
Apply blush:apply blush to both sides of the mouth.
Reference sources
1.Learn the most comprehensive guide for single crochet(sc)
Author:Sarah Stearns
Publication date: on June 15, 2021, updated:December 14, 2024
Title: How to single crochet (sc)for beginners
Summary as blow:
- Step-by-Step Single Crochet for Beginners
- Single Crochet into a Foundation Chain
- Single Crochet into another Row
- Single Crochet in the Round
- Increases and Decreases
- Working Single Crochet in Different Loops


