


Chain Stitch |Step By Step Guide| Text & Photo &Video
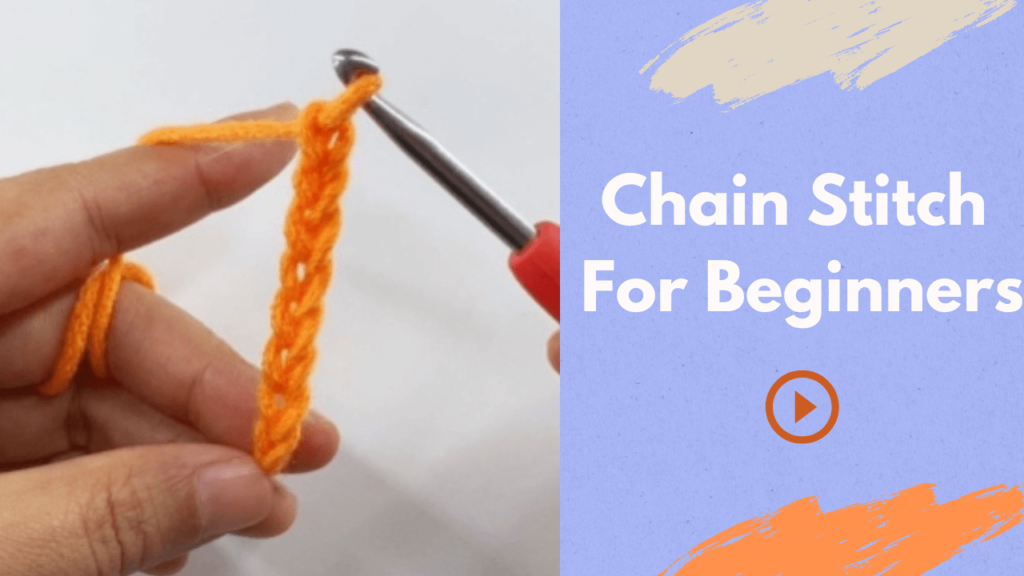
Chain Stitch :learning the chain stitch is essential for anyone starting crochet because it forms the foundation of almost every project.
Whether you’re making scarves, blankets, or intricate lace designs, the chain stitch is the first step. Mastering it helps you build confidence, improve hand coordination, and create even stitches for a polished look.
😊For beginners, we specifically explain chain stitch through text, video and photo.
Table of Contents
What is the chain stitch for crochet ?
The chain stitch (abbreviated as ch in crochet patterns) is the most basic and essential stitch in crochet. It forms the foundation for many projects, acting as the starting point for rows, rounds, and decorative designs.
Each chain stitch appears as a small, interconnected loop. The chain stitch length depends on the number of stitches made and serves as a base for other stitches like single crochet, half-double crochet, or double crochet.
How to hold a crochet hook?
There are several ways to hold a crochet hook, but the most common is the pencil grip. There’s no right or wrong method—just choose what feels most comfortable.

The pencil grip: Hold the hook as you would a pencil, letting it rest between your thumb and index finger.
Mark: We found that in the actual crochet process, there are two incorrect ways of holding the hand. If you crochet for a long time, the hand holding the pen grip method will feel sore and everyone should try to avoid the following two situations.
Tip 1:
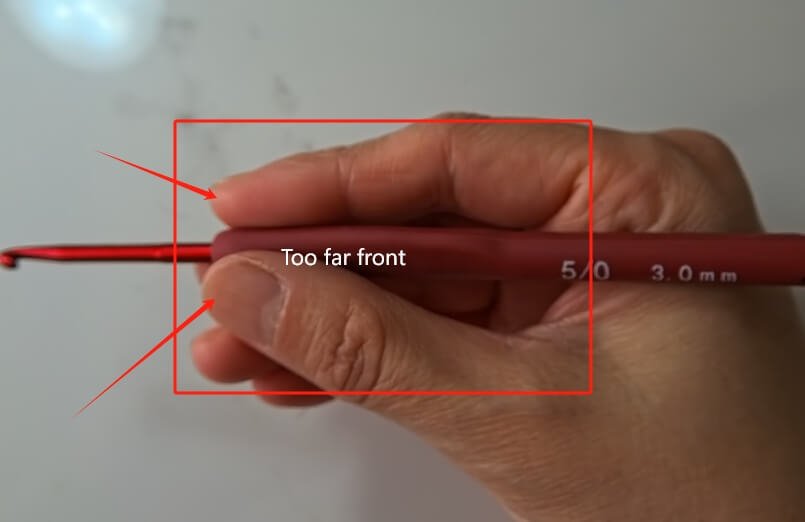
As shown in the photo on the left, the hook is held too far forward。
your hands will feel uncomfortable after crochet for a long time.
Tip 2:
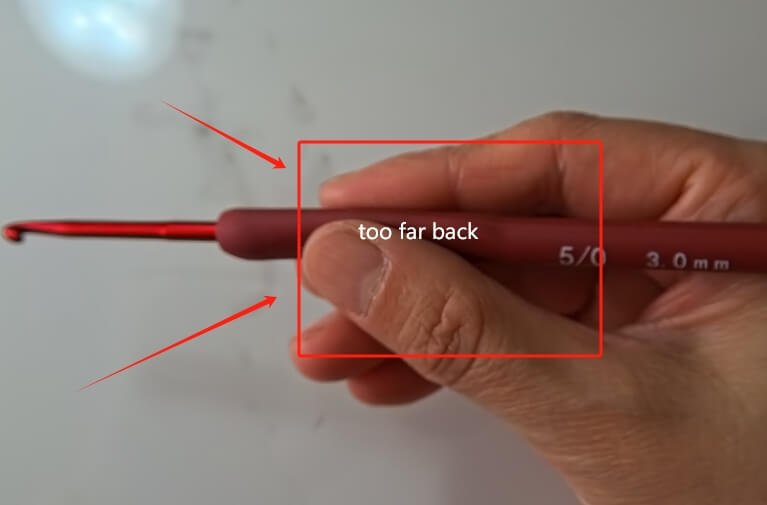
As shown in the photo on the left, the hook is held too far back.
The hands feel like they can’t reach the fabric during crocheting.
Best selling products
-

Raffia Cross Pattern Basket Handbag Kit
$19.99 -

Hexagonal Bucket Bag Kit
$29.99 -

Raffia Handbag Kit
$29.99 -

Hammock Bag Kit
$29.99 -

Wheat Bucket Bag Kit
$19.99
Recommended articles
Learn single crochet to make magic ring , please click here:How To Crochet Magic Ring ? l Step-By-Step l Video & Text &Photo
Learn single crochet decrease,please click here: Single Crochet Decrease -Three Method In More Details Slowly For Beginner | Video&Text&Picture
Want to know crochet abbreviation: please click here: Crochet Abbreviation More Details | Table & Text Guide
More cute doll with short video,please click here: https://www.youtube.com/@hookiyfs/shorts
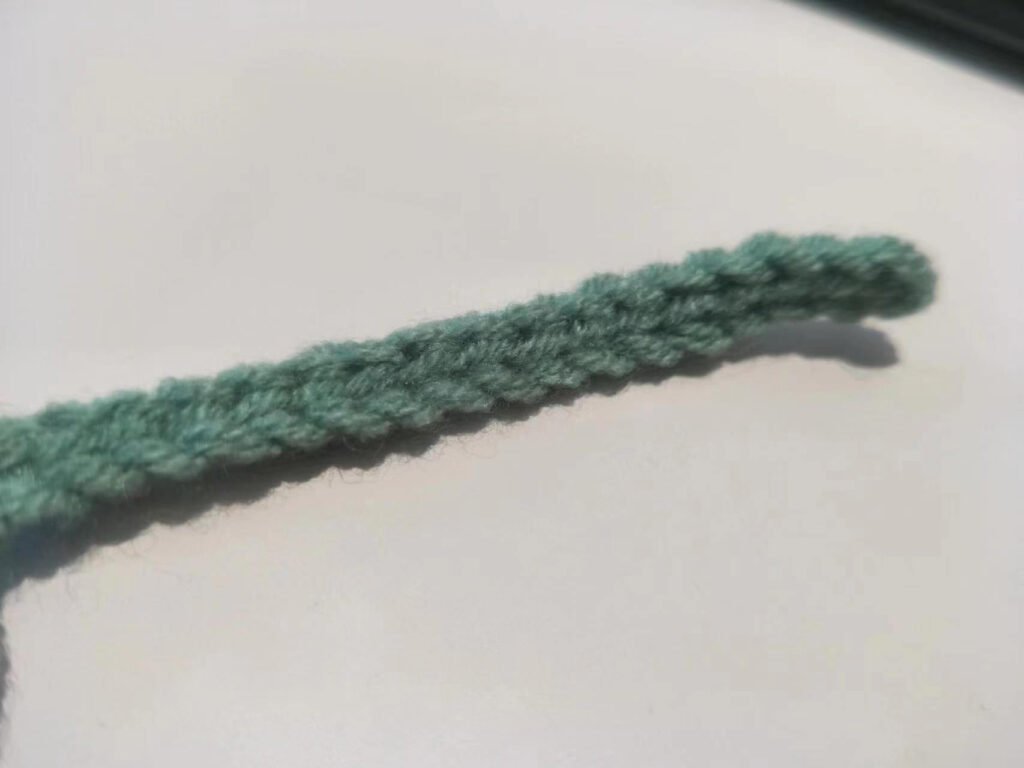
How to crochet chain stitch?
Chain stitch tutorial
For beginners who love crochet, the text and photo may be difficult to understand, so we made a video for you to use as a reference.
Chain stitch for beginners
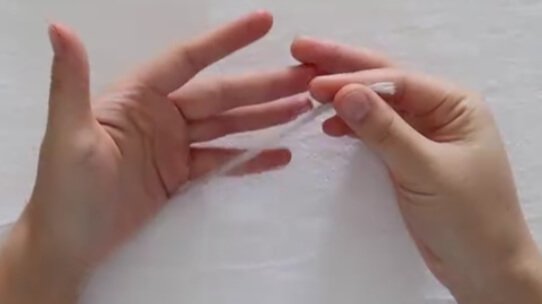
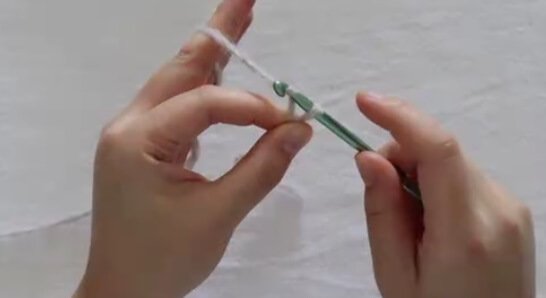
Turn your left palm toward you and hold the desired yarn in your right hand
Then place the tail of the yarn in front of your left palm’s pinky finger.
Wrap the tail of the yarn around your left pinky finger, making sure the loop is tight but not too tight.
Slide the tail of the yarn over the back of your left hand and place the yarn in front of your index finger.
Pinch the yarn tightly with your middle finger and thumb finger.
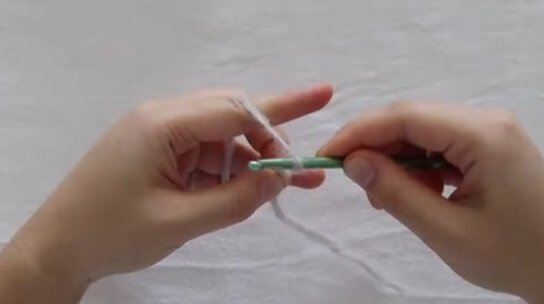
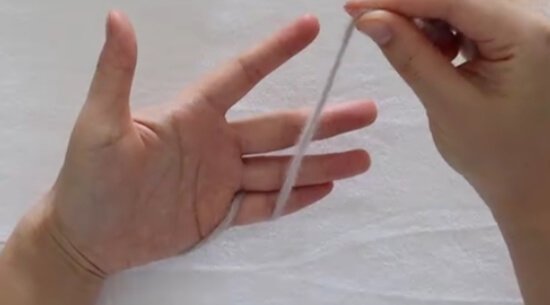
The hook is placed behind the yarn.
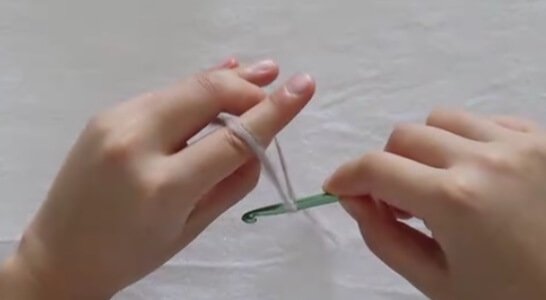
The hook presses the yarn from the back to the front.
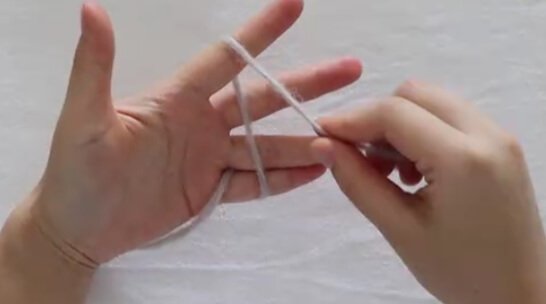
Use the counterclockwise winding method to bring out the coil
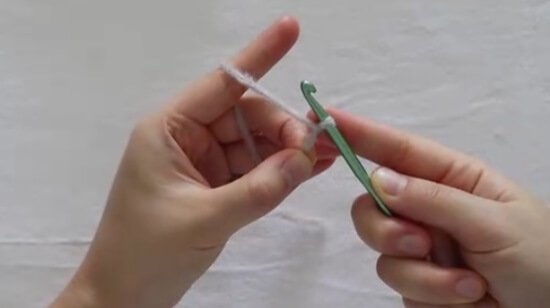
Pinch the yarn tightly between the thumb and index finger of your left hand.
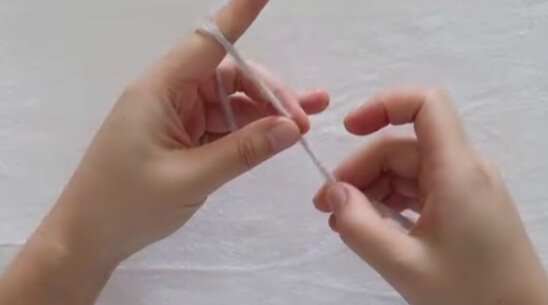
Use the counterclockwise winding method to bring out the coil again.

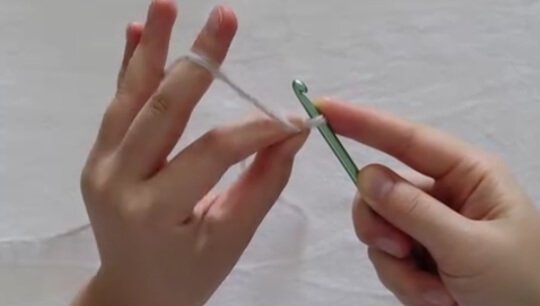
Pull down with your left hand, tighten the loop, and tie a knot.
This is our starting stitch
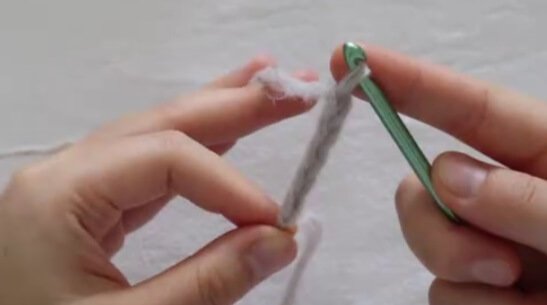
Use the counterclockwise winding method to bring out the coil repeat again.
Crochet to the number of stitches you want.
What is the difference between split stitch and chain stitch?
The split stitch and chain stitch are both embroidery stitches, but they differ in appearance, technique, and purpose.
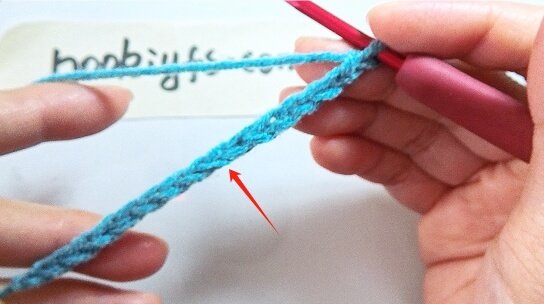
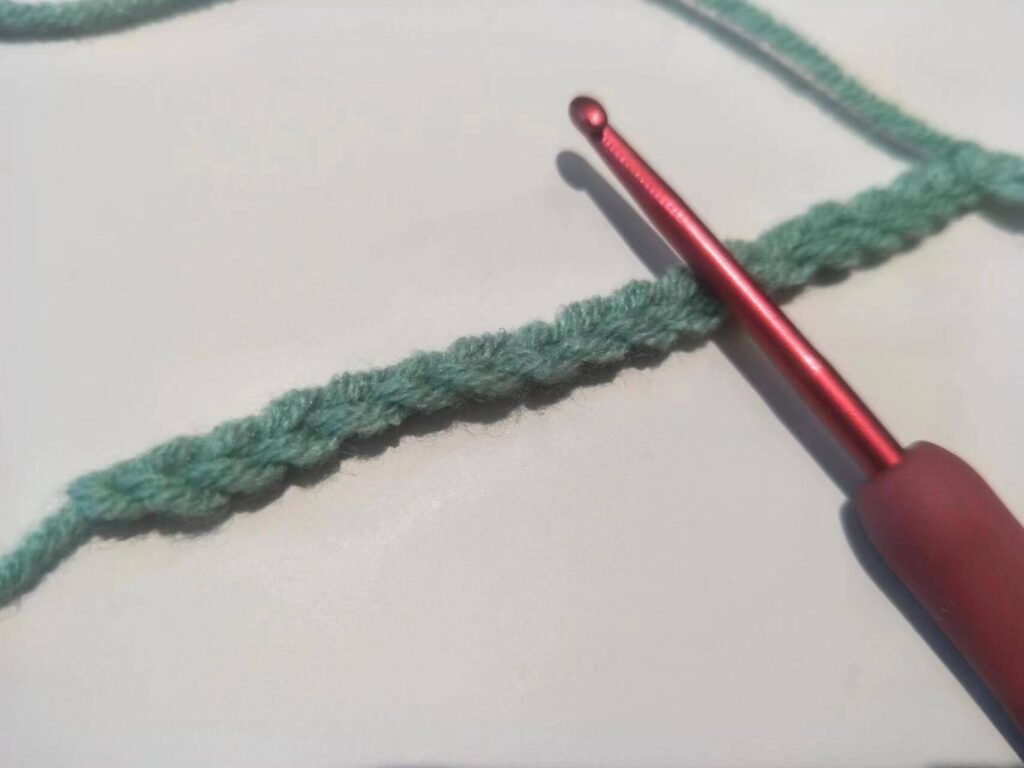
1. Chain Stitch
- Appearance: Forms a series of looped, interlocking stitches that resemble a chain.
- Technique: Each stitch loops through the previous one, creating a continuous, textured line.
- Photo as below:
2. Split Stitch
- Appearance: Looks like a tightly braided or twisted line with a slightly raised texture.
- Technique:Bring the hook up through the center (or “split”) of the previous stitch, making a smooth, continuous line.
- Photo as below:
Key Differences
| Look | Looped & decorative | Tight, twisted effect |
| Technique | Stitches interlock in loops | Hook splits previous stitch |
| Usage | Decorative, filling | Outlines, shading |
What is the best thread for chain stitch?
Our long-term testing has shown that the best thread for chain stitch is usually high-quality, smooth and strong cotton thread, which is popular for its lustre and rich colour options.
Is chain stitch a basic stitch?
Yes, the chain stitch is a basic stitch. It is one of the must-learn basic stitches for beginners because it is simple and easy to learn.
Despite its simplicity, it can be used to create the basis of complex and decorative patterns.
What is the purpose of a chain stitch?
Chain stitch is great for working on seams and pairs well with embellishments. It’s also commonly used in creating tambour lace, needlelace, macramé, and crochet, making it a versatile technique across various textile crafts.
How loose should a chain stitch be?
We found :
- If the yarn is too loose with a chain stitch, the stitches will look uneven or unravel.
- If the yarn is too tight, the fabric will bunch up.
It should be tight enough to hold its shape, but loose enough but not too loose to allow the hook to pass through for the next stitch.
Strive for even tension in your hand while crocheting so that each loop is flat and consistent throughout the design.
How to make the perfect chain stitch?
Here are the top tips to make the perfect chain stitch.
- Use the right hook – it’s best to use the same thickness as your thread, e.g. yarn 3mm for 3mm hook.
- Keep even tension in your hand while crocheting – this is key for consistency in all stitches.
- Practice loop size – we want to try to keep each loop the same size to achieve a neat look.
What is the disadvantage of a chain stitch?
1.Easy to unravel if not properly secured.
Because chain stitch consists of interconnected loops, pulling the thread (especially from the end) can cause the entire stitch to unravel, like a chain reaction.
2.Slower to make by hand.
Time consuming, it requires patience and attention to detail.
3.Difficulty.
It may take some practice to master the chain stitch technique, especially for beginners.
How do you keep chain stitch from twisting?
1.Maintain a smooth thread path
Before you start sewing, the thread is not crossed or tangled. Make sure that the loop is pulled out more smoothly
2.Check the direction of the thread winding
Pay attention to the direction of the thread pulling. the same winding method is used to avoid the thread twisting during the knitting process. try to keep the loops smooth through.
3.Start working your foundation chain as usual.
After a few chains, remove the hook from the working loop, insert the hook into the first chain [from back to front], and reinsert it into the working loop again.


