


Dinosaur Crochet Pattern Step By Step Tutorial
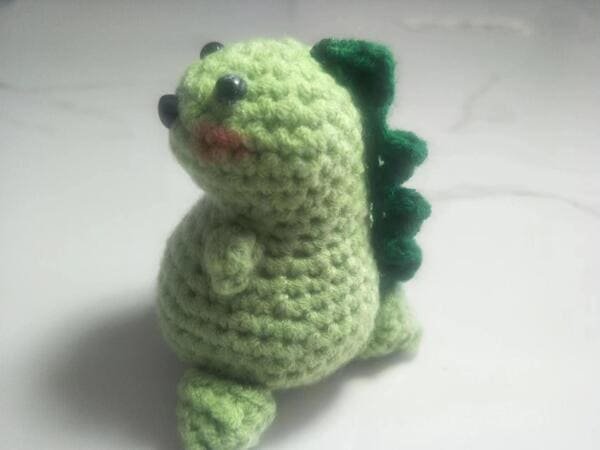
Table of Contents for dinosaur crochet
Material of dinosaur crochet
Material kit
- Crochet Hook: the thickness of hook matches that yarn
- Stuffing: (polyester fiberfill)
- Safety & nose eyes
- Yarn(light & dark green)
- Yarn needle and marker
List of necessary tools
- Scissors
- Hot melt glue or glue
- Blush
Abbreviation for dinosaur crochet
These are the required abbreviations for dinosaur crochet pattern.
- ch – Chain stitch
- sc – Single crochet
- sl – Slip stitch
- inc – Increase (usually 2 stitches in the same stitch)
- st(s) – Stitch(es)
- mc – Magic circle (or magic ring)
- hdc-Half double crochet
- dc-Double crochet
- dec-Decrease
- pc-Popcorn
- k-Space
Crochet the body (use light green yarn )for dinosaur crochet
- R1: 6 sc into mc(6)
- R2: 2 sc in each st repeat 6 (12)
- R3: (1 sc, inc) repeat 6 (18)
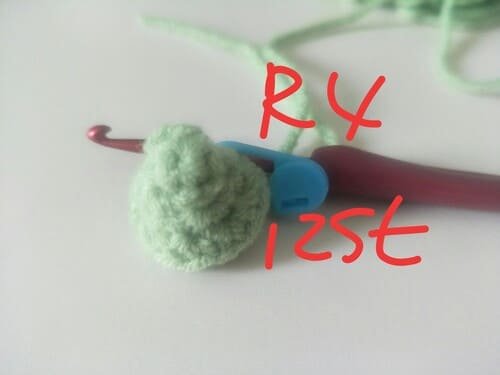
- R4:(1sc,inc,1sc) repeat 6 (24)
- R5-R7:(24sc)in each st(24)
- R8:8sc,4dec,8sc(20)
- R9:5sc,5dec,5sc(15)
- R10:(15sc)in each st(15)
- R11:4sc,(sc,inc) repeat 3,5sc(18)
- R12:(2sc,inc)repeat 2,p,sc,inc,2sc,inc,p,sc,inc,2sc,inc,3sc,inc(22)
- R13:9sc,inc,3sc,inc,3sc,inc,6sc(27)
- R14:10sc,inc,6sc,inc,3sc,inc,5sc(30)
- R15:(4sc,inc)repeat 2,4sc,inc,4sc,inc,(4sc,inc)repeat 2 (36)
- R16:36sc (36)
- R17:36sc (36)
- R18:36sc (36)
- R19:(4sc,dec)repeat 6 (30)
- R20:(3sc,dec)repeat 6 (24)
- R21:(2sc,dec)repeat 6 (18)
- R22:(sc,dec)repeat 6 (12)
- R23:(dec)repeat 6 (6)
Tips-this will be very friendly to us newbies.
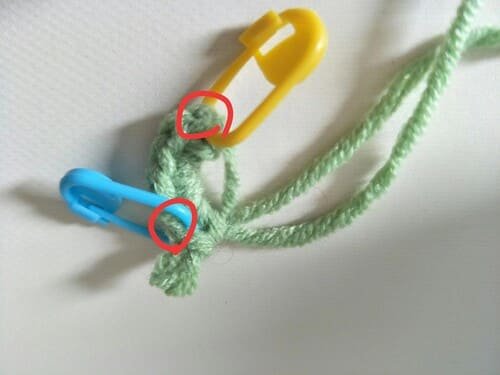
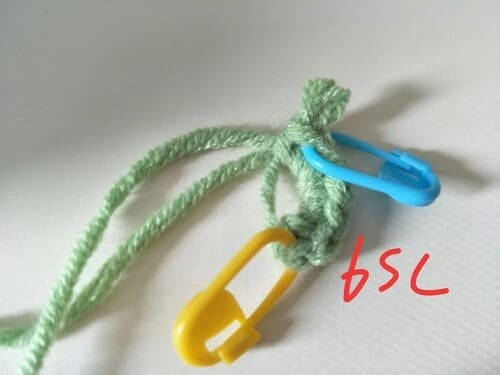
We need to note that in this article, we use the yellow marker button to button the first stitch.
When we finish the last stitch with blue marker.
We need to count the stitches. count from the first marker button to the last marker button to ensure that the stitch count for this row is correct.
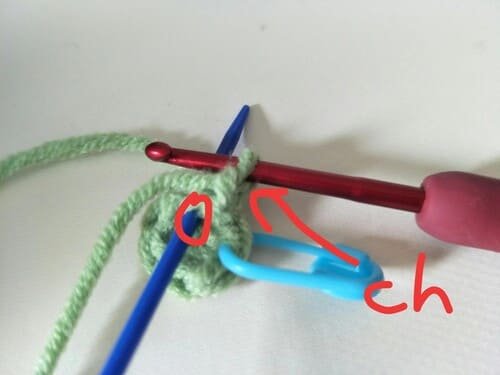
When crocheting each row, we need to add a chain stitch(ch)first (I won’t repeat it later, but please remember it.)
Hold the thread end with your left hand and pinch the magic ring with your right hand. Form a closed loop, this is “O gap”.
Each V-shaped forms a stitch, which makes it easier for everyone to count how many stitches are crocheted in each row.
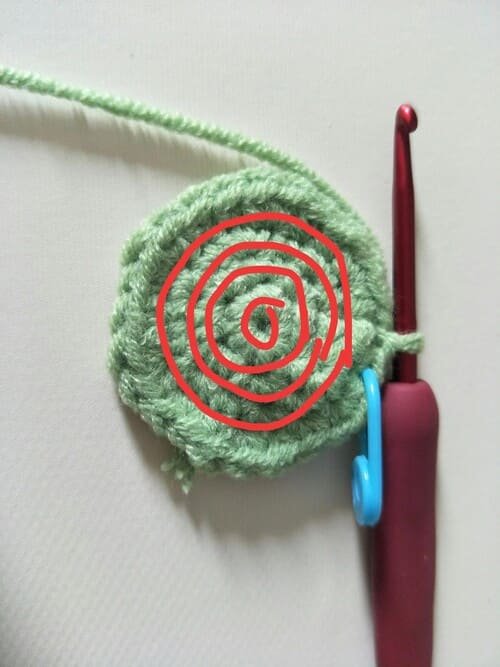
If we want to count how many rows we have crocheted in total, we just count a raised shape.
A raised circle represents a row.
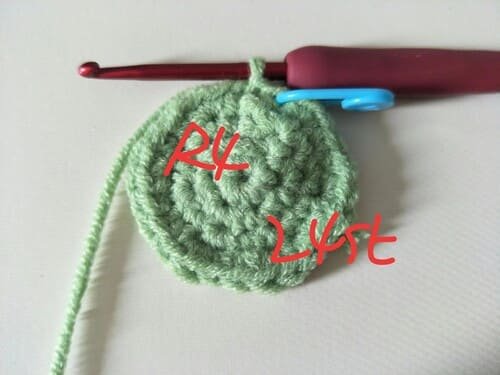
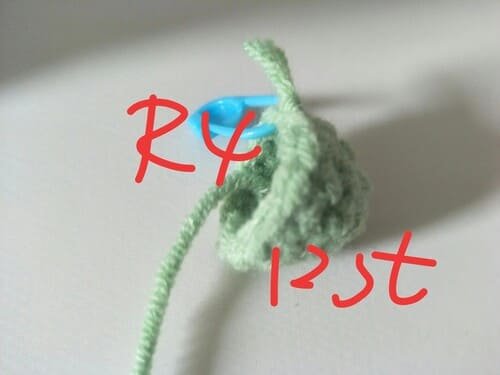
R1
First crochet 6 single stitches(sc)on the magic ring.
If we do not know how to make magic ring, please click:How To Crochet Magic Ring ? l Step-By-Step l Video & Text &Photo
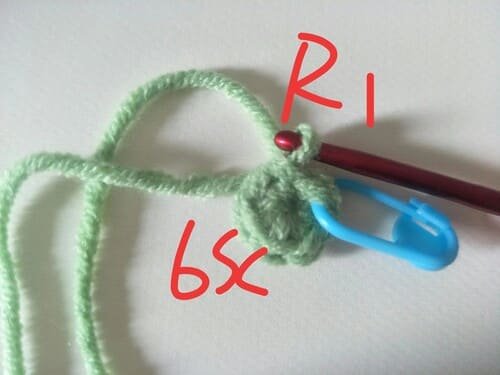
After slip stitch,we got R1.
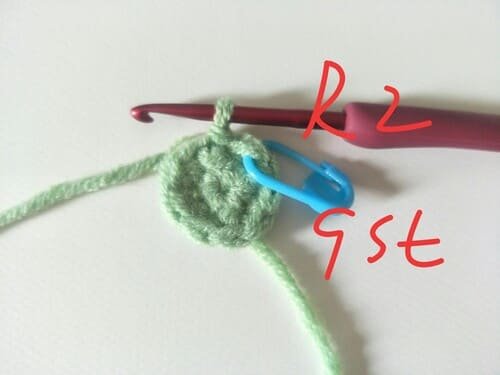
R2
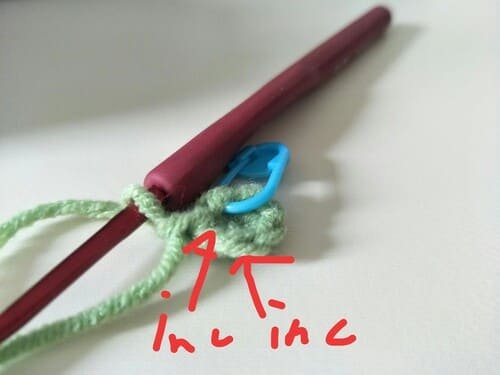
Let’s do 2 single crochets in each stitch around.
We’ll repeat 6 times this until we reach 12 total stitches by the end of the round.
After slip stitch,we got R2.
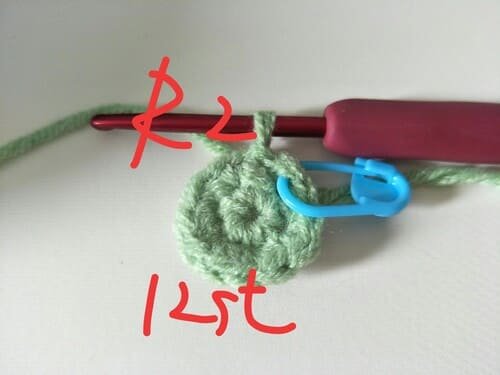
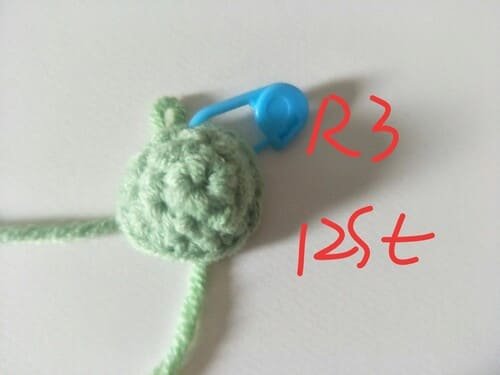
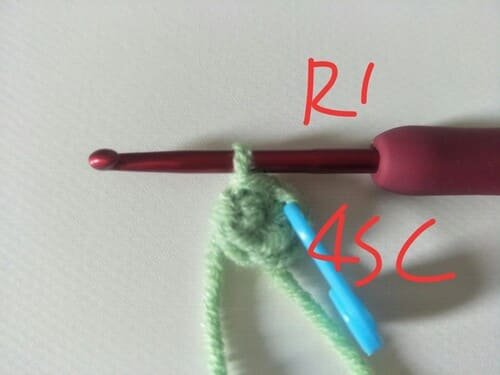
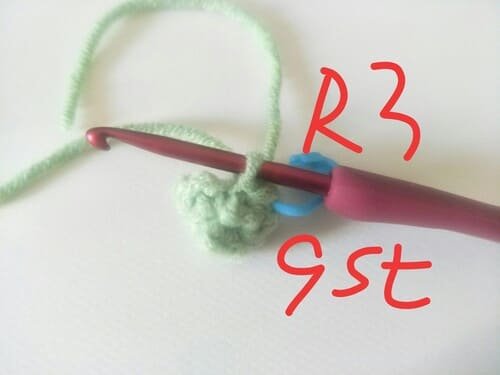
R3
For the first stitch :we are going to do 1 single crochet.
For the second single crochet, we are going to do an increase. We will repeat this sequence six times and end the round with 18 stitches.
After slip stitch,we got R3.
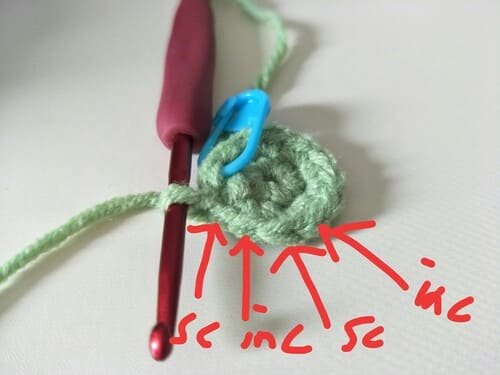
R4
To begin with, we will do 1 single crochet, followed by an increase, which is 2 single crochets in the next stitch, and 1 single crochet again.
We’ll repeat this sequence 6 times and at the end of the round, we will have 24 stitches as expected.
After slip stitch,we got R4.
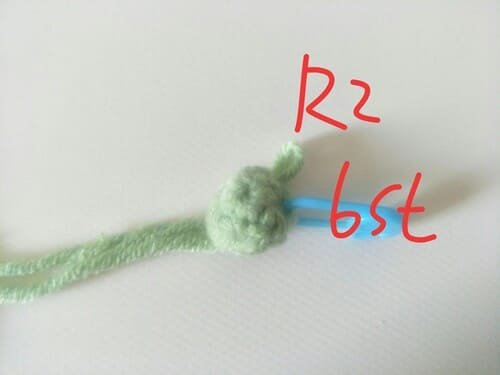
R5
Over R5-R7,we’ll do 1 single crochet in every stitch.
There’s no need to add or subtract stitches; just keep a constant 24 stitches per round.
R5 is completed.
R6
R6 is completed.
R7
R7 is completed.
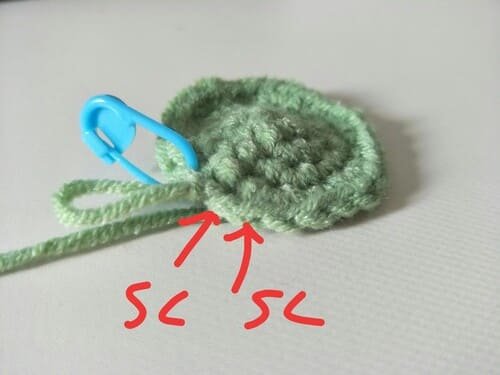
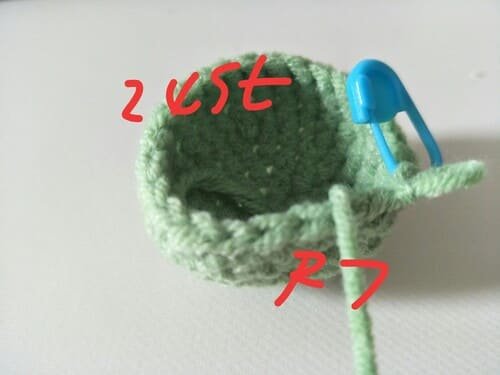
R8
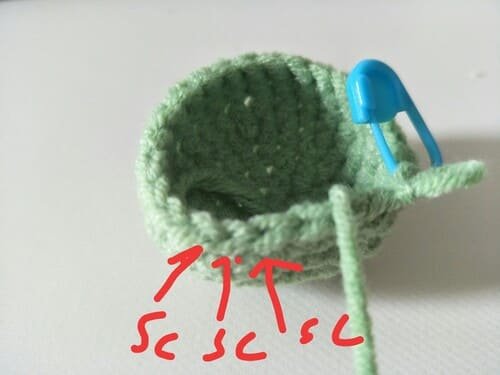
We will begin with 8 single crochets, followed by 4 decreases (single crochet two stitches together, 4 times), and round it off with 8 more single crochets. That will get us down to 20 stitches at the completion of the round.
We crochet 8 sc in red frame( show as picture)
After slip stitch,we got R8.
This is the picture I put upside down on the desktop.
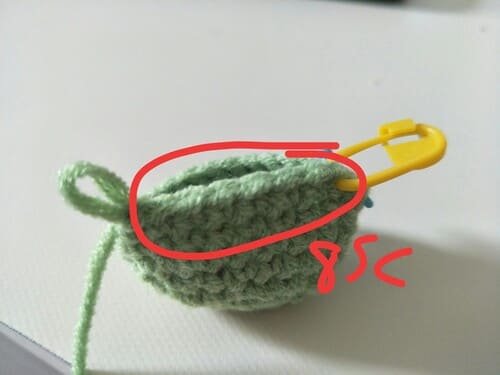
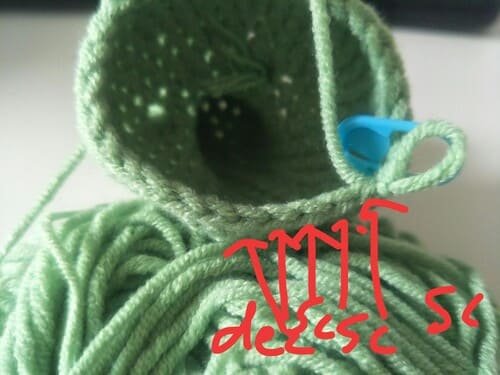
R9
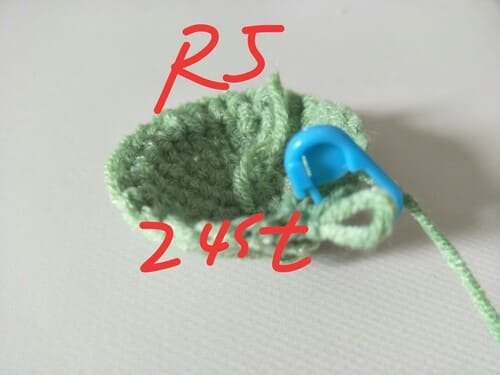
We’ll start off with 5 single crochets, then do 5 decreases in a row, and finish with another 5 single crochets. That gives us 15 stitches total for the round.
Sorry for that:When I was uploading pictures, I found that the pictures of R9 were missing, so I borrowed the pictures of R10 to use.
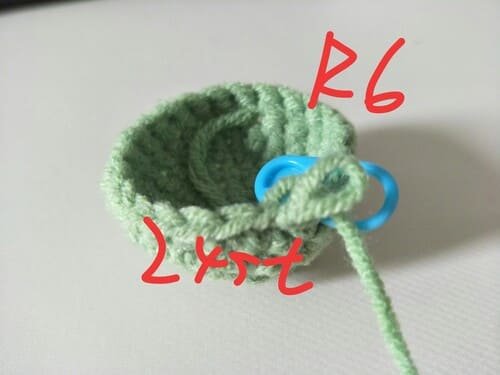
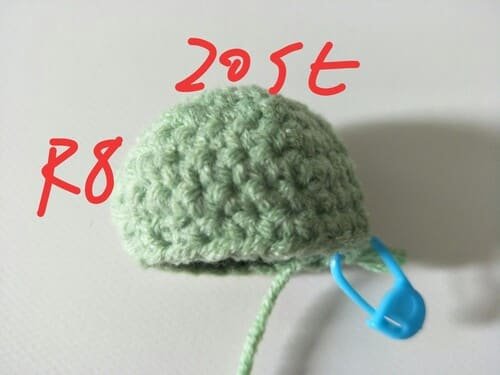
R10
We will create 1 single crochet in every stitch around.
No increases or decreases——only 15 stitches.
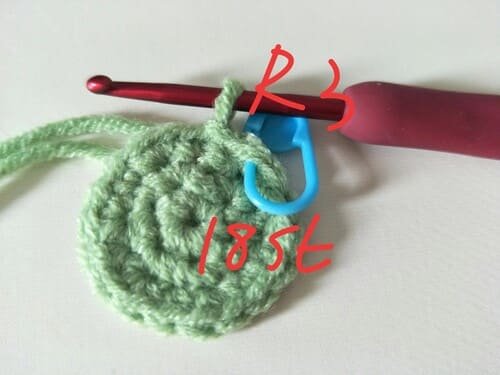
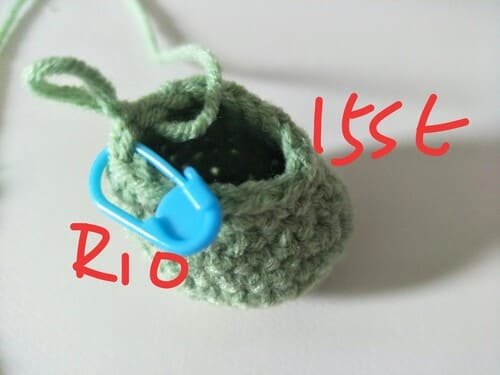
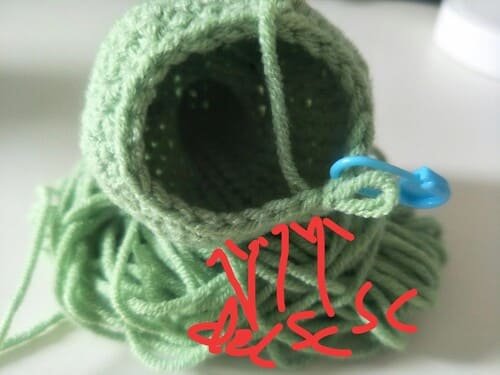
R11
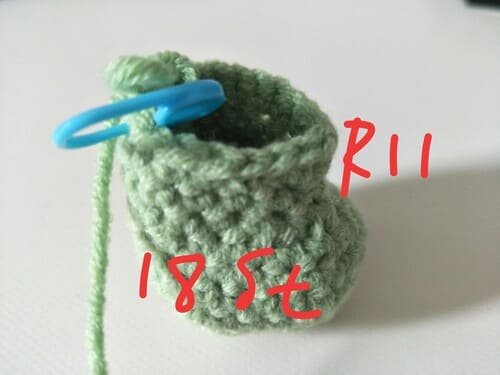
We complete the first round by making 4 single crochets followed by repeating (1 single crochet then an increase) three times , and finishing with 5 single crochets.
At the end of the round, we will still have 18 stitches.
R12

This circle will be more complicated because we need to hook out the dinosaur’s two hands.
Let’s begin with 2 sc, and an increase repeat 2 times. then popcorn (4 dc ), 1 sc, 1inc, 2sc,1inc, popcorn(4dc),1 sc, inc, 2 sc, 1inc, and finally 3 sc, followed by an increase.
We will end with 22 stitches at the fringe of the round.
Tips:Four long double stitches form a popcorn stitch.
R13
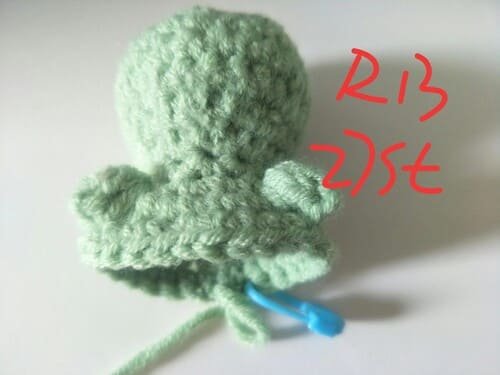
So here’s the plan: first 10 sc, inc, then 6 sc, inc, 3 sc, inc, 5 sc final.
That is how we will make 30 stitches for the round.
R14
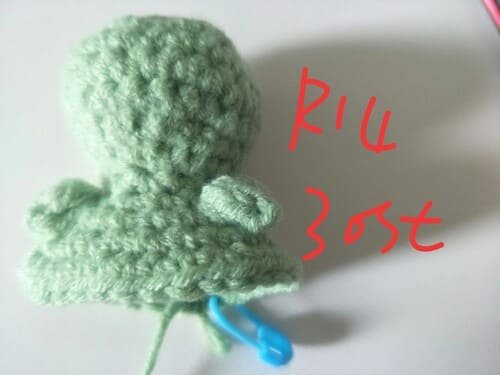
First we create (4 sc, inc) two times then follow that with 4 sc, inc, 4 sc, inc and finalize with (4 sc, inc) two times and end up with 36 sts.
It’s a little complicated, we can crochet according to the crocheting order and we won’t make mistakes.
R15
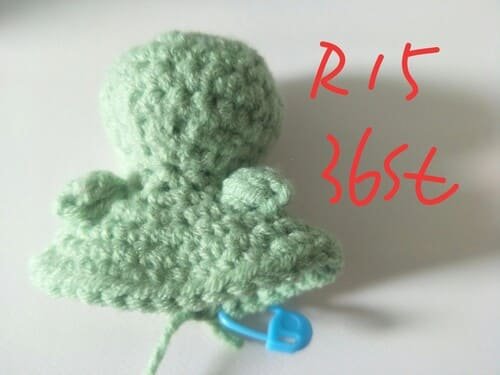
Let’s do 1 sc in each of the stitches around for the entire round. We should still have 36 stitches at the end.
R15 is completed.
R16
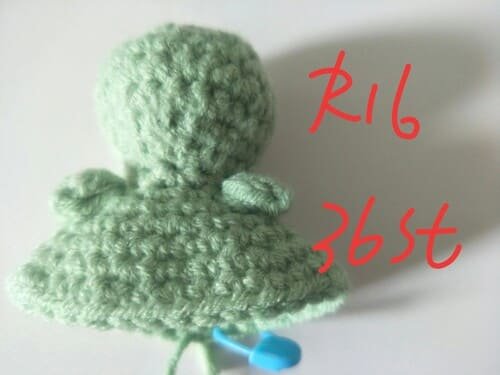
1 sc in each of the stitches.
R16 is completed.
R17
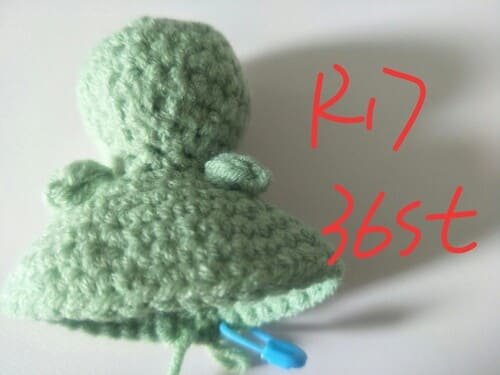
1 sc in each of the stitches.
R16 is completed.
R18
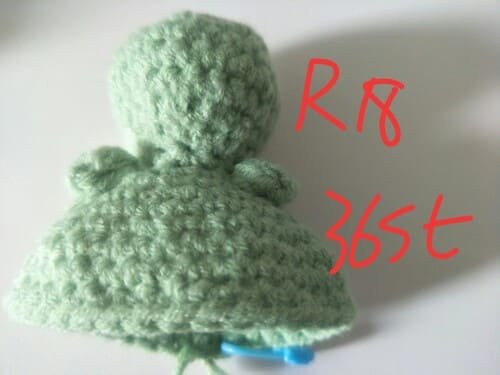
1 sc in each of the stitches.
R17 is completed.
R19
We will do (4 sc, dec) six times around, ending up with 30 stitches total.
After slip stitch, we got R19.
R20
We’ll do (3 sc, dec) 6 times around.
This wiil leave us with 24 results.

After slip stitch, we got R20.
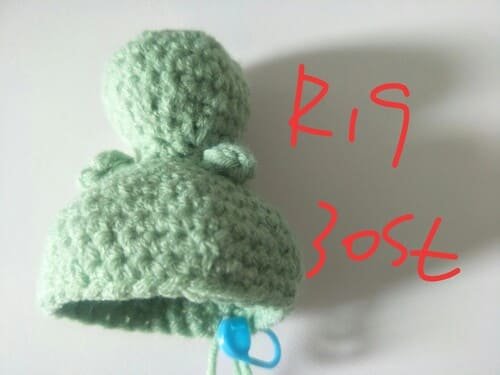
Now we can roughly see the shape of the dinosaur’s body.
R21
R21: We do (2 sc, dec) six times around and will end up with 18 stitches.
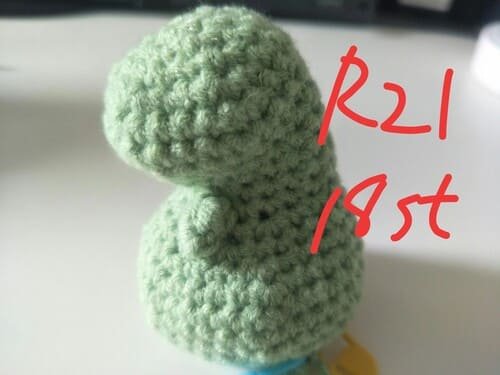
After slip stitch, we got R21.
Through each round of decrease stitch, the hem is slowly decreasing.
R22
R22: Proceed with (1 sc, dec) six times around.
At the end of the round, we shall have 12 stitches.
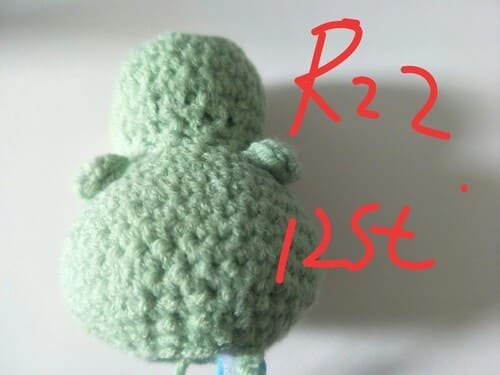
After slip stitch, we got R22.
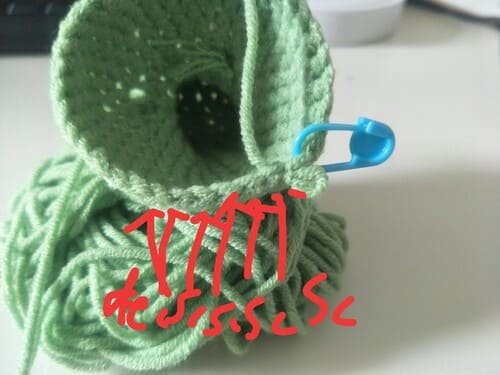
Fiberfill
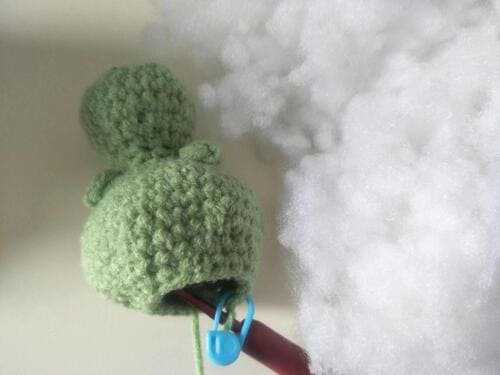
Put the stuffing a little at a time, slowly increasing the amount if we find it’s too little.
However, do not overstuff as this will stretch the stitches.
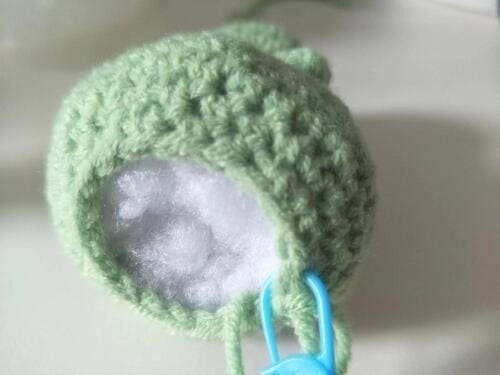
This is the bottom picture after fiberfill.
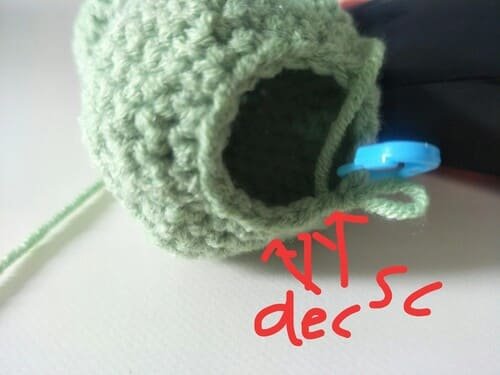
R23
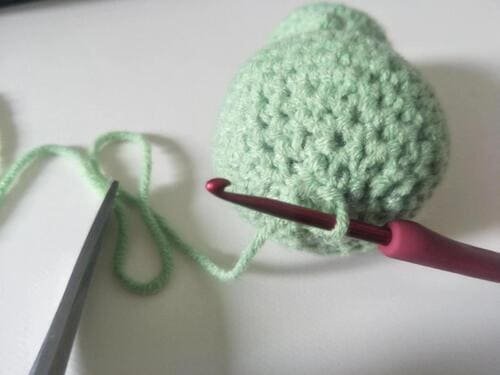
R23: We do dec 6 times around which brings us down to just 6 sts.
Then slip stitch to finish and cut yarn end ,and pull out yarn end. and leave in end.
Body of dinosaur is completed.
Crochet the foot (use light green yarn )for dinosaur crochet
- R1: 6 sc into mc(6)
- R2: (1 sc, inc) repeat 3 (9)
- R3:(2sc,inc) repeat 3 (12)
- R4: sc in each st repeat 12 (12)
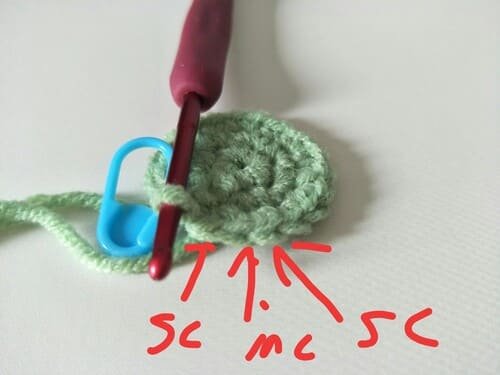
From 6 sc, we will create a mc (magic circle).
We will have 6 sts at the end.
If you feel a little trouble with magic ring, please click here:How To Crochet Magic Ring ? l Step-By-Step l Video & Text
R2: We are going to do (1 sc, inc) three times around, This will give us a total of 9 sts.
R3:We’ll do (2 sc, inc) three times around. We will end each round with 12 sts.
We’ll do 1 single crochet in each stitch around, totaling 12 sts.
Then fasten off and use hook pull the yarn end, and leave in end.
Need crochet another foot again .
Crochet the tail (use light green yarn )for dinosaur crochet
- R1: 4sc into mc(4)
- R2: (sc, inc) repeat 2 (6)
- R3:(sc,inc) repeat 3 (9)
- R4: (2sc,inc) repeat 3 (12)
- R5:(2sc,inc) repeat 4 (16)
Magic ring :Forming a magic circle, we shall create 4 sc which will yield 4 stitches in the end.
R1:We’ll do (1 sc, inc) 2 times around. This means we will have completed sc and inc two times which totals to 6 stitches.
R3:We will be doing (1 sc, inc) 3 times around. This will bring us to 9 sts for the round.
R4:We will do (2 sc, inc) 3 times around; this brings us to 12 sts at the end of the round.
R5:We will perform (2 sc, inc) 4 times, got 6 stitches (sts) at the end.
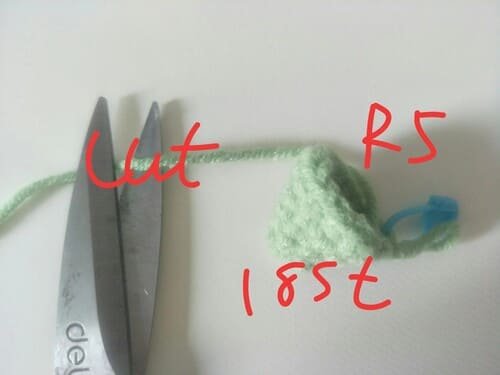
Sorry for that , should be 12 st for picture.18 st is wrong.
Fasten off and we use hook pull the yarn end, and leave in end.
Crochet the back (use dark green yarn )for dinosaur crochet
- R1:15 ch
- R12:k1,[2sl,2sl,hdc,dc,hdc)]repeat 4,2sl
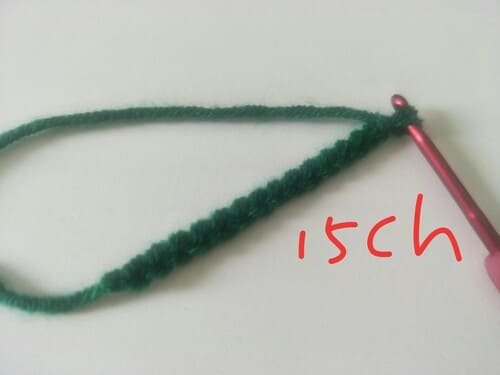
R1:15 ch for dinosaur back .
Let’s k1, then repeat [2 sl, 2 sl, hdc, dc, hdc], four times. then crochet 2sl in last stitch.
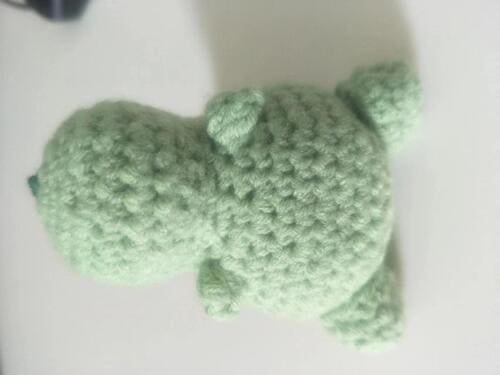
Sew foot&tail &back on the body
The feet are sewing on the body in row R18-P19, parallel to the position of the hands.
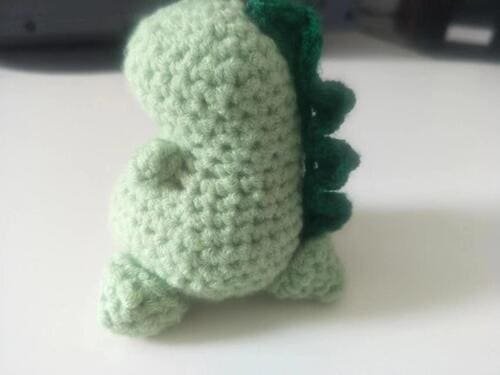
The back is on R2 to R18. my suggestion is to use glue, which is easier to fix.
The tail is installed at the bottom of the back. It forms a fixed triangular plane with the two front feet.
Safety eyes and apply blush
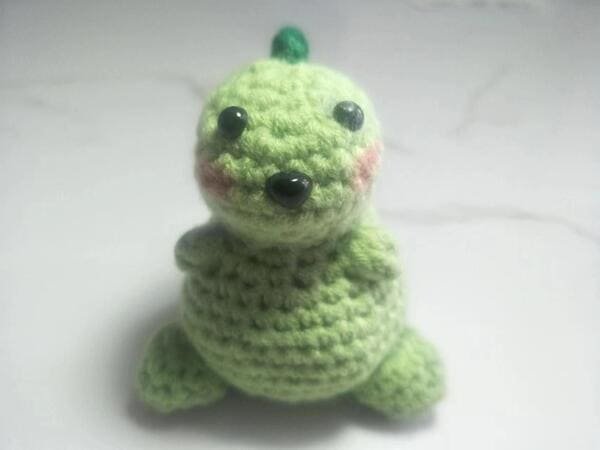
Two eyes are placed on the front of R3.
The mouth is placed at R5, just below the eyes.
The blush is distributed on both sides of the mouth.
Reference sources
1.Learn the most comprehensive guide for single crochet(sc)
Author:Sarah Stearns
Publication date: on June 15, 2021, updated:December 14, 2024
Title: How to single crochet (sc)for beginners
Summary as blow:
- Step-by-Step Single Crochet for Beginners
- Single Crochet into a Foundation Chain
- Single Crochet into another Row
- Single Crochet in the Round
- Increases and Decreases
- Working Single Crochet in Different Loops


