


Bear Crochet Pattern More Detailed Instructions
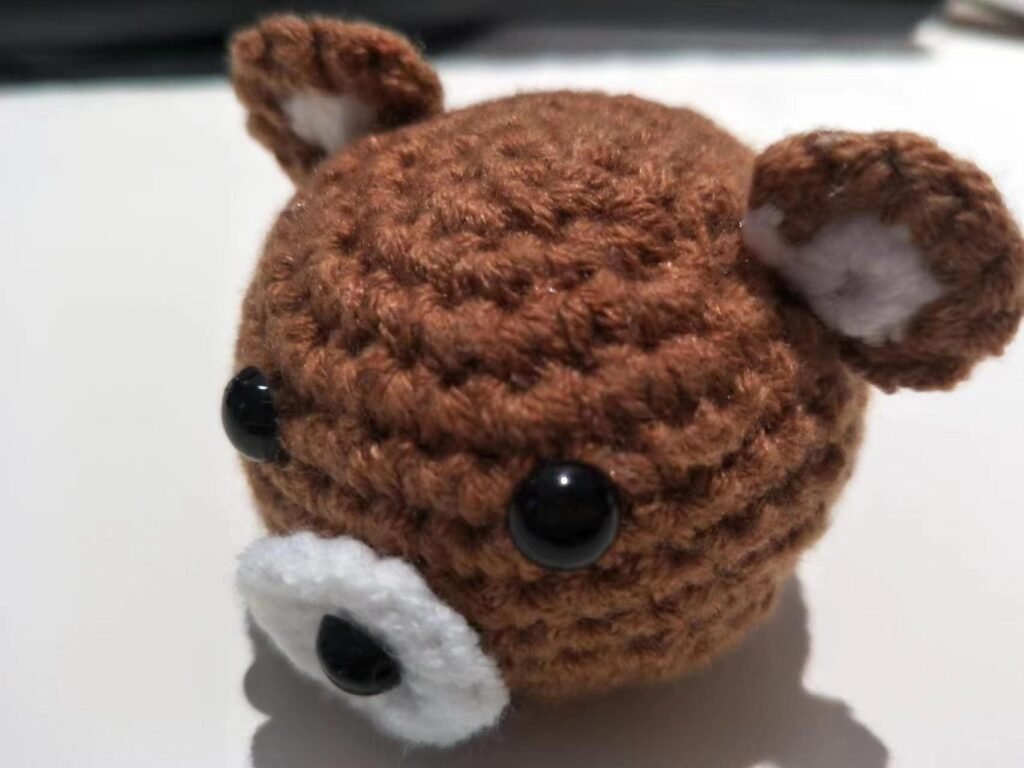
Table of Contents
Material kit of bear crochet
- Crochet Hook: the thickness of hook matches that yarn
- Stuffing: (polyester fiberfill)
- Safety & nose eyes
- Yarn(white & brown)
- Yarn needle
List of necessary tools
- Scissors
- Hot melt glue or glue
Abbreviation for bear crochet
These are the required abbreviations for crochet bear pattern.
- ch – Chain stitch
- sc – Single crochet
- sl st – Slip stitch
- inc – Increase (usually 2 stitches in the same stitch)
- dec – Decrease (typically done by crocheting two stitches together)
- st(s) – Stitch(es)
- mc – Magic circle (or magic ring)
Crochet the body (use brown yarn )for bear crochet
- R1: 7 sc into mc(7)
- R2: 2 sc in each st repeat 7 (14)
- R3: (1 sc, inc) repeat 7 (21)
- R4:(1sc,inc,1sc) repeat 7 (28)
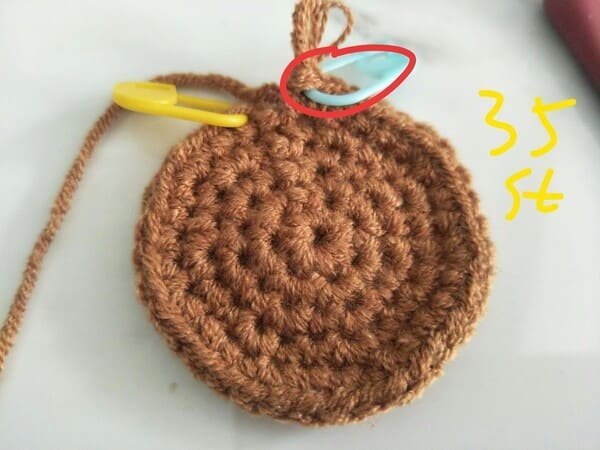
- R5:(3sc,inc)repeat7(35)
- R6-11:35sc in each st (35)
- R12:(3sc,dec) repeat 7 (28)
- R13:(1sc,dec,1sc) repeat 7 (21)
- R14:(1sc,des)repeat7(14)
- Fiberfill
- R15:dec repeat 7(7)
Tips for bear crochet:
As below:
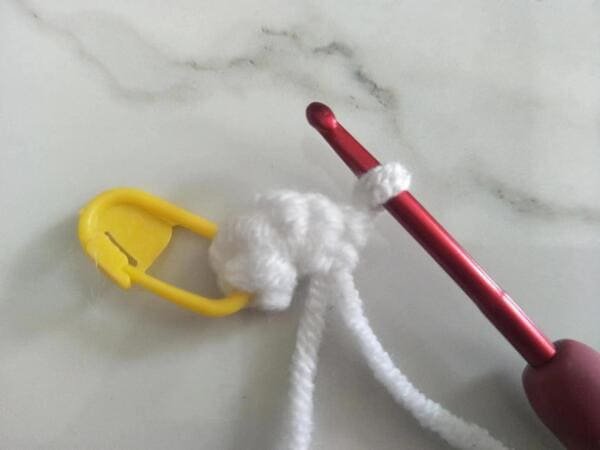
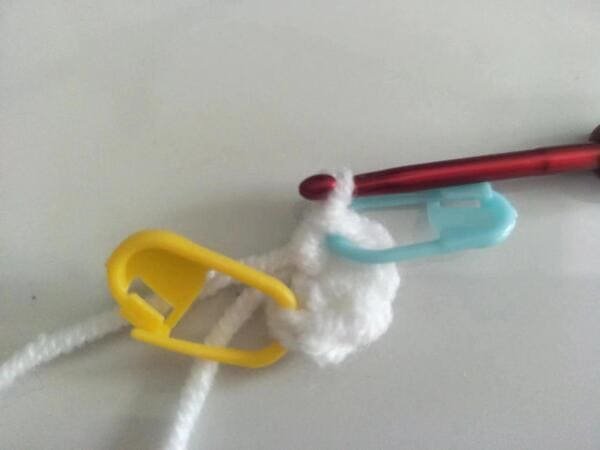
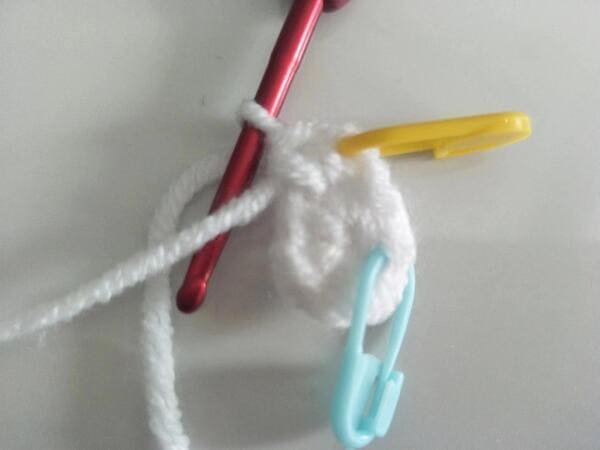
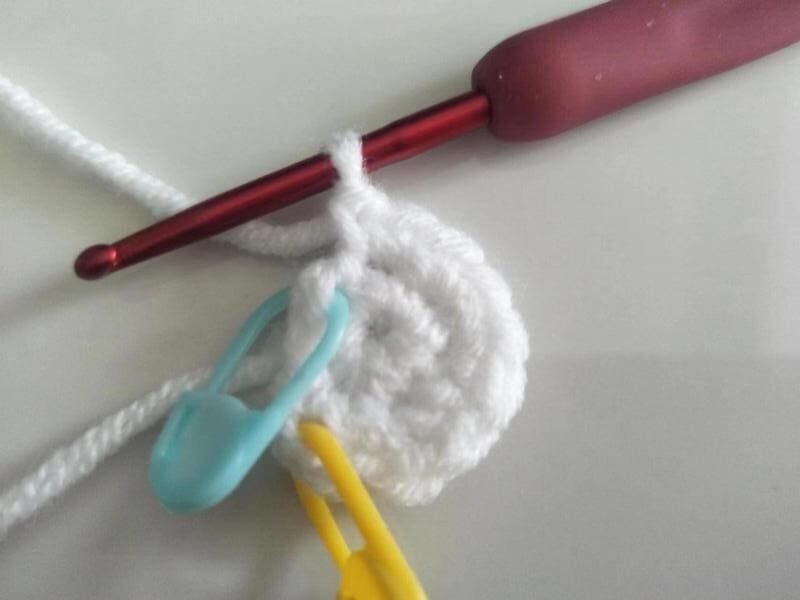
when the first stitch is completed, we use the yellow marker button.
When the last stitch is completed, we use the blue marker button.
As shown in the picture, a red arrow points to a yellow V-shape, which is a stitch.
Every “row” creates a “ridge” or ‘line.
The picture shows a red circle indicating a row.
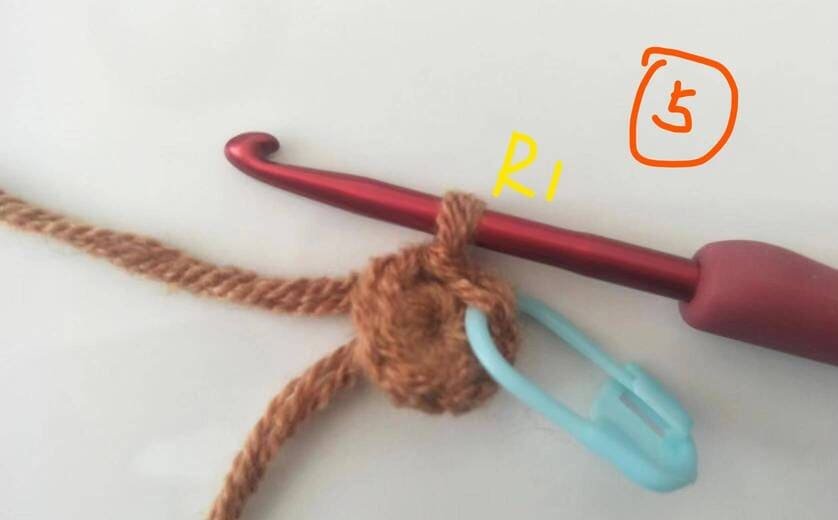
R1
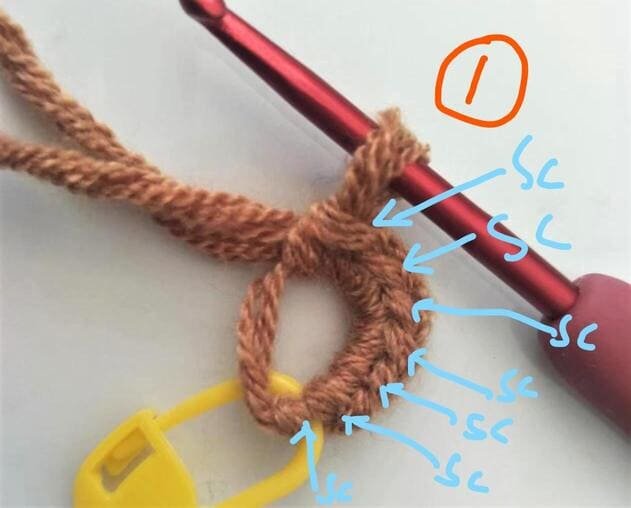
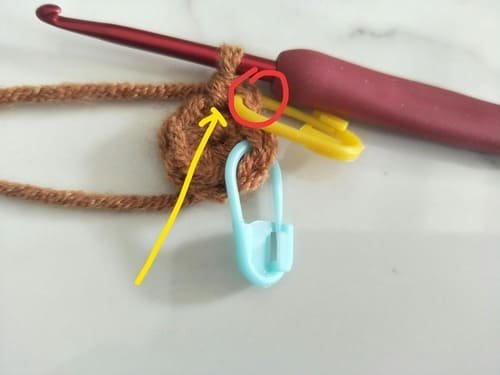
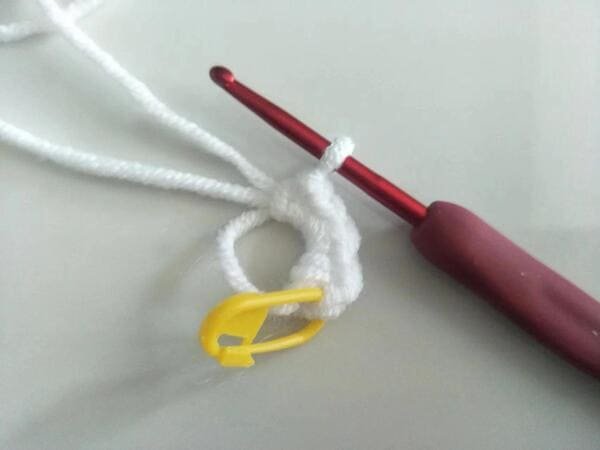
- Wrap the yarn strand around your finger to form a slip knot;
- Perform a chain stitch fixing loop (or perform a standing hook 1 ch);
- Perform the first single stitch as marked( with yellow) and place a marking enabling for the first pull out. This will assist beginners to figure out where the first stitch is and it will be practical for slip stitch.
- Then perform 7 single stitches over the loop (making it 7 sc)
V stitch is a single stitch as illustrated in the image.
If we want to learn magic ring , please click here:How To Crochet Magic Ring ? l Step-By-Step l Video & Text &Photo
As shown in the diagram
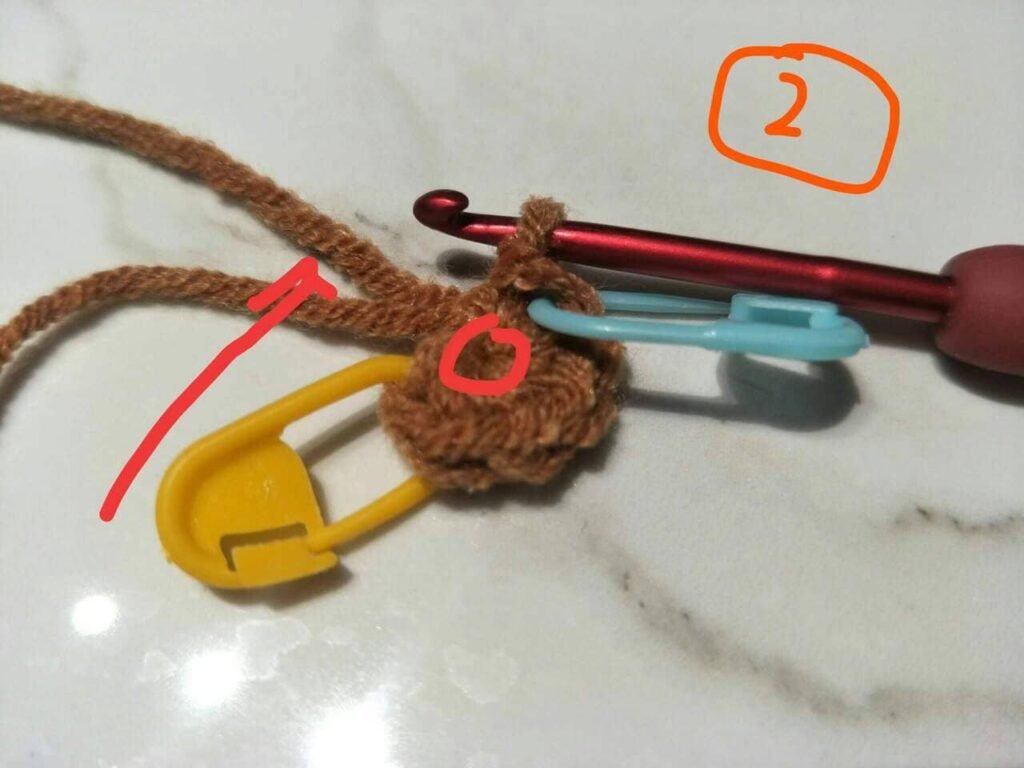
- The last stitch is buttoned with the blue mark button, which is very friendly to beginners.
- Grip the yarn end with your left hand (pulling to the left) while gripping the fabric firmly with your right hand.
This is the only way to really tighten the center of the loop and reach “0 gap” in the center.
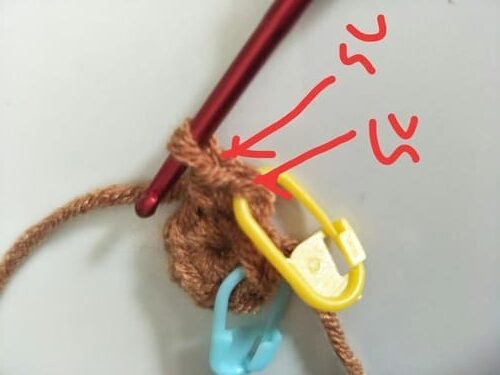
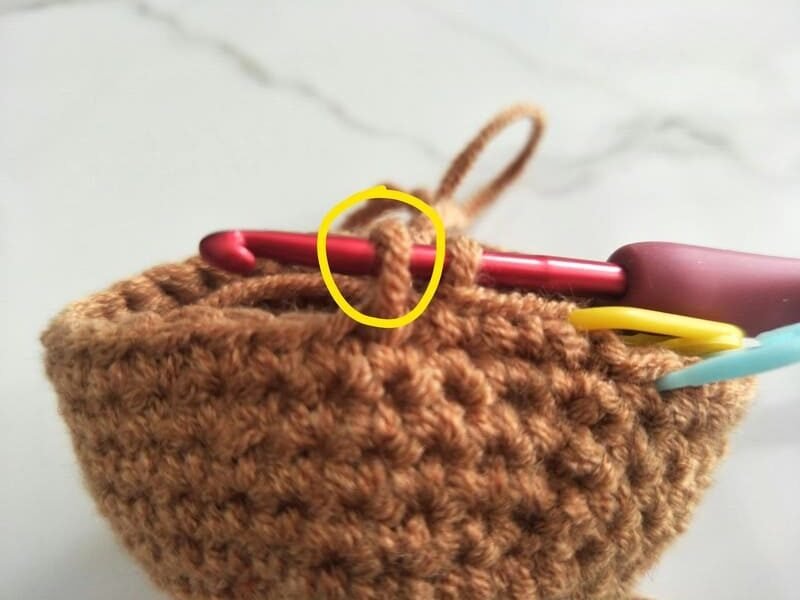
Locate the upper part of the first V-shaped single stitch which is where the yellow mark is;
We put hook into the V-shaped of the first stitch.
Yarn over for slip stitch .
- The yarn moves from the back of the hook to the front (or “from the bottom to the top”).
Slip stitch (SL):The crochet hook brings out all the loops at once to complete magic ring.
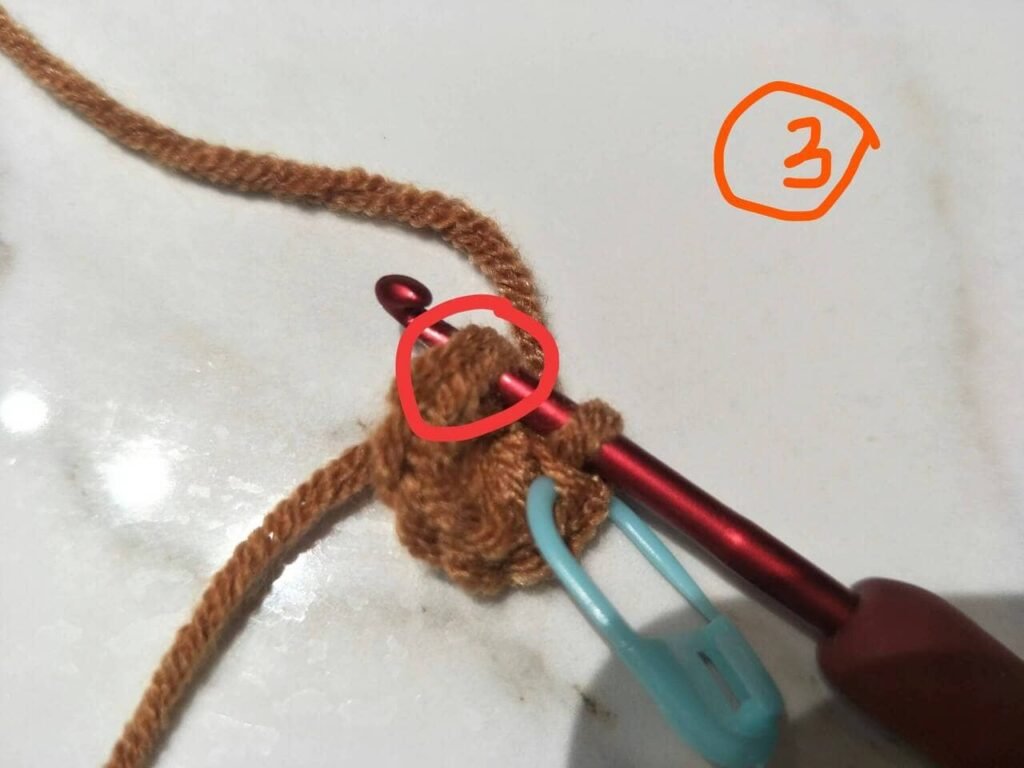
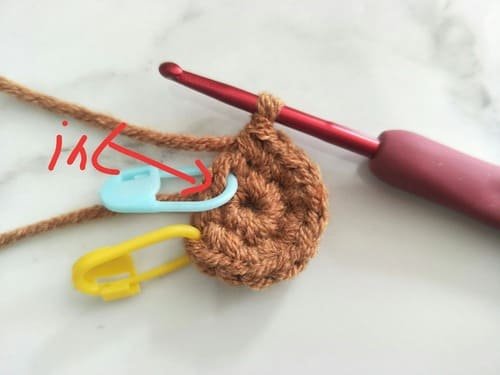
R2:
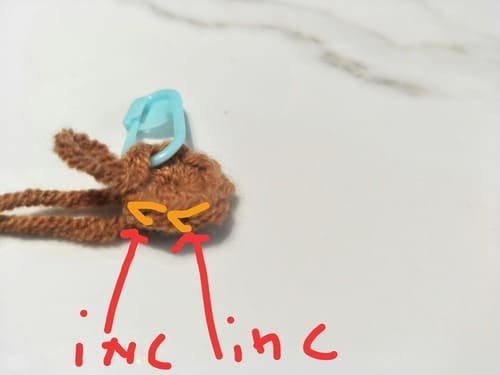
As shown in the picture
- The yellow V-shape is one stitch.
- Increase (2 SC in the same stitch)
- Repeat 7 times
I don’t know how to crochet a single crochet, please click:Single Crochet-You Want To Know The Most Detailed Information
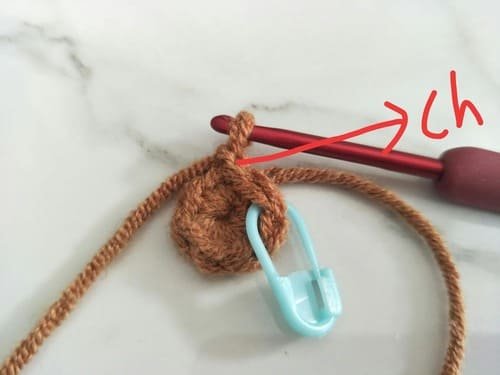
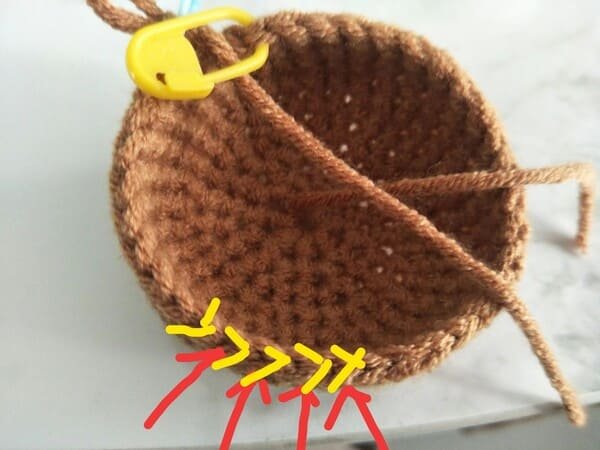
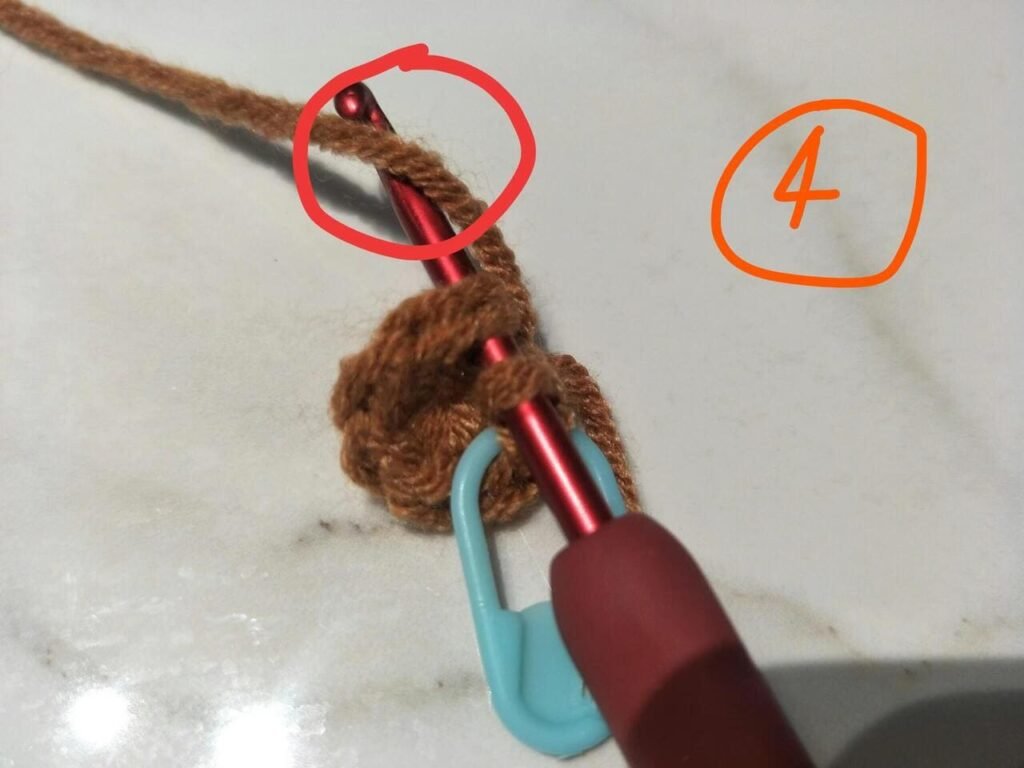
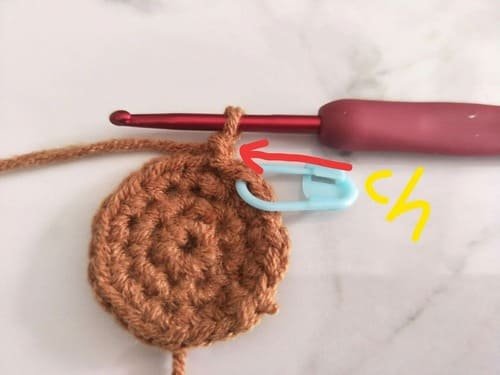
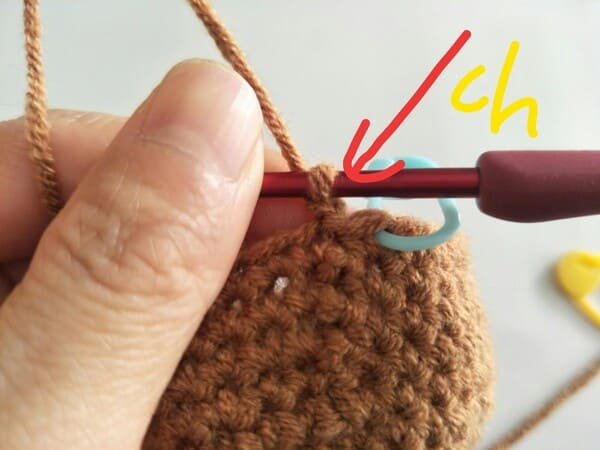
Add 1 chain stitch(next, I use ch instead.)From R2 to R15, we need to crochet a standing stitch(ch) at the beginning of each row.
- If a standing chain stitch isn’t used, the start of new row will either twist or flatten, both of which would disrupt pattern alignment.
- Rows have universal symmetry with the use of chain stitch.
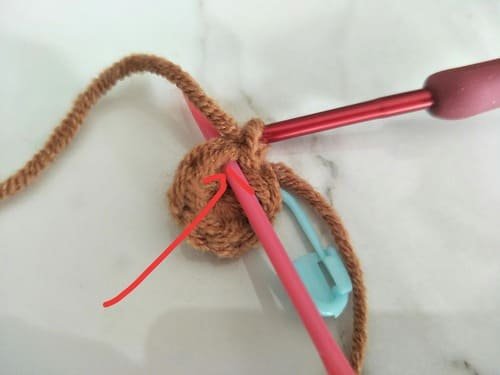
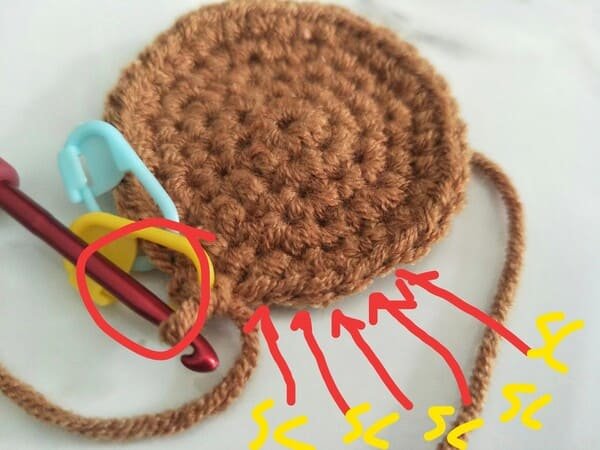
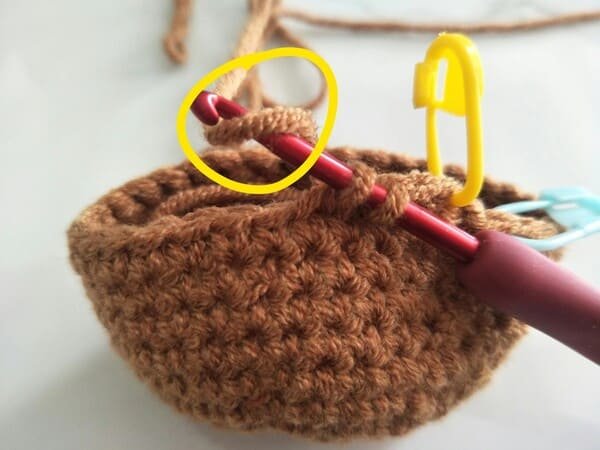
As shown in the picture (the position where the red needle is inserted)
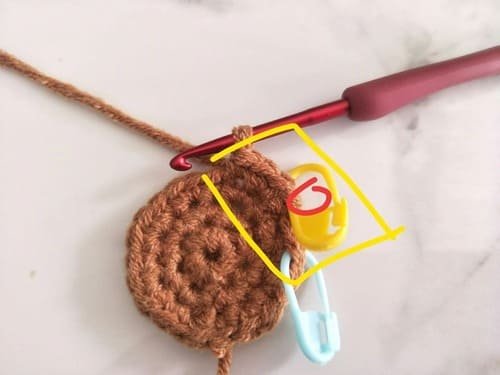
The first single stitch(SC) should be hooked on the stitch immediately after the chain stitch(CH), which is the position of the first round of slip stitch(SL).
The yellow arrow indicates that the first single stitch is completed.
Mark the first single stitch with a yellow marker for slip stitch.
- Red arrow with yellow maker is the first SC.
- Followed by the second single stitch(hook in the same stitch)
- Repeat 6 times
In this way, we have completed the first single crochet increase.
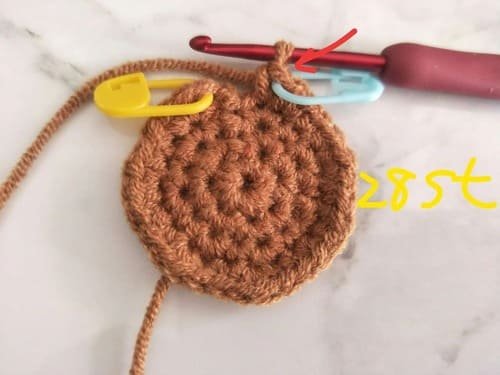
As shown in the picture( last stitch with blue marker)
We crochet 1 Inc again.
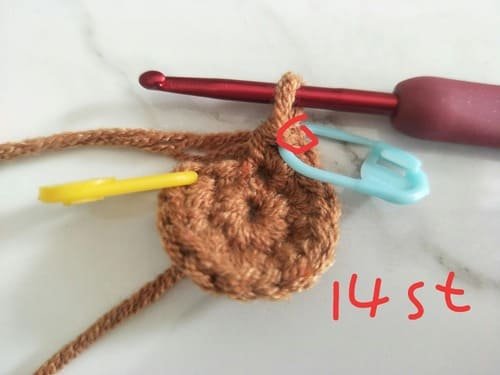
When the last stitch is completed, we buckle the marking button.
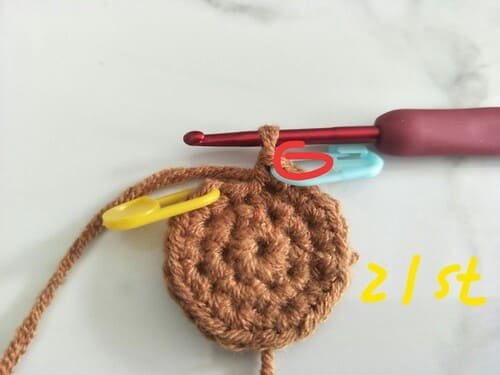
We must count the number of stitches to complete the second round, which is 14.
After the slip stitch is completed, this is R2.
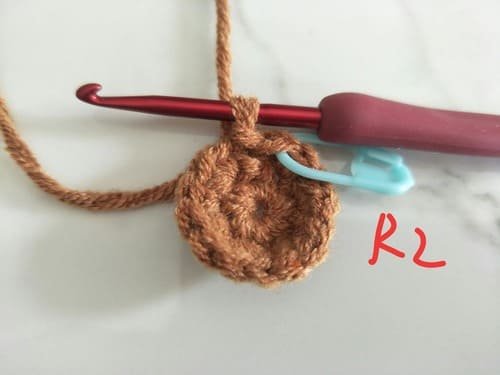
R3:
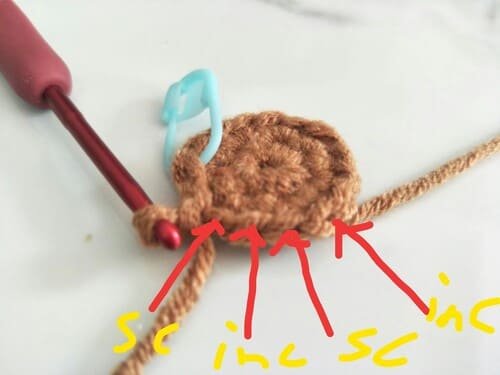
(1 sc, inc) repeat 7
I put it on the side so that I can clearly see the pattern of increase with added stitches order.
Firstly a SC, then the next stitch is INC, repeat this order 7 times.

Add CH.
The first single stitch(SC) should be hooked on the stitch immediately after the chain stitch(CH), which is the position of the first round of slip stitch(SL).-I emphasize again
- Mark the first SC with yellow
- Next stitch, INC again (show as picture)
When the last stitch is completed, we buckle the marking button.
We must count the number of stitches to complete the third round, which is 21.
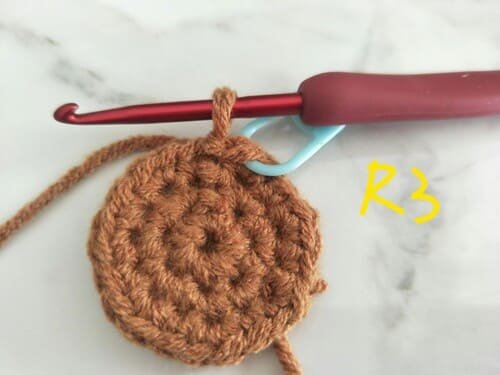
After the SL, this is R3.
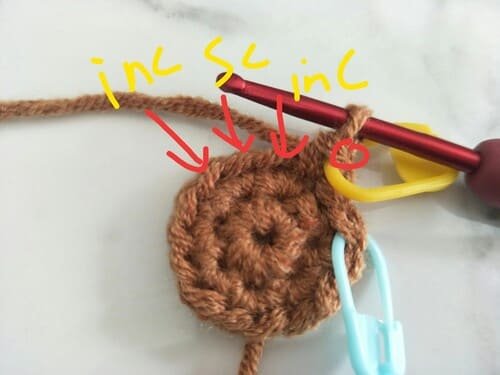
R4:
(1 sc, inc,1sc) repeat 7
I put it on the side so that I can clearly see the pattern of increase with added stitches order.
Firstly a SC, then the next stitch is INC,then SC, repeat this order 7 times.
Add CH.
- We use the yellow marker for the first stitch, .
- In the yellow frame, we complete a SC and INC.

When we left the last three stitches in this round,SC, then the next stitch is INC,then SC.
When the last stitch is completed with blue marker.
We must count the number of stitches to complete the fourth round, which is 28.
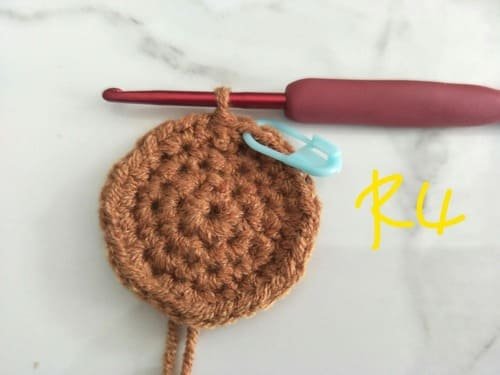
After the SL, this is R4.
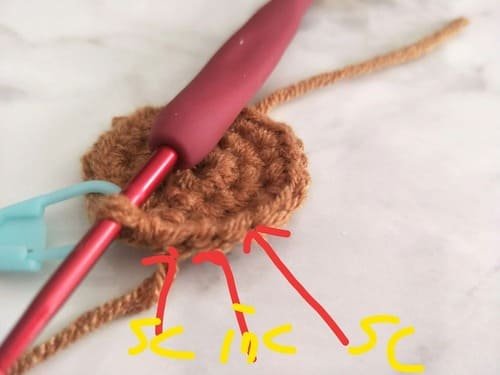
R5:
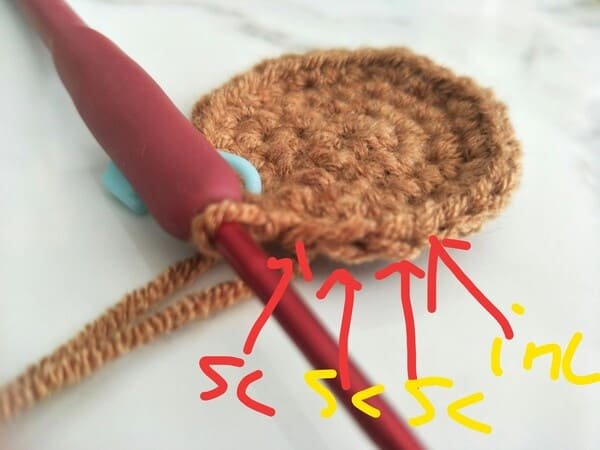
(3 sc, inc) repeat 7
I put it on the side so that I can clearly see the pattern of increase with added stitches order.
3SC in each sttich , then the next stitch is INC, repeat this order 7 times.
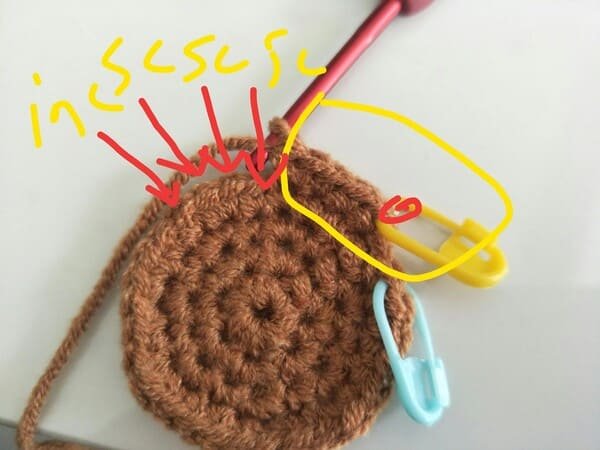
- We use the yellow marker for the first stitch, .
- In the yellow frame, we complete a 3SC and INC.
- For next the stitches listed are in this order: SC, SC, SC, INC.
When we left the last four stitches in this round,stitches listed are in this order: SC, SC, SC, INC.
When the last stitch is completed with blue marker.
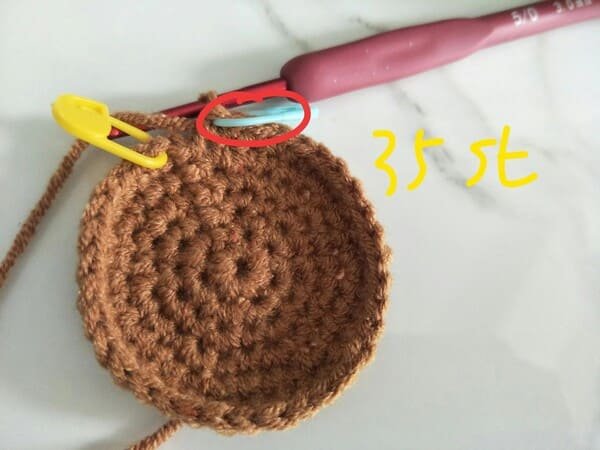
We must count the number of stitches to complete the fourth round, which is 35.
After the SL, this is R5.
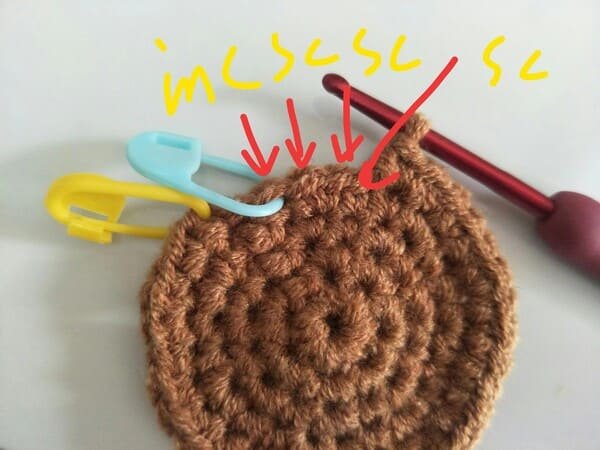
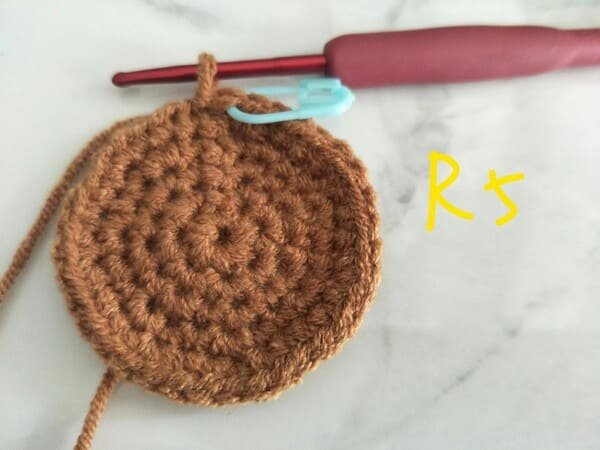
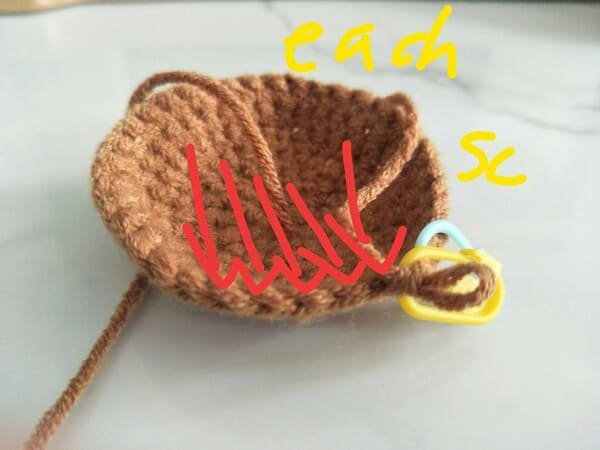
R6:
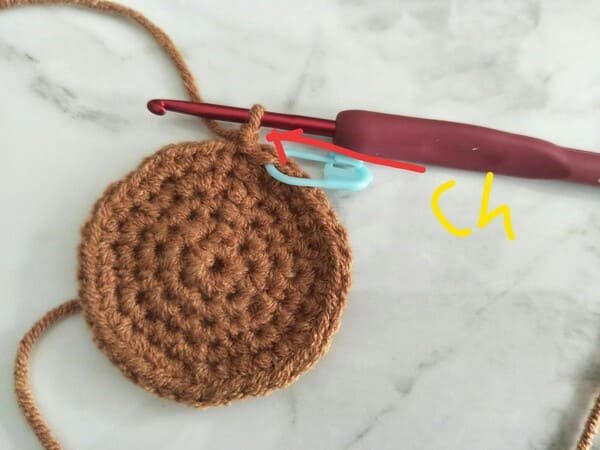
Add CH.
We use the yellow marker for the first stitch, .
For next the stitches listed are in this order: SC, SC, SC, SC….
When the last stitch is completed with blue marker.
We must count the number of stitches to complete the sixth round, which is 35.
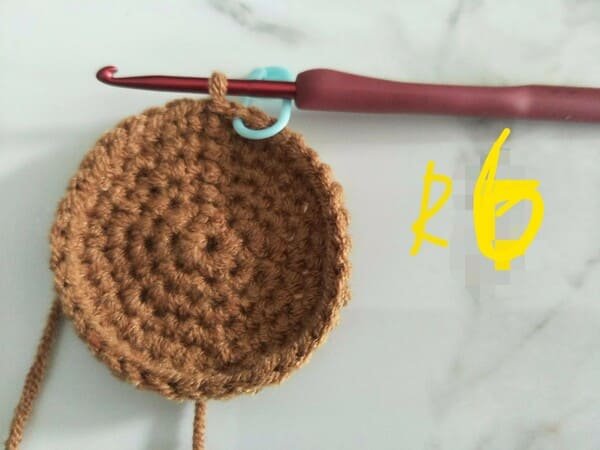
After the SL, this is R6.
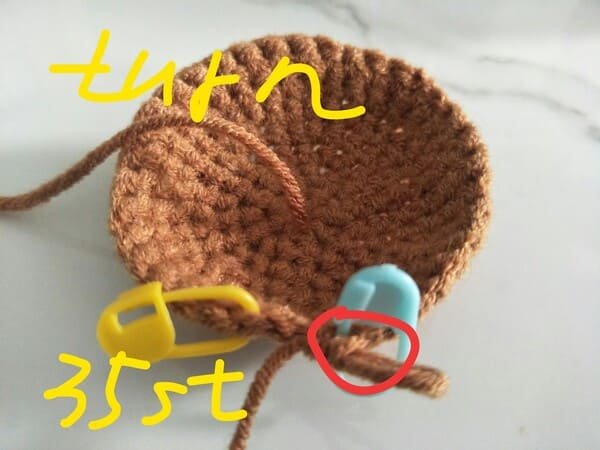
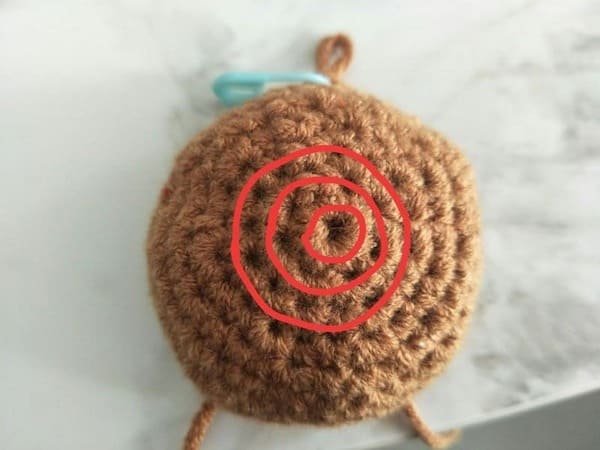
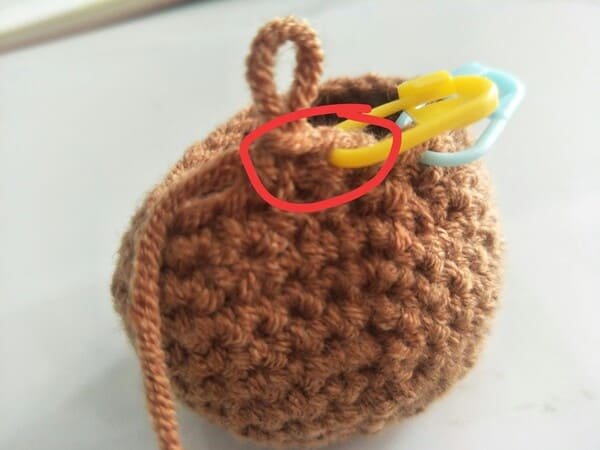
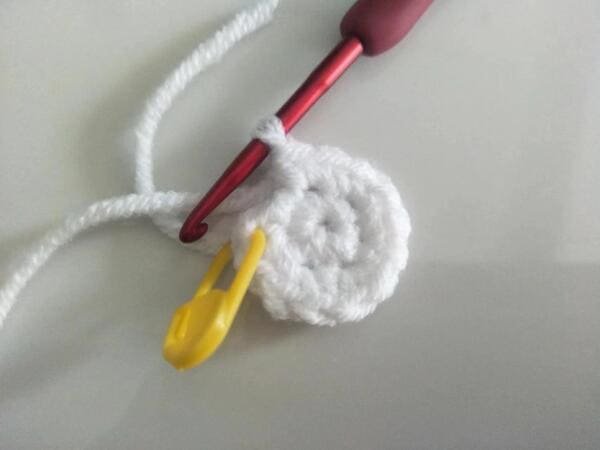
As shown in the picture, the yarn end is placed inside the entire fabric, so that it forms a flip=turn.
R7
We use the yellow marker for the first stitch, .
For next the stitches listed are in this order: SC, SC, SC, SC….

When the last stitch is completed with blue marker.
We must count the number of stitches to complete the seventh round, which is 35.
After the SL, this is R7.
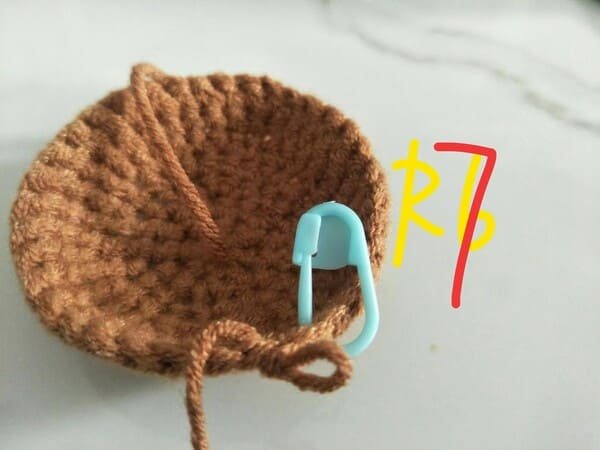
R8
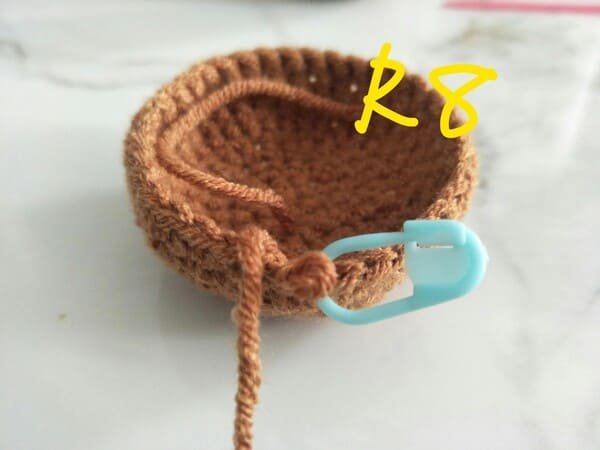
R8 is completed.
R9
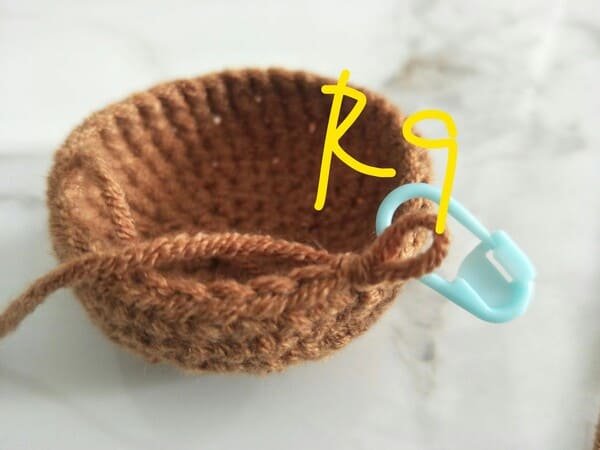
R9 is completed.
R10

R10 is completed.
R11
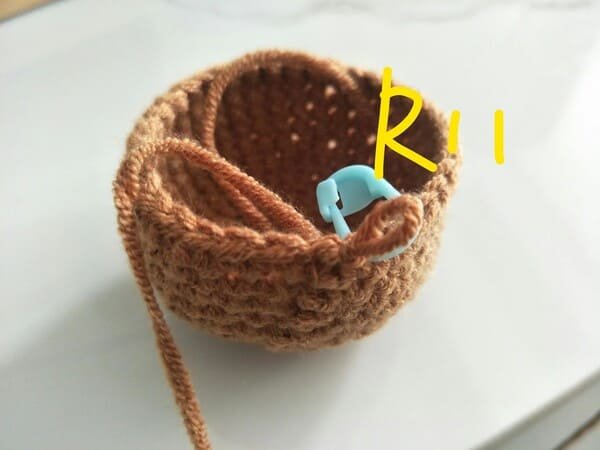
R11 is completed.
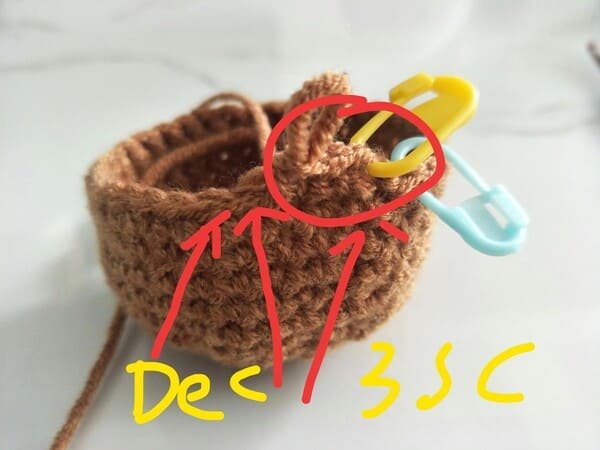
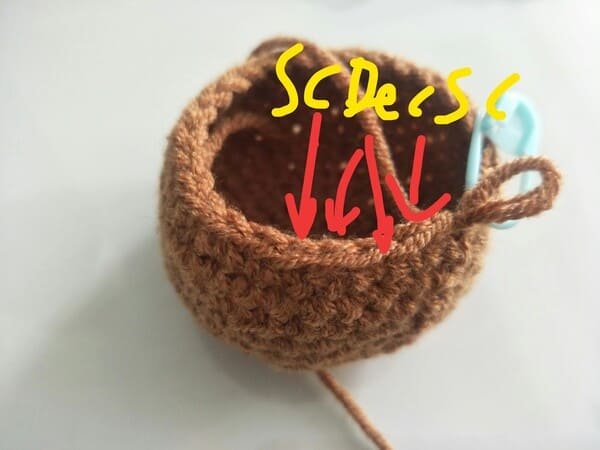
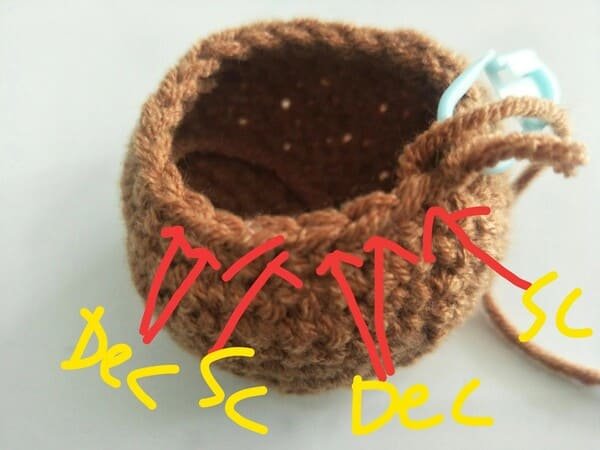
R12

I put it on the side so that I can clearly see the pattern of increase with added stitches order.
Firstly 3SC,DEC repeat this order 7 times.
Add CH.
- 3 SC is completed, which the first SC with yellow marker.
- The red arrows indicate that these next two stitches should be DEC.
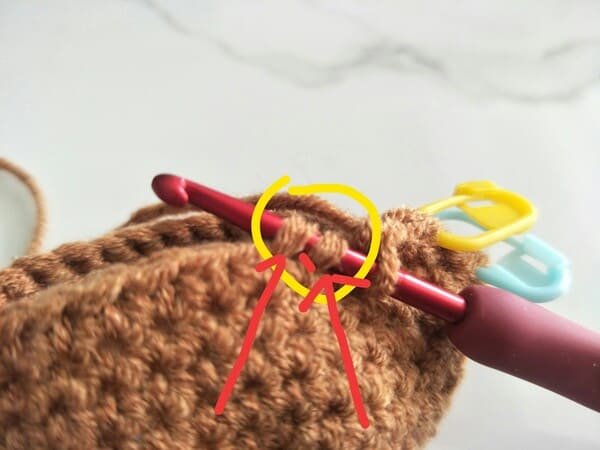
Insert the hook only into the front loop of the first and second stitches for DEC.
Yarn over and pull through both front loops.
The remaining two loops for DEC.
Yarn over again for des for R12.
Pull through both loops on the hook, leaving one loop remaining. DEC is completed.
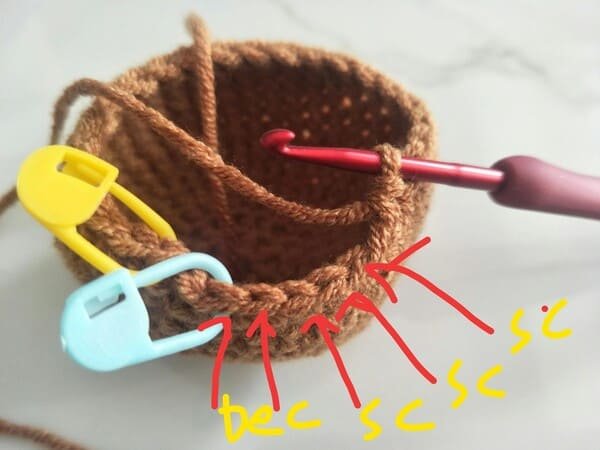
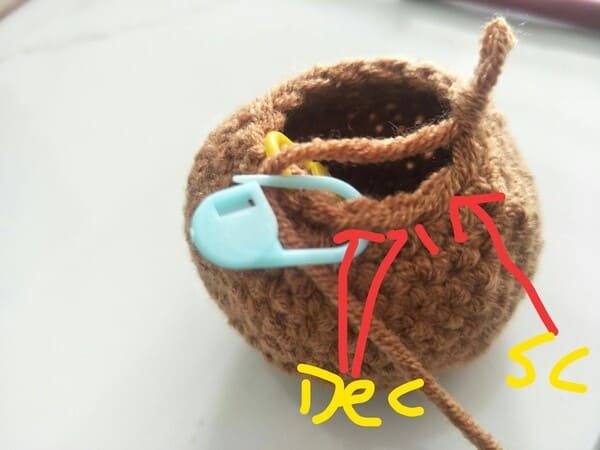
When we left the last five stitches in this round,stitches listed are in this order: SC, SC, SC, DEC.
When the last stitch is completed, we buckle the marking button.
We must count the number of stitches to complete this round, which is 28.
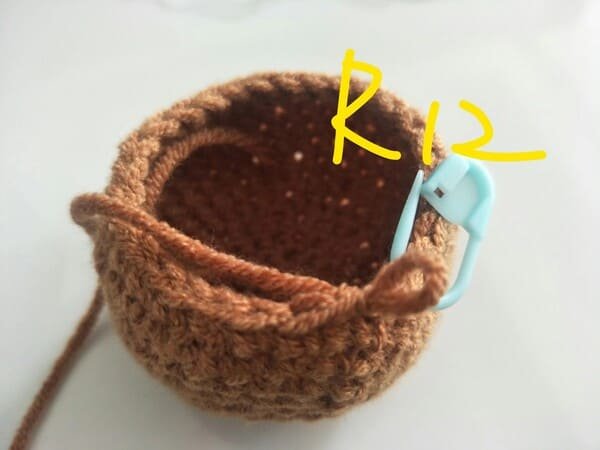
After the SL, this is R12.
R13
I put it on the side so that I can clearly see the pattern of increase with added stitches order.
SC,DEC,SC repeat this order 7 times.
- First SC with yellow marker.
- The we competed DEC and SC again.
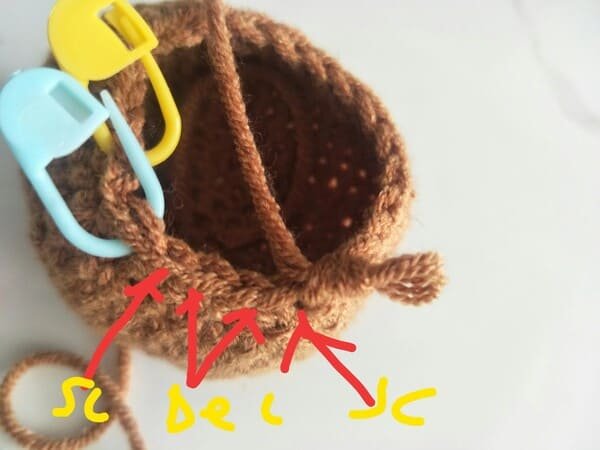
When we left the last four stitches in this round,stitches listed are in this order: SC, DEC, SC.
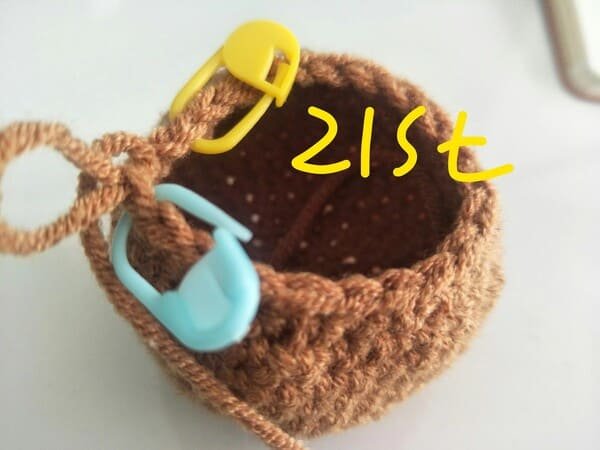
When the last stitch is completed, we buckle the marking button.
We must count the number of stitches to complete this round, which is 21.
After the SL, this is R13.
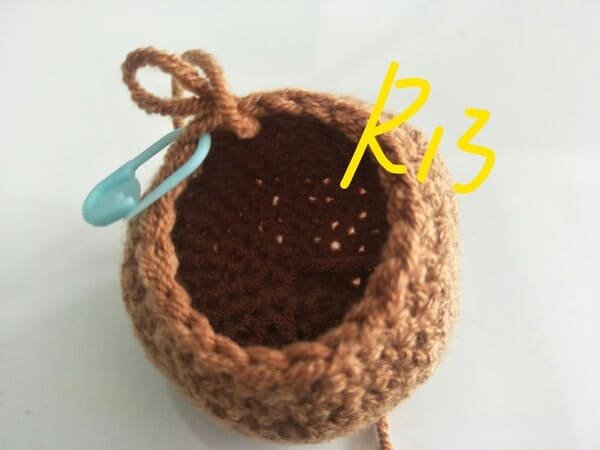
R14
SC,DEC, repeat this order 7 times.
First SC with yellow marker.
The we competed DEC again. (Show the red circle).
When we left the last three stitches in this round,stitches listed are in this order: SC, DEC.
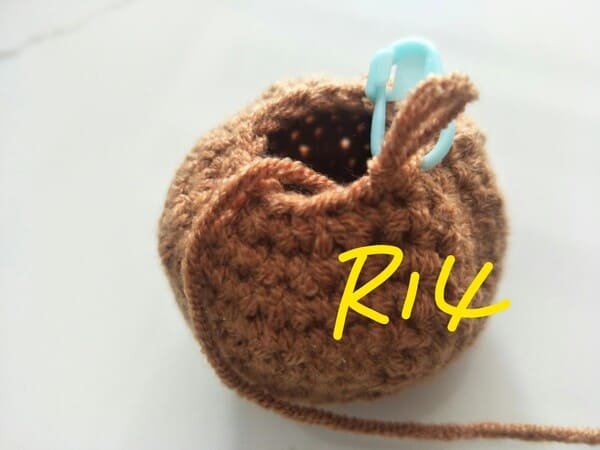
When the last stitch is completed, we buckle the marking button.
We must count the number of stitches to complete this round, which is 14.
After the SL, this is R13.
Fiberfill for bear crochet
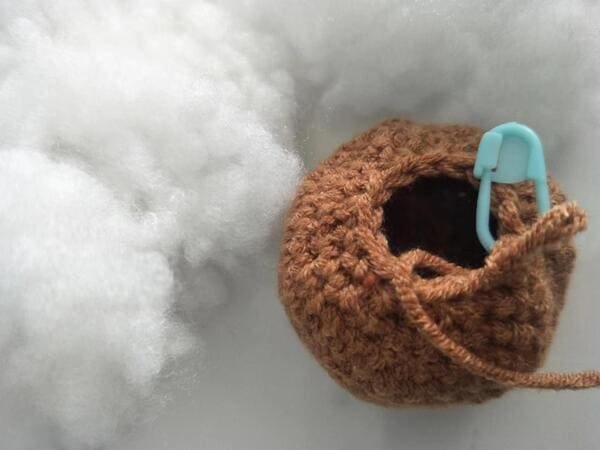
While crocheting, ensure to add small amounts of stuffing to maintain a smooth shape.
Don’t overfill as this can cause stitches to stretch and stuffing to peek through.
Using high-quality materials ensures softness and shape retention.
R15
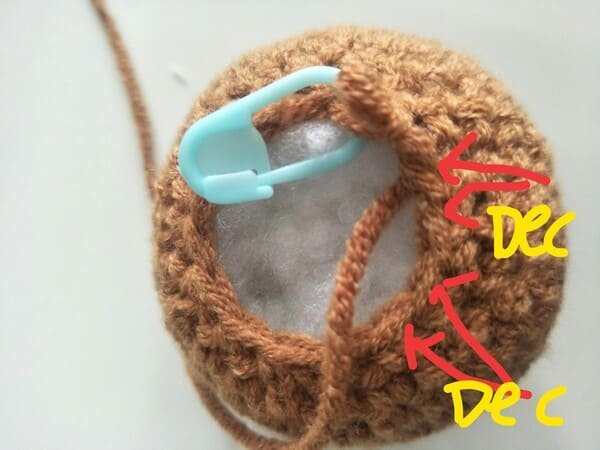
DEC repeat 7 times
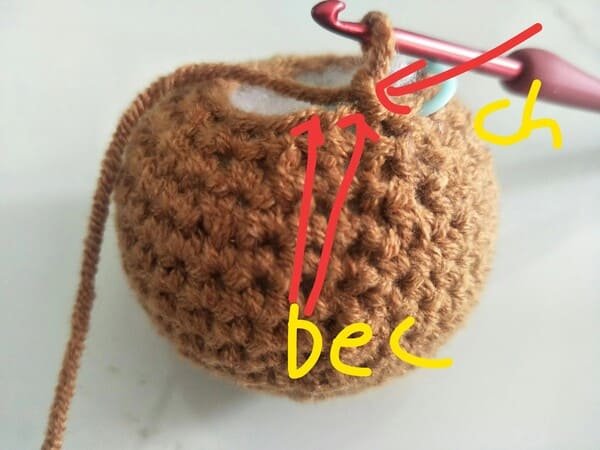
Add CH
The next two stitches are decrease stitches.
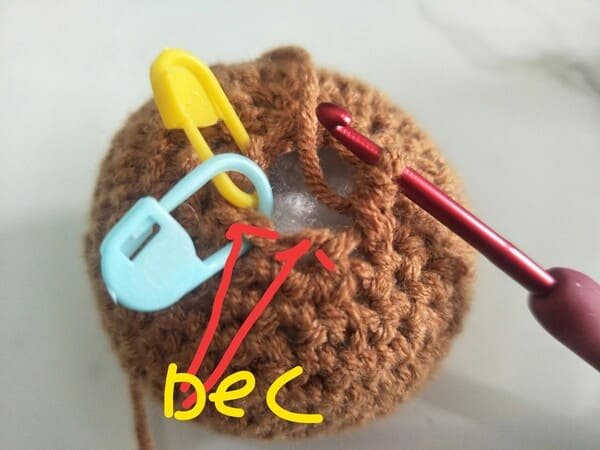
When we left the last two stitches in this round,stitches listed are in this order: DEC.
When the last stitch is completed, we buckle the marking button.
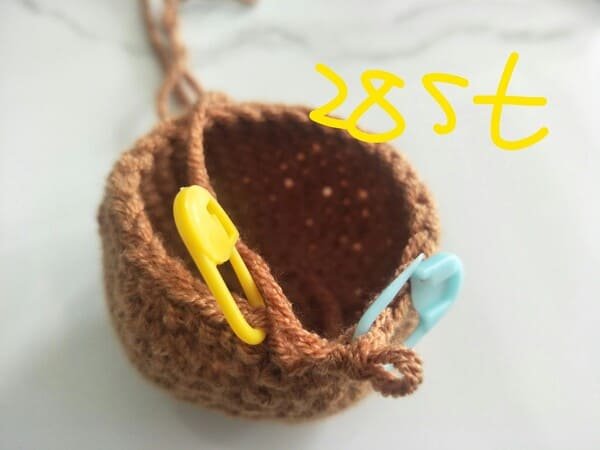
We must count the number of stitches to complete this round, which is 7.
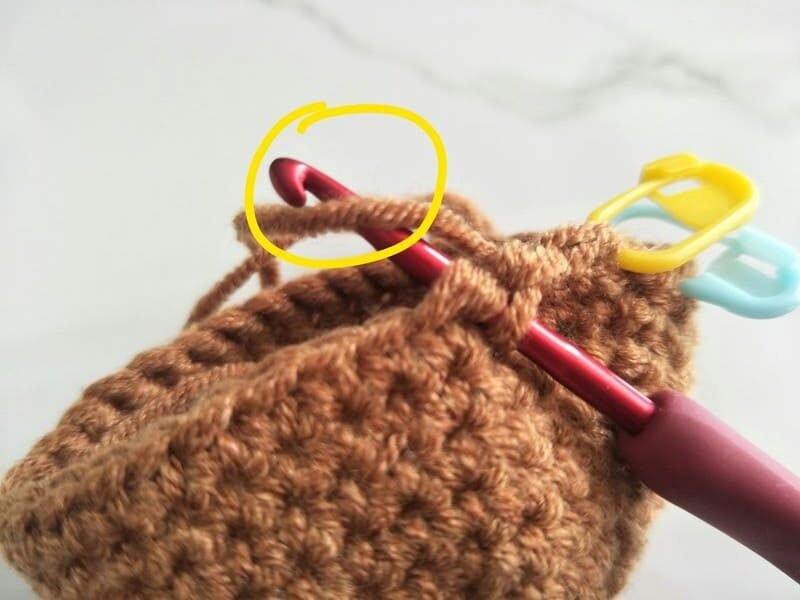
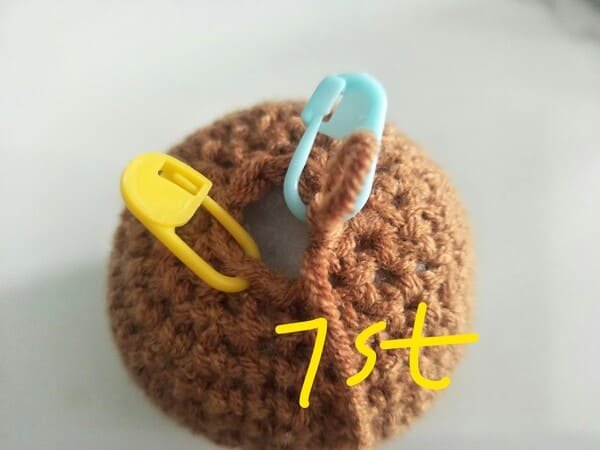
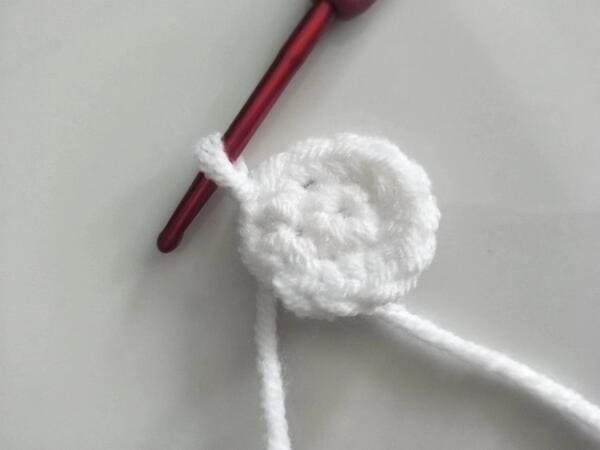
slip stitch and cut yarn end for R15
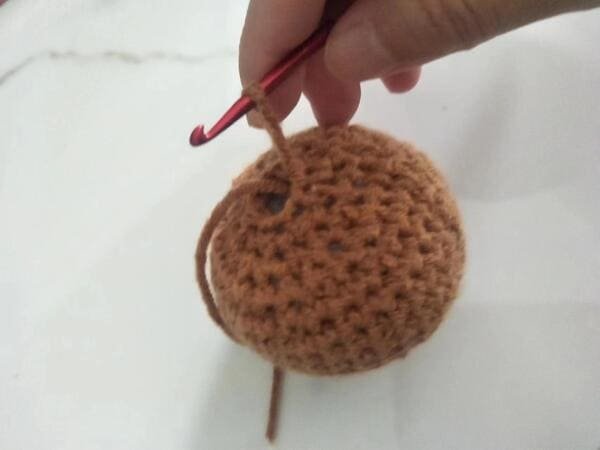
We use hook to pull out the yarn end.
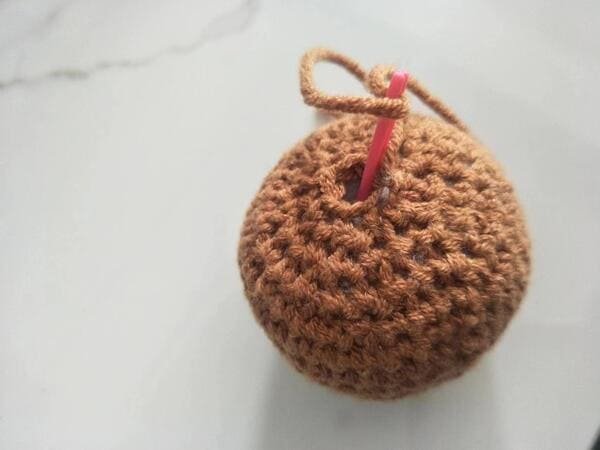
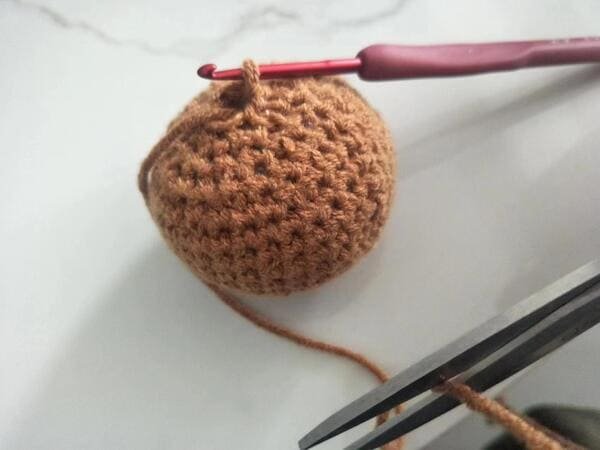
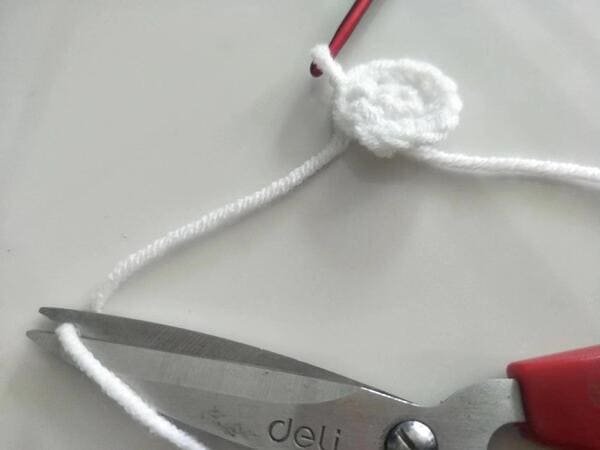
Conceal end.
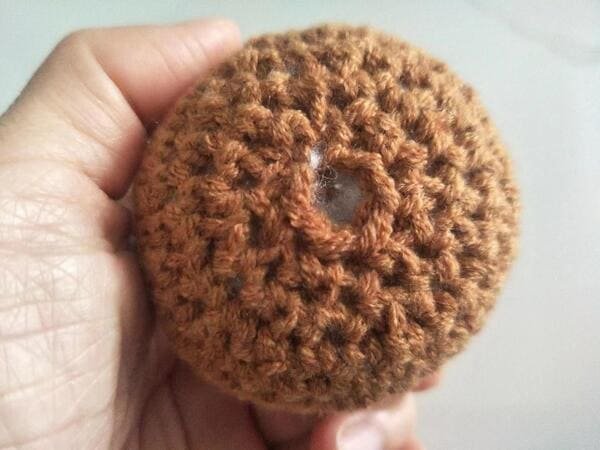
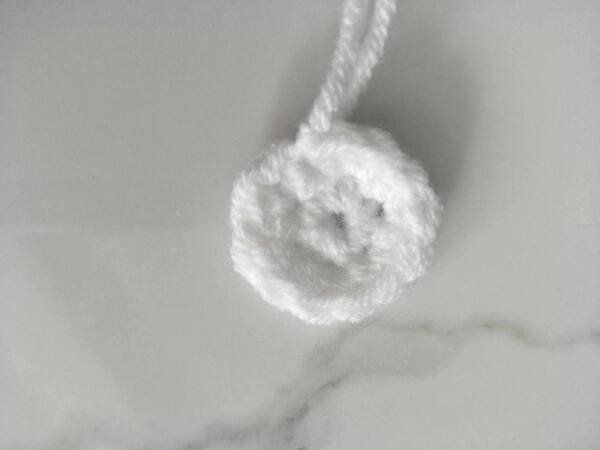
Bottom of body.
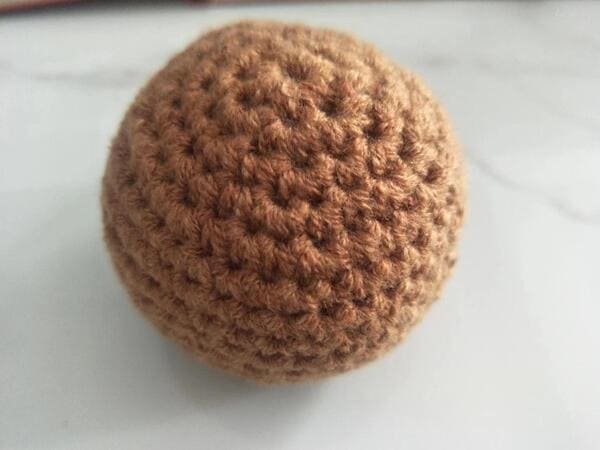
Body is finished.
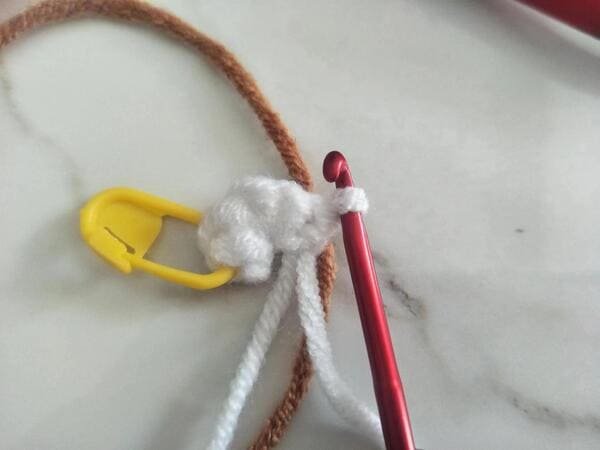
Crochet the ear (use brown &white yarn ) for bear crochet
- R1: 5 sc into mc(5)– use white yarn
- R2: 2 sc in each st repeat 5 (10) –use brown yarn
Perform 5 single stitches over the loop (making it 5 sc)
Turn of magic ring (not to do slip stitch).
Place the brown yarn behind the looped fabric and crochet two stitches(Inc)in each stitch.
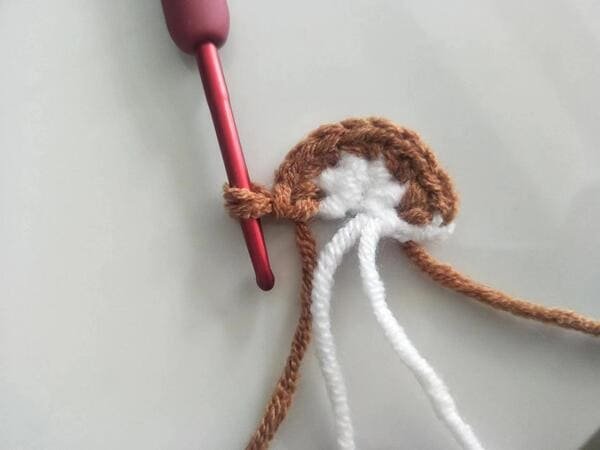
5 Inc is completed.
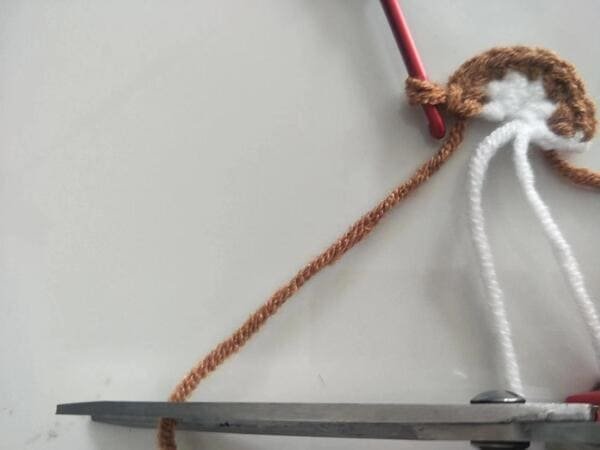
Cut the brown yarn end for R2
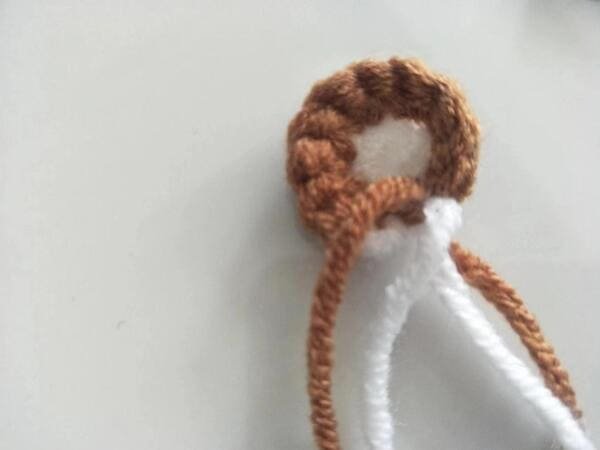
Tie knot for ear to perform shaped for ear.
Crochet the nose (use white yarn ) for bear crochet
- R1: 6 sc into mc(6)
- R2: 2 sc in each st repeat 6 (12)
Perform 6 single stitches over the loop (making it 6 sc)

Slip stitch for magic ring.
The first Inc is completed and the first SC with yellow marker For R2.
left one stitch for Inc for R2.
We must count the number of stitches to complete this round, which is 12.
Slip stitch for R2.
Cut yarn end.
Use hook to pull out yarn end.
Sewing the ear on the body for bear crochet
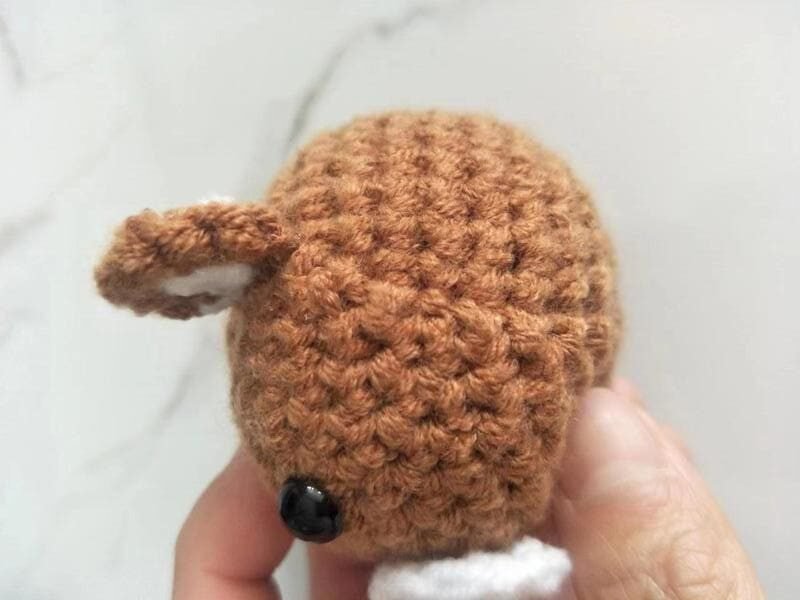
Sewing or glue ear on the slip stitch position.
Counting from the top, the ears are installed on the fifth and sixth round or row.
This is for a more beautiful look.
This is the other ear to sewing the body.
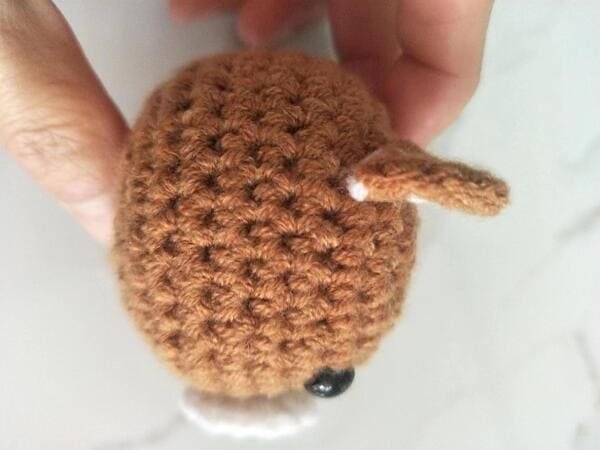
Sewing the nose and eyes for bear crochet

For eyes: counting from the top, the ears are installed on the sixth and round or row.
For nose: Installed just below the eyes
For little nose as shown(small black triangle): Installed just below nose.
Reference sources
1.Learn the most comprehensive guide for single crochet(sc)
Author:Sarah Stearns
Publication date: on June 15, 2021, updated:December 14, 2024
Title: How to single crochet (sc)for beginners
Summary as blow:
- Step-by-Step Single Crochet for Beginners
- Single Crochet into a Foundation Chain
- Single Crochet into another Row
- Single Crochet in the Round
- Increases and Decreases
- Working Single Crochet in Different Loops


