


Crochet Pig Pattern Step-By-Step Tutorial

We begin by crocheting with yarn and magic ring techniques, then moving on to nose, ear, body,if you get stuck don’t worry we will be right there to assist you. Moreover, we demonstrate proper stuffing techniques so that your pig not only looks chubby but also super cute.
As a final touch, we will make your pig character complete with the addition of eyes and a tail which will make your peg companion look even more adorable.
To you, and to all participants, become familiar with crochet hooks as we are going to have a blast crocheting together.
Table of Contents for crochet pig
Material kit of crochet pig
- Hook: 3.0mm
- Stuffing: (polyester fiberfill)
- Yarn(pink )
- Yarn needle
- Marker
- Safe eyes
List of necessary tools
- Scissors
- Hot melt glue or glue
Abbreviation for crochet pig
These are the required abbreviations for crochet pig pattern
- ch = Chain stitch
- sc = Single crochet
- sl =Slip stitch
- st(s) =Stitch(es)
- mc =Magic circle (or magic ring)
- dc=Double crochet
- hdc=Half double crochet
- R=Round
- pc=Popcorn
- tr=Triple crochet
- inc=Increase
- dec=Decrease
Best selling products
-

Raffia Cross Pattern Basket Handbag Kit
$19.99 -

Hexagonal Bucket Bag Kit
$29.99 -

Raffia Handbag Kit
$29.99 -

Hammock Bag Kit
$29.99 -

Wheat Bucket Bag Kit
$19.99
Tips
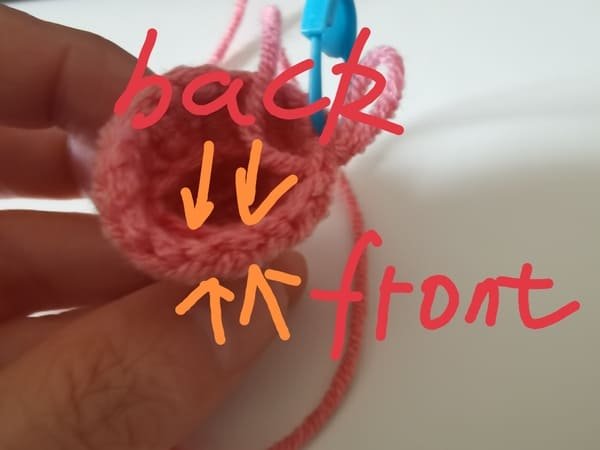
The side of “v” which is facing us is the front and the part which is hidden is the back.
If there is a pattern instruction that says “crochet in front loop only (FLO)”, it means only the front part is to be taken with the hook.
For back loop only (BLO), we take the loop which is farther from us, the back loop.
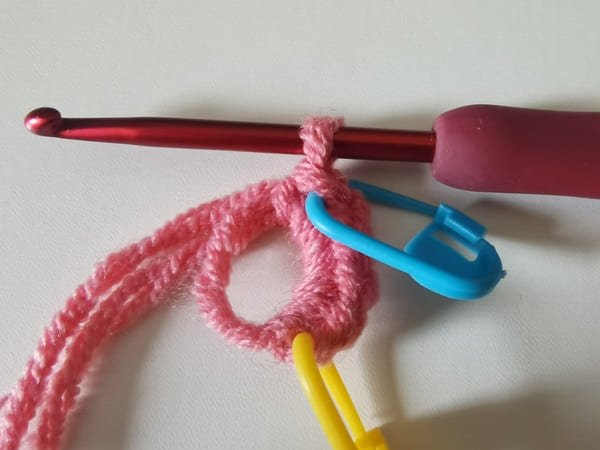
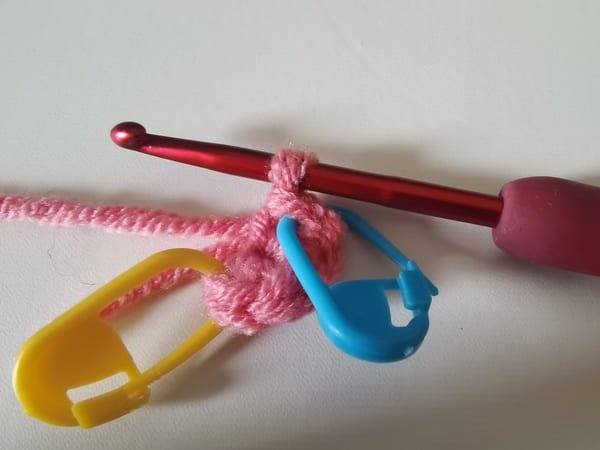
Most novice users should, in my opinion, utilize the marking button (yellow in the article) immediately after the first stitch is created.
Also, as explained in the article, blue marking buttons should be positioned right after the last stitch is completed.
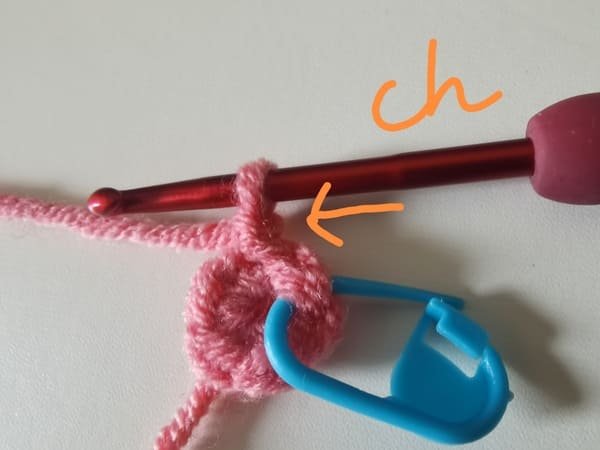
The crochet chain stitch is necessary here as it helps start new rounds, maintains height, keeps even edges, preserves structure, and prevents gaps in the neat, orderly pattern.
Crochet the main body (pink )for crochet pig
- R1:6 sc in to magic ring (6)
- R2:inc*6,slip stitch BLO(12)
- R3:BLO-12sc(12)
- R4:12sc,slop stitch FLO(12)
- R5:FLO(2sc,inc)*4(16)
- R6:(3sc,inc)*4(20)
- R7:(2sc,inc,2sc)*4(24)
- R8:(3sc,inc)*6(30)
- R9:10sc,(FLO-hdc,dc,tr,ch),(FLO-tr,dc,hdc),6sc,(FLO-hdc,dc,tr,ch),(FLO-tr,dc,hdc),10sc(30)
- R10:2sc,FLO-pc,7sc,BLO-2sc,6sc,BLO-2sc,7sc,,FLO-pc,2sc(30)
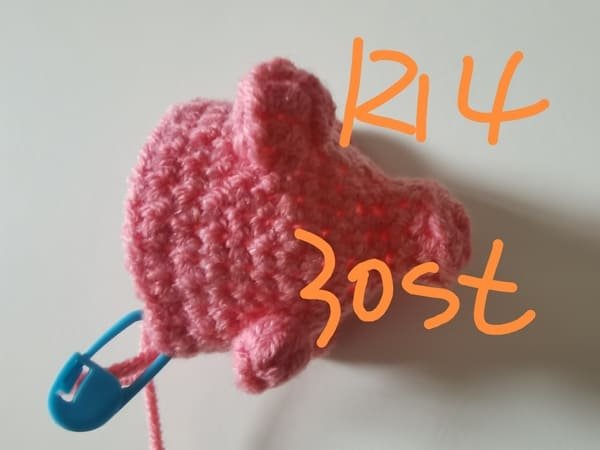
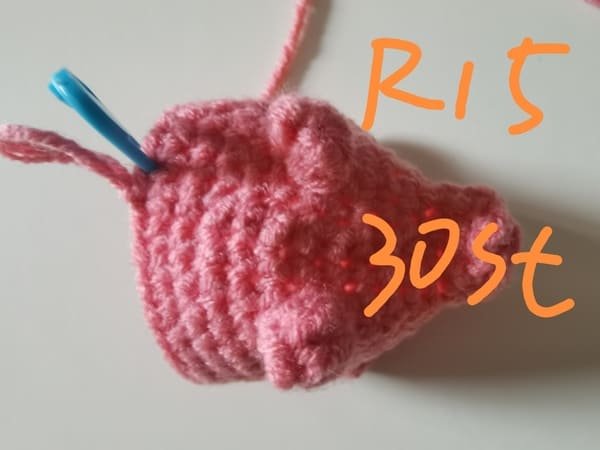
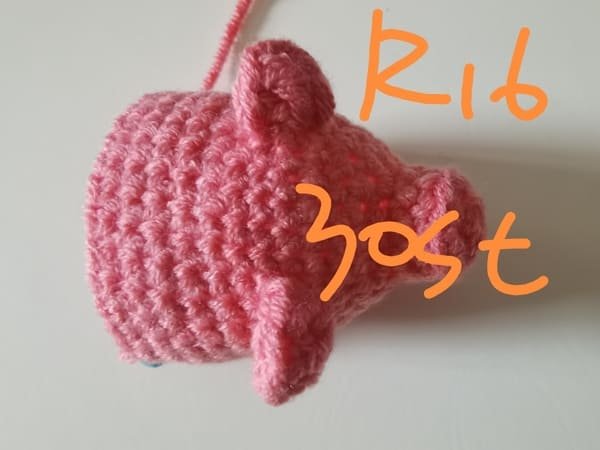
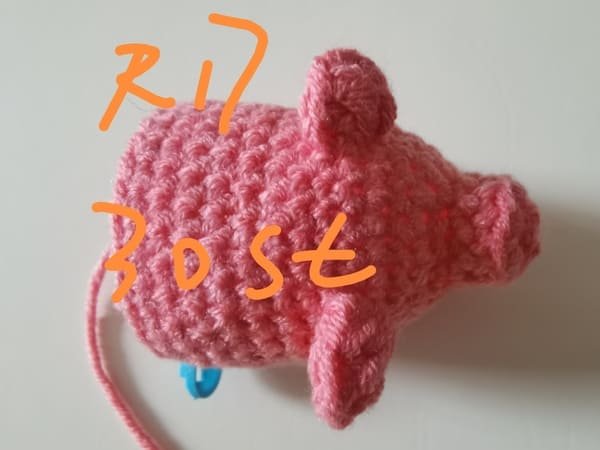
- R11-R17:30sc(30)
- R18:4sc,FLO-pc,23sc,FLO-pc,sc(30)
- R19:(3sc,dec)*6(24)
- R20:(sc,dec,sc)*6(18)
- R21:(sc,dec)*6(12)
- Fiberfill
- R22:dec*6(6)
- Tail:8ch-(starting from second to last stitch)-7sc
R1
Do 6 single crochets in the magic ring.
Magic Ring – Utilizes the index and thumb of the left hand to hold the strand and pinches the fabric with the right hand. This aids in making the middle of the ring, or part of it extremely small, which resembles an ‘O’ gap.
Want to learn magic ring , please click:How To Crochet Magic Ring ? l Step-By-Step l Video & Text &Photo
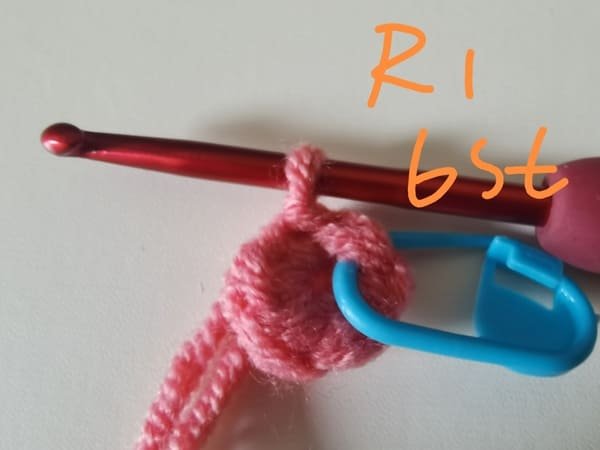
Slip Stitch: will be done with a hook moving through the initial yellow v stitch. we will do a yarn over and extract using the two outer loops lying on the hook. From this process we obtain one loop which is slip stitch.
After the slip stitch (sl), we have 6 stitches for round 1.
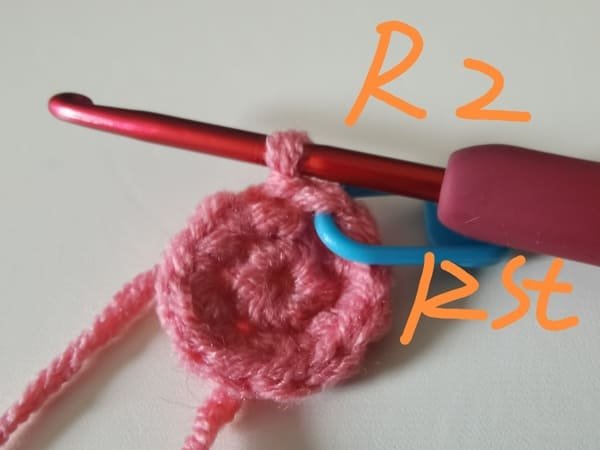
R2
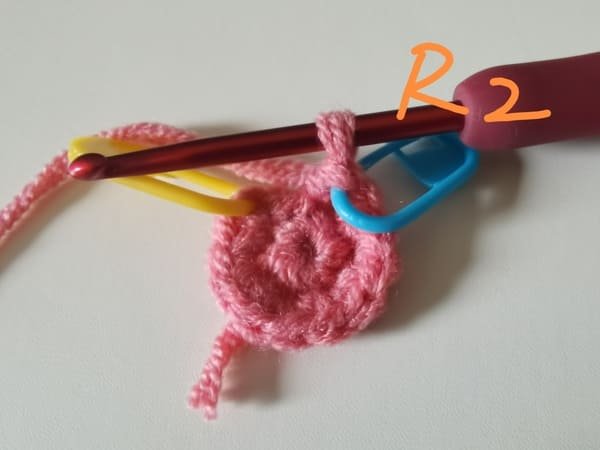
Crochet order inc in each stitch, need repeat 6 times.
We had crocheted 12 stitches for round 2 . (show as left picture).
Hook insert the back loop , then slip stitch(sl)
We need crochet nose for pig.
After the slip stitch (sl), we have 12 stitches for round 2.
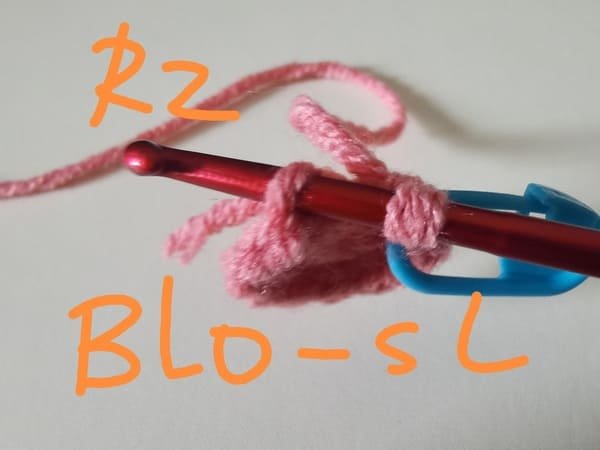
R3
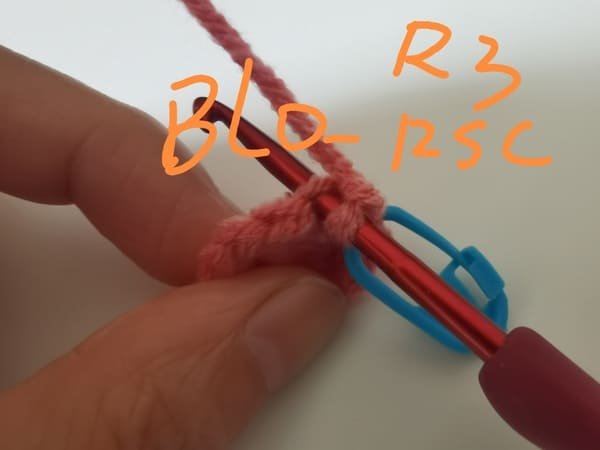
Crochet order: BLO 12 single stitches in next 12 chain stitch( ch).
Hook insert the back loop of stitch firstly.
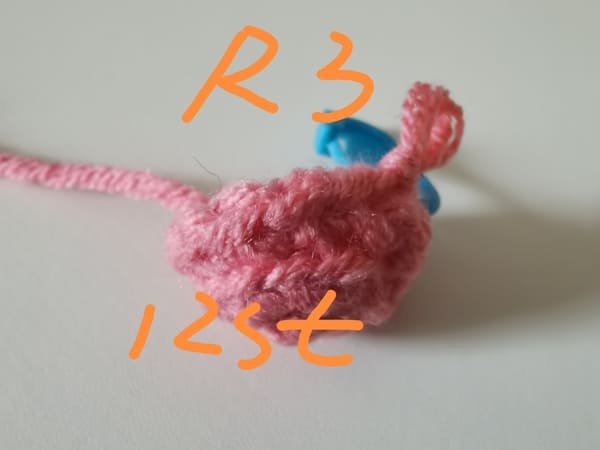
After the slip stitch (sl), we have 12 stitches for round 3.
R4
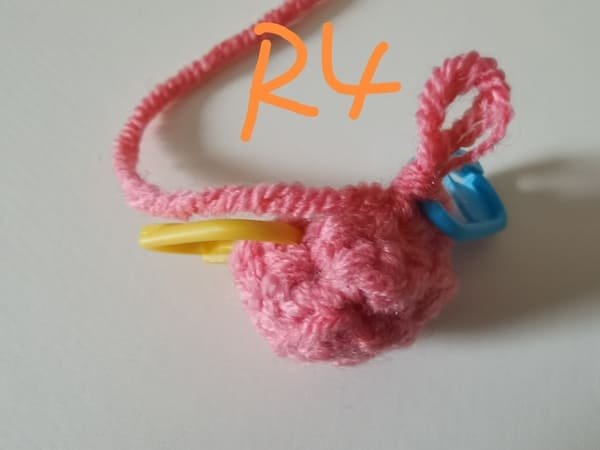
Crochet order: 12 single stitches in next 12 chain stitch( ch).
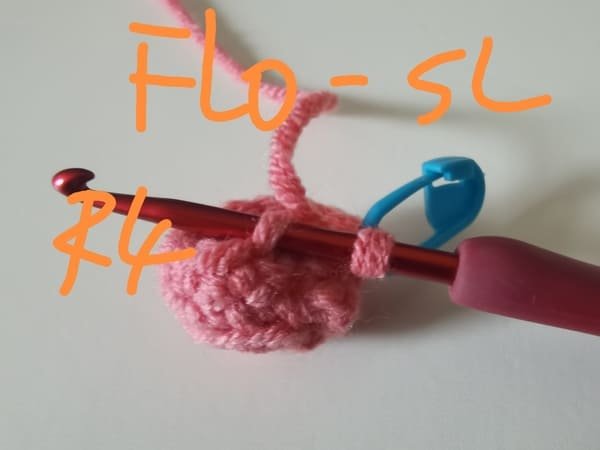
It should be noted that slip stitch with first FLO stitch.
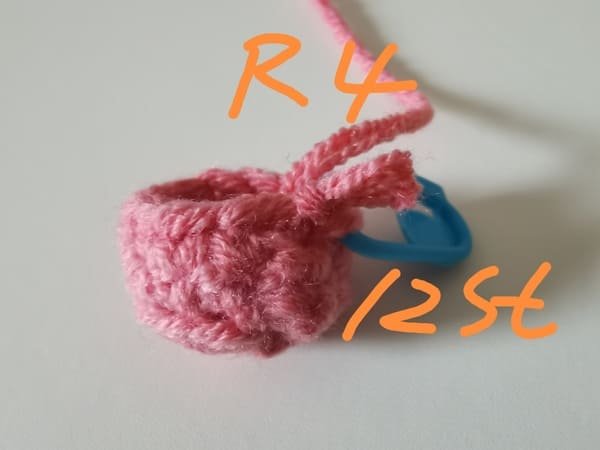
After the slip stitch (sl), we have 12 stitches for round 4.
R5
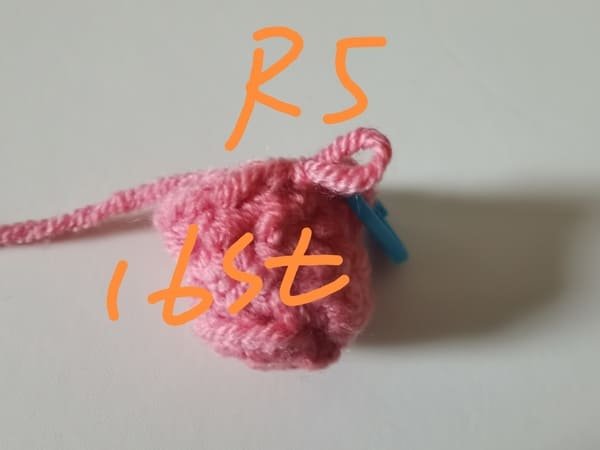
Crochet order-FLO(2sc,inc) repeat 4 times.( we only crochet front loop only)
After the slip stitch (sl), we have 16 stitches for round 5.
R6
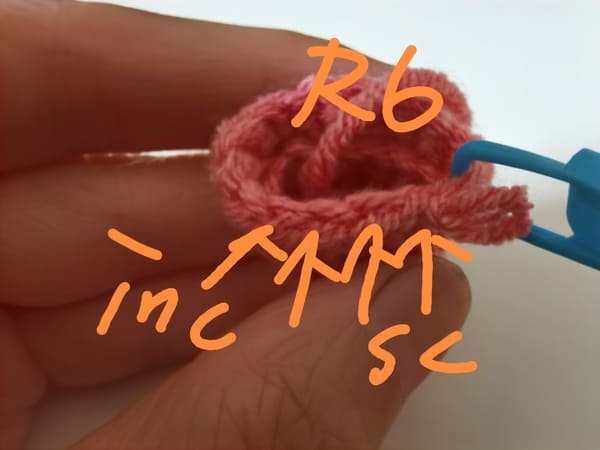
Crochet order:(3sc,inc) repeat 4 times.
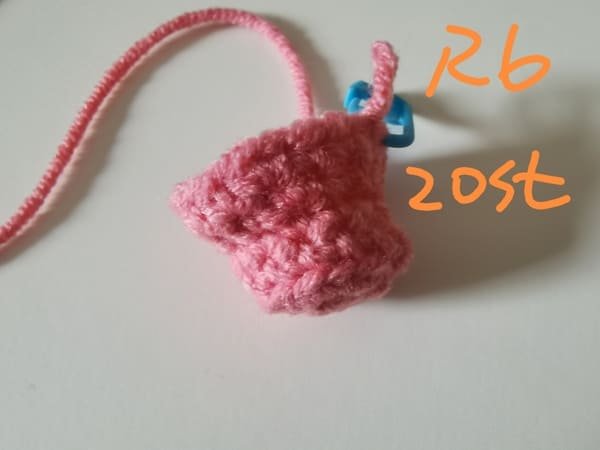
After the slip stitch (sl), we have 20 stitches for round 6.
R7
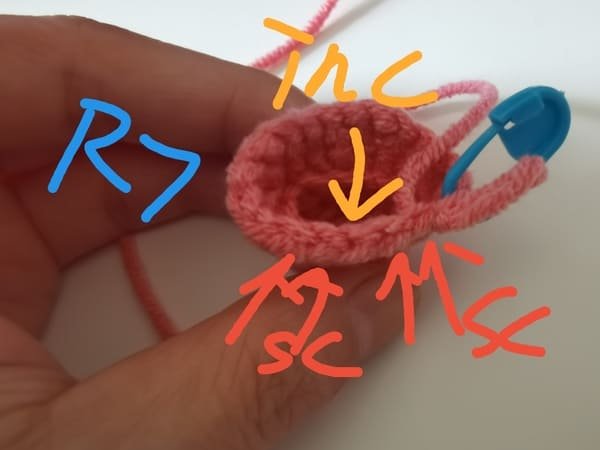
Crochet order:(2sc,inc,2sc) repeat 6 times.
We need to crochet strictly according to the order of the crochet pig pattern, which is the key to ensure the final effect.
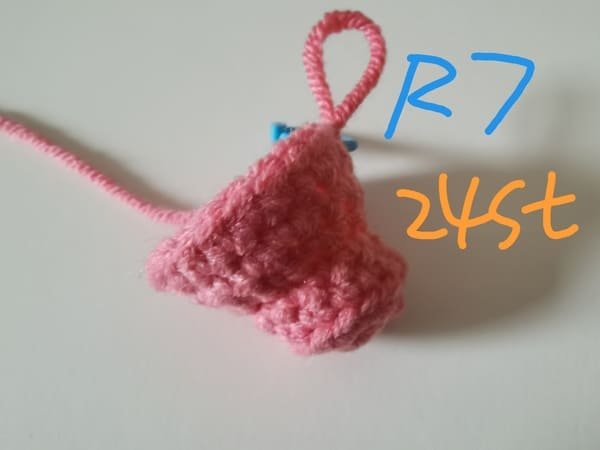
After the slip stitch (sl), we have 24 stitches for round 7.
After each round is completed, we need to count the number of stitches to see if it is consistent with the crochet pattern requirements.
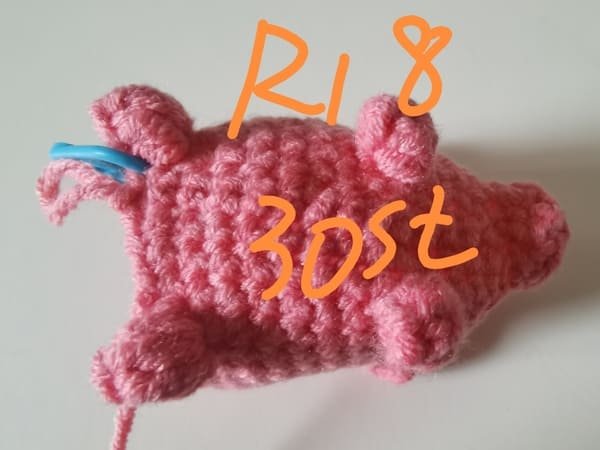
R8
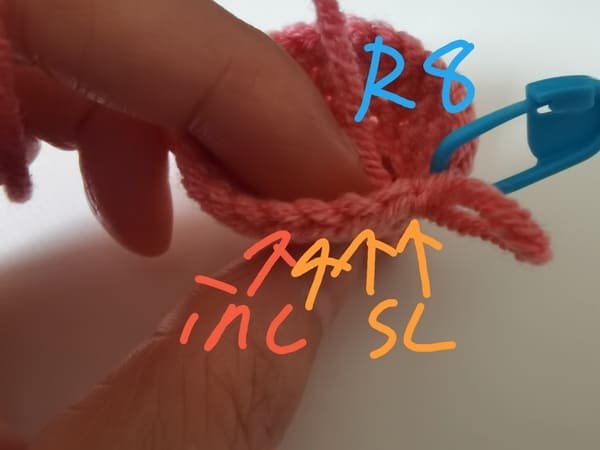
Crochet order:(3sc,inc) repeat 6 times.
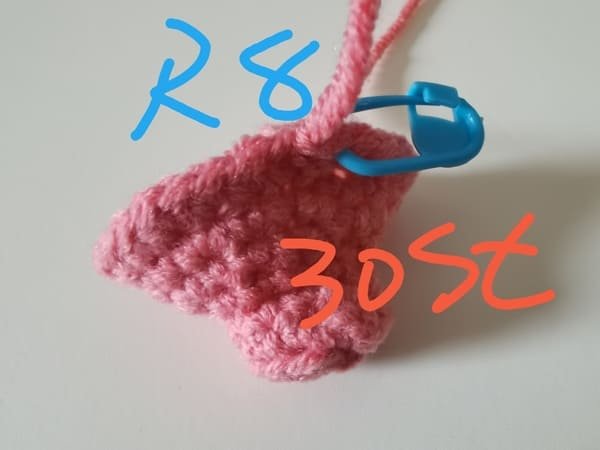
After the slip stitch (sl), we have 30 stitches for round 8.
R9
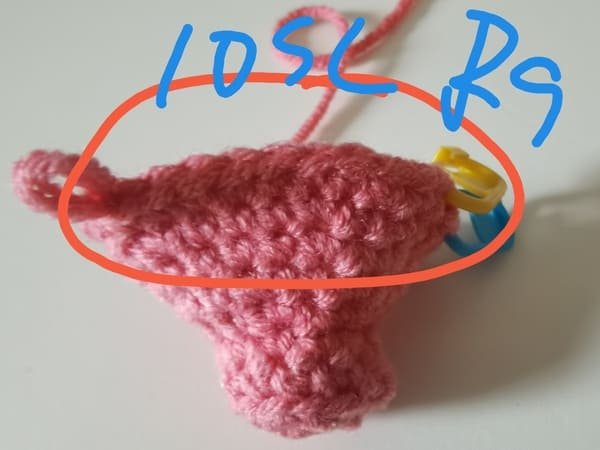
We start to crochet ear shape for this round, which is more complex, so i will write it more details step by step.
Step 1:crochet 10 single crochet (sc) in next 10 chain stitch(ch) firstly.
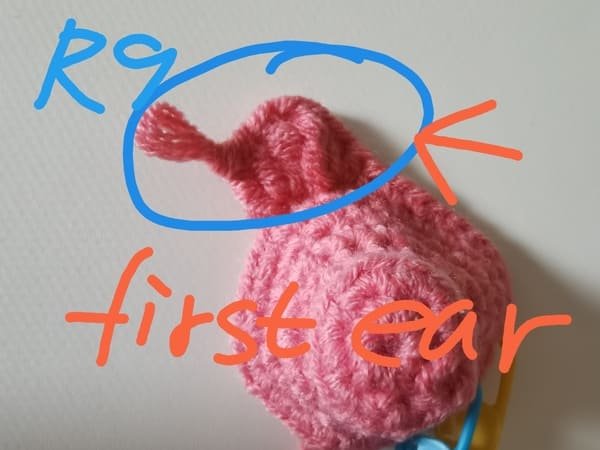
Step 2: FLO crochet (hdc,dc,tr,ch)in the same stitch, then FLO (tr,dc,hdc)in same next stitch,again.
Use above crochet order,we get the first ear of pig.
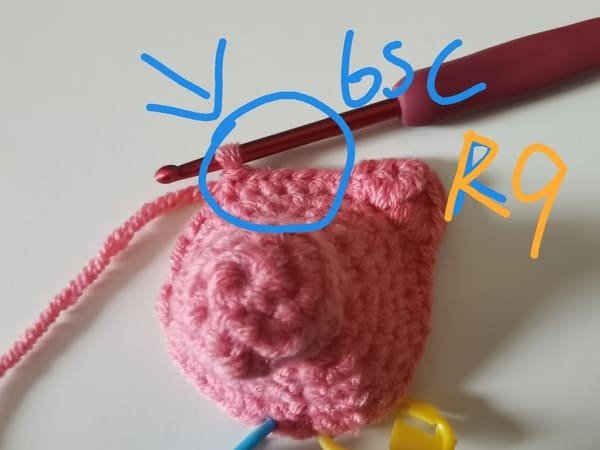
Step 3: We crochet 6 single crochet in the next 6 chain stitch again.
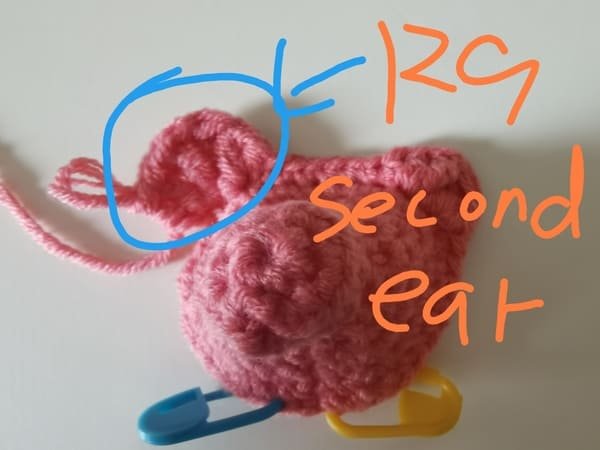
Step 4:FLO crochet (hdc,dc,tr,ch)in the same stitch, then FLO (tr,dc,hdc)in same next stitch,again.
Then we get the second ear which use above crochet order.
Step 5:crochet 10 single crochet (sc) in next last 10 chain stitch(ch) .
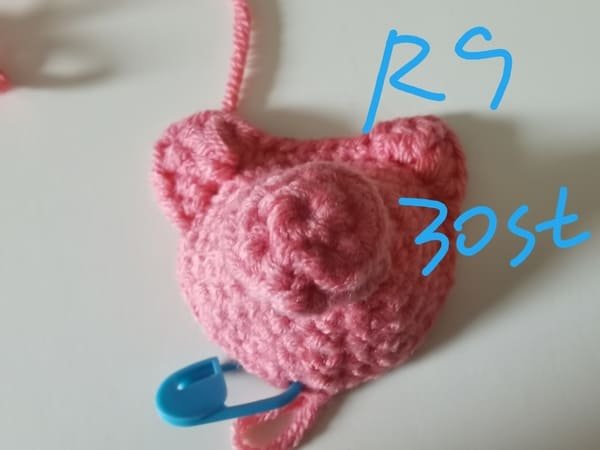
After the slip stitch (sl), we have 30 stitches for round 9.
R10

Crochet order as below:
- Step 1 : 2 sc in 2 ch
- Step 2: FLO-pc in next 1ch
- Step 3: 7sc in next 7 ch
- Step 4: BLO-2sc in next 2ch
- Step 5: 6 sc in next 6ch
- Step 6: BLO-2 sc in next 2ch,
- Step 7: 7sc in next 7 ch
- Step 8: FLO-pc in next 1ch
- Step 9: 2 sc in last 2 ch.
We use above crochet method to make two front feet of pig.
After the slip stitch (sl), we have 30 stitches for round 10.
R11
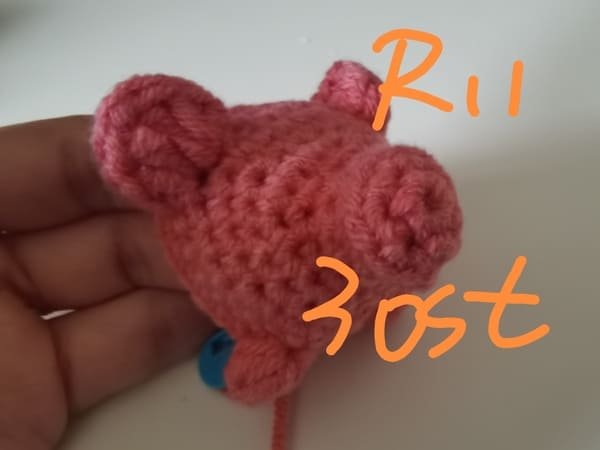
Crochet order :30 single crochets in each 30 chain stitch.
We start to crochet body of pig from this round.
R12
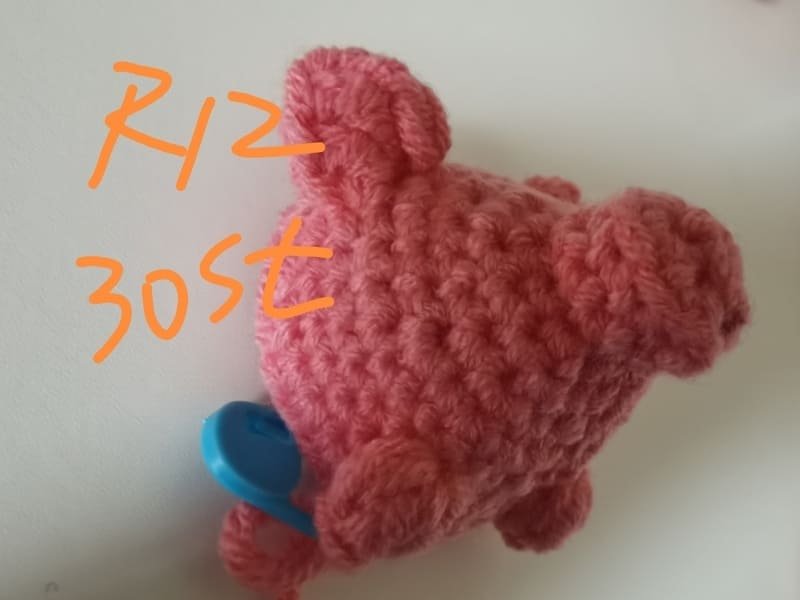
Same as R11.
Same as R12.
Same as R13.
Same as R14
Same as R15.
Same as R16.
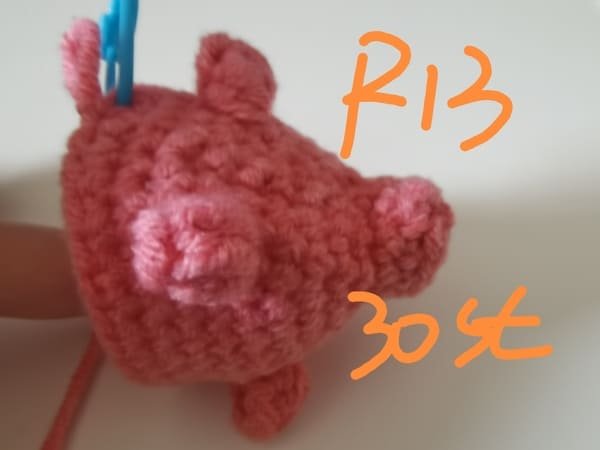
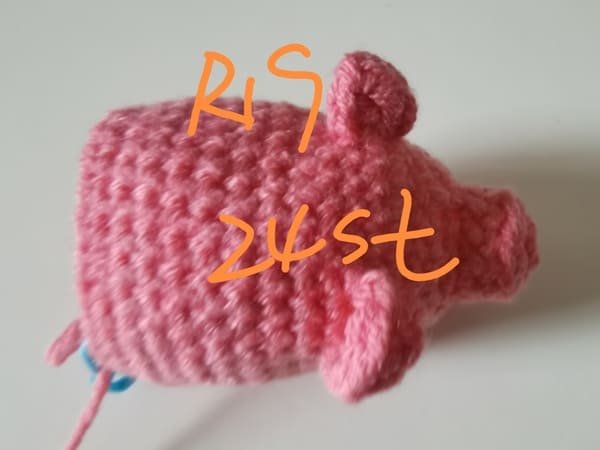
Crochet order as blew;
- Step 1: 4sc in next 4 ch
- Step 2: FLO-pc in next 1 ch
- Step 3: 23 sc in next 23 ch
- Step 4: FLO-pc in next 1 ch
- Step 5: sc in last ch
We use above crochet method to make two back feet of pig.
After the slip stitch (sl), we have 30 stitches for round 18.
Crochet order:( 3 sc ,dec) repeat 6 times
After the slip stitch (sl), we have 24 stitches for round 19.
From this round, we start to crochet invisible des.
If you want to learn des , please click Single Crochet Decrease -Three Method In More Details Slowly For Beginner | Video&Text&Picture
R20
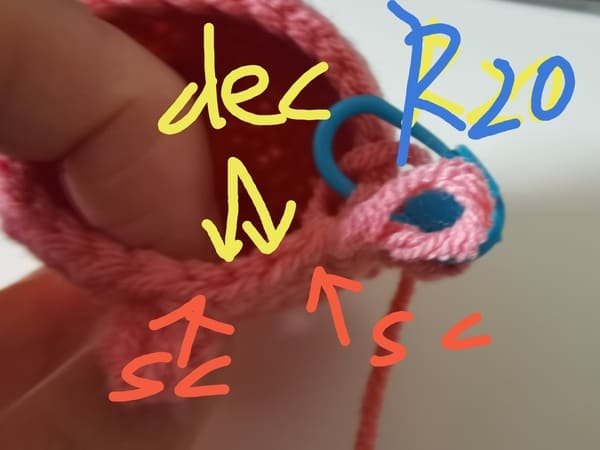
Crochet order:( sc ,dec,sc) repeat 6 times
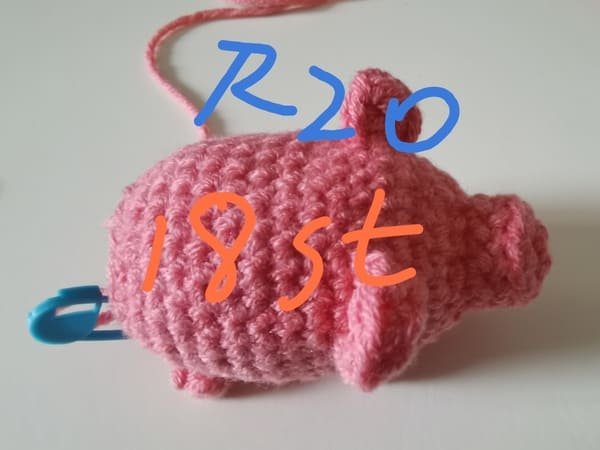
After the slip stitch (sl), we have 18 stitches for round 20.
R21
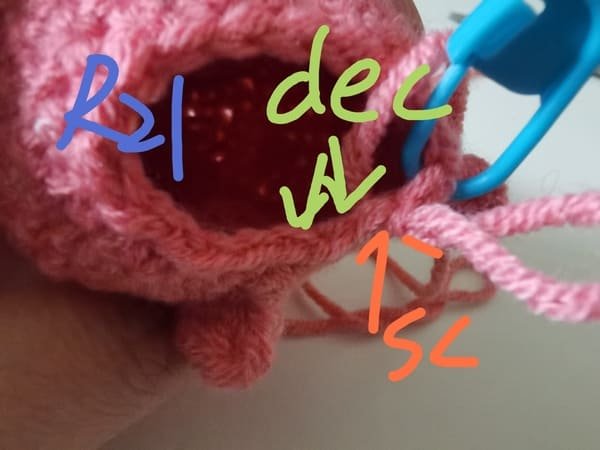
Crochet order:( sc ,dec) repeat 6 times.
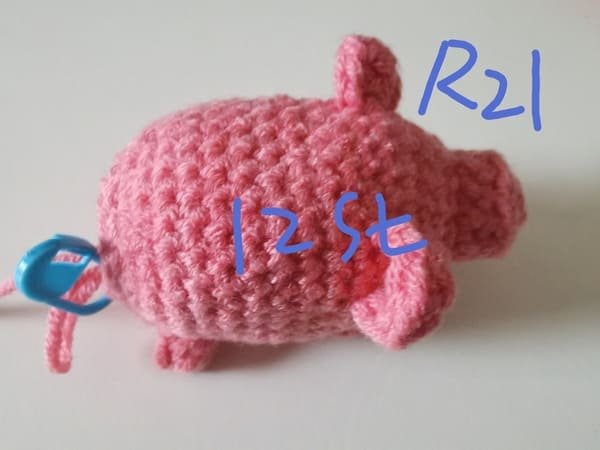
After the slip stitch (sl), we have 12 stitches for round 21.
Fiberfill
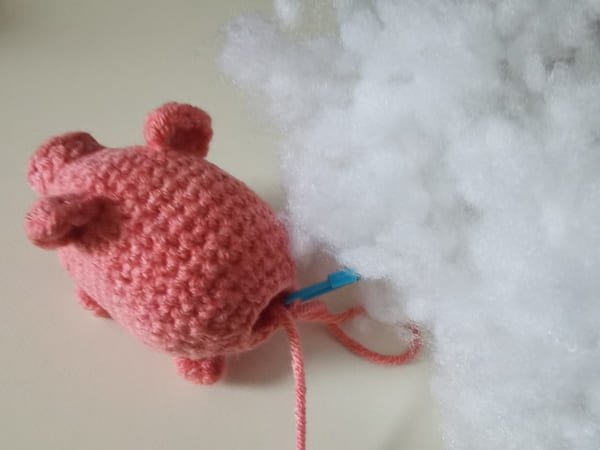
We’ve completed crocheting the body, so let’s get our fiberfill. We’ll stuff it gently into the hole at the base of the pig’s torso, ensuring an even distribution to maintain a soft, cuddly form while preserving its shape. Let’s avoid overfilling.
The fiberfill is completed.
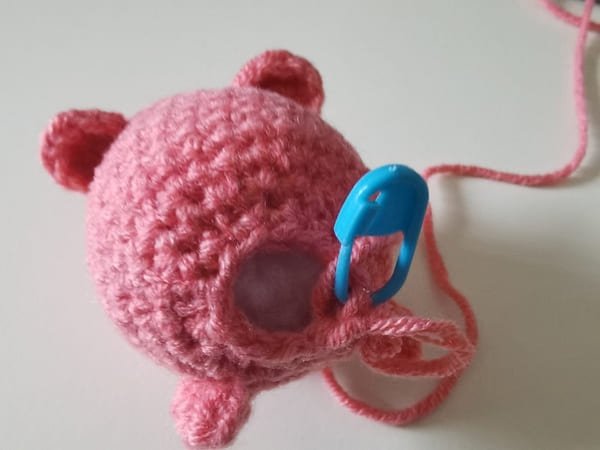
R22
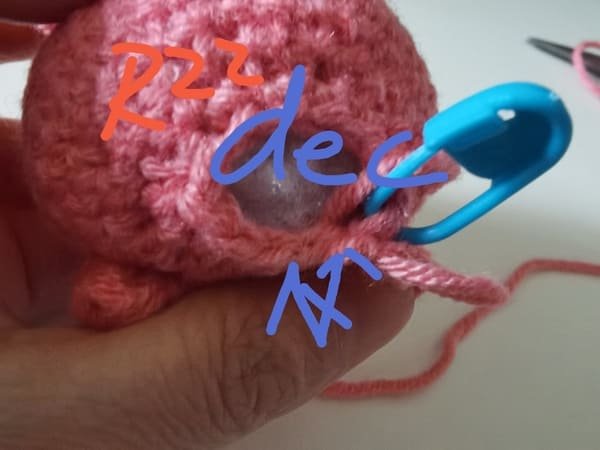
Crochet order:( dec) repeat 6 times.
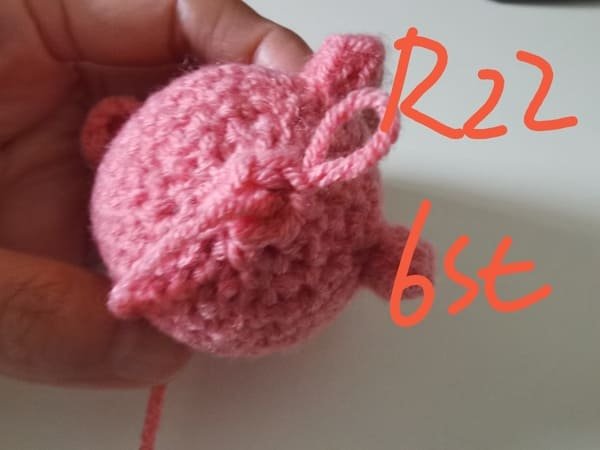
After the slip stitch (sl), we have 6 stitches for round 22.
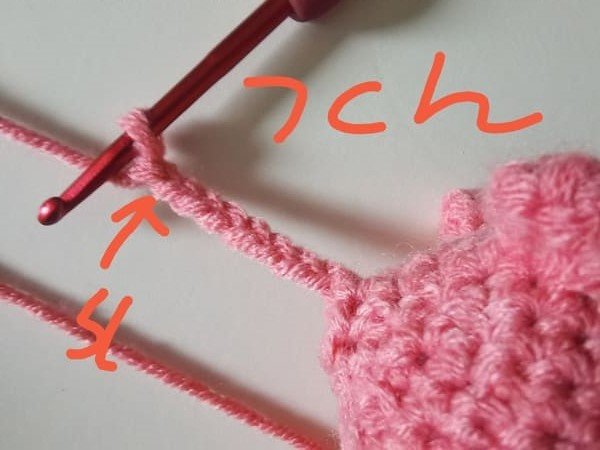
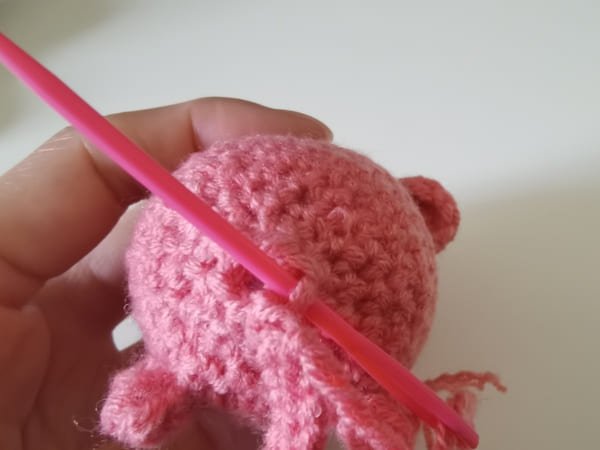
Crochet the tail (use pink )for crochet pig
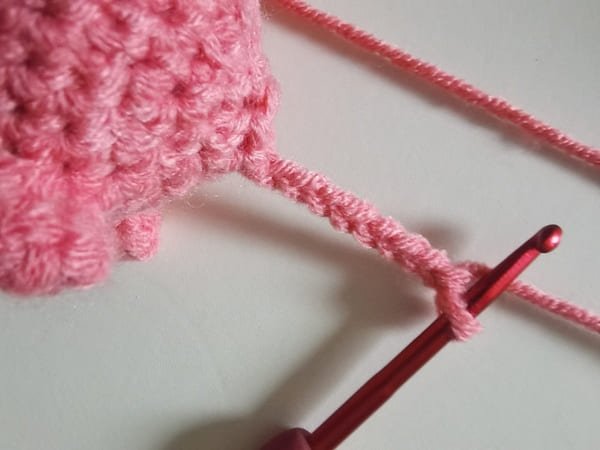
Step 1: crochet 8 chain stitch at the slip stitch.
Step 2: Crochet the main body (pink )for crochet pig
Now working on the second chain from the hook (so you skip the first chain and crochet into the second):
1 sl in 2nd ch from hook ,7sl in next 6 ch.
Sorry for that, 7 ch should be 8 ch.

The tail is completed.
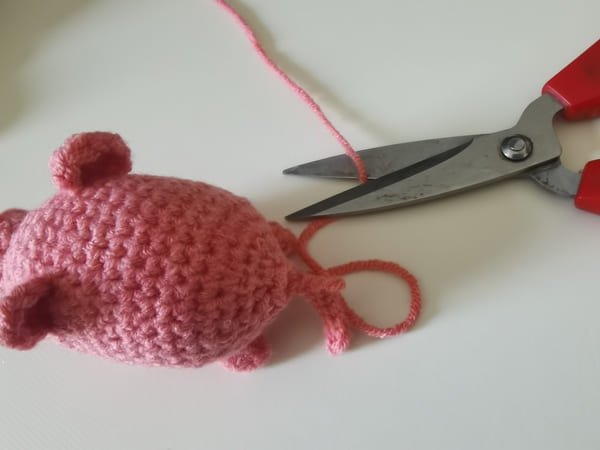
Leave 8 cm yarn end and cut yarn end for pig.
Pick the front loop to tighten the opening ,which is no gap .
Then we conceal yarn end again.
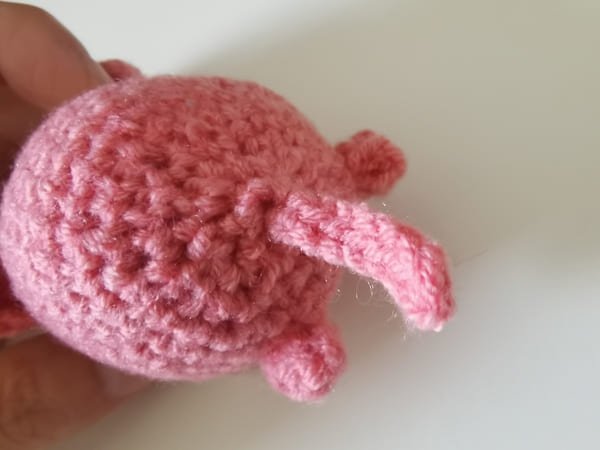
The tail with no gap as picture.
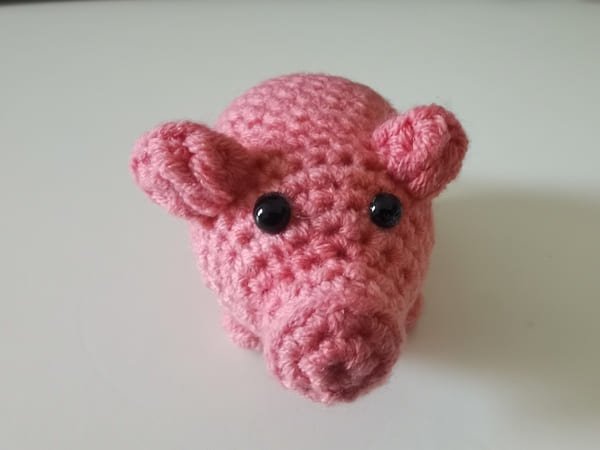
Then we glue the eyes on the round 6, Just below the ears.
Leave there stitches between two eyes.
Side of crochet pig.
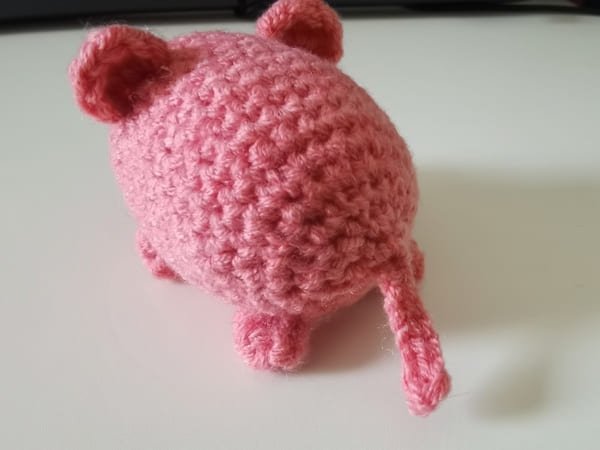
Bottom of crochet pig.
Reference sources
1.Learn the most comprehensive guide for single crochet(sc)
Author:Sarah Stearns
Publication date: on June 15, 2021, updated:December 14, 2024
Title: How to single crochet (sc)for beginners
Summary as blow:
- Step-by-Step Single Crochet for Beginners
- Single Crochet into a Foundation Chain
- Single Crochet into another Row
- Single Crochet in the Round
- Increases and Decreases
- Working Single Crochet in Different Loops


