Crochet Camera Bag Tutorial |Using Braided Macrame Cord
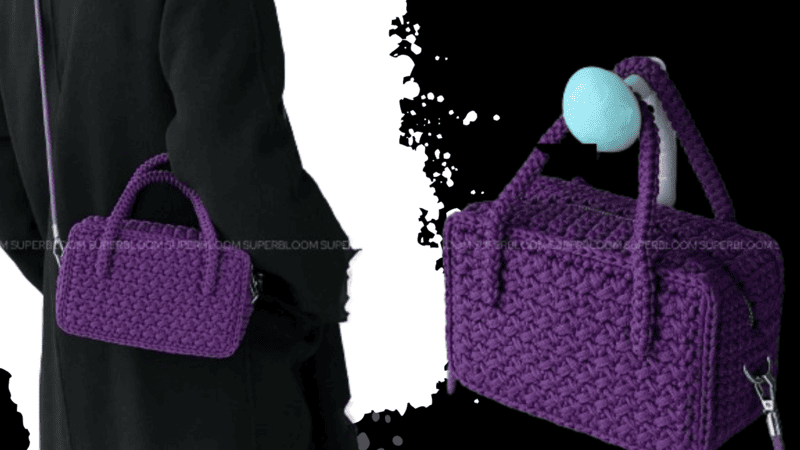
Table of Contents
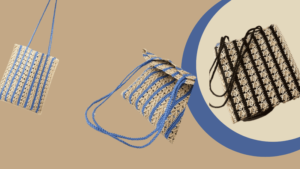
Crochet camera bag : as much as you appreciate unique handmade accessories, you will appreciate more this crocheted camera bag constructed using braided macrame cord.
It is modern, robust and ideal for carrying your camera, phone and other essentials while on an adventure.
This is a comprehensive guide on step-by-step processes involving materials and finishing the bag. Thus, you will be able to make your own distinctive and sturdy crochet camera bag.
Why we love crocheting our own camera bag
Having the capability to make a handsome yet functional bag brings a sense of satisfaction and accomplishment. With a braided macrame cord, we are able to obtain a smooth, structured finish which gives the bag it’s shape beautifully. Perfect for a camera bag which needs to be strong and protective.
Smooth texture and the subtle sheen of macrame cord is a modern take compared to the traditional, yarn, cotton. Additionally, it is incredibly easy for beginners as it does not split and provides a neat, even finish for every stitch.
Having the ability to crochet your very own camera bag gives the satisfaction of knowing you were able to make it from scratch.
Everything is customizable, from the strap length to the bag’s size and even the colors. Personally, I would prefer a beige minimalist tone, but the bright color design is a good option as well.
Material kit for crochet camera bag
💙hook & yarn needle & marker buckle : https://amzn.to/3TXavWn
💙Braided purse straps : https://amzn.to/4gOWBjw
💙D buckle :https://amzn.to/3IRosmE
💙Zipper: https://amzn.to/3WgOmDp
💙Braided macrame cord : https://amzn.to/4nxcjCo
💙 Mesh canvas sheets: https://amzn.to/4mMWHtA
💙Black felt fabric sheets: https://amzn.to/471wZN7
Abbreviation for crochet camera bag
- ch = Chain stitch
- sc = Single crochet
- sl =Slip stitch
- st(s) =Stitch(es)
- R=Round
- HDC in st below=Half double crochet in stitch below
Video for crochet camera bag
Learn how to crochet a trendy camera bag with braided macramé cord and with us brand each step with the base and strap.
Each step is perfect for newbies as well as the camera lovers. For more tutorials on DIY bags subscribe to us and let us make something beautiful together.
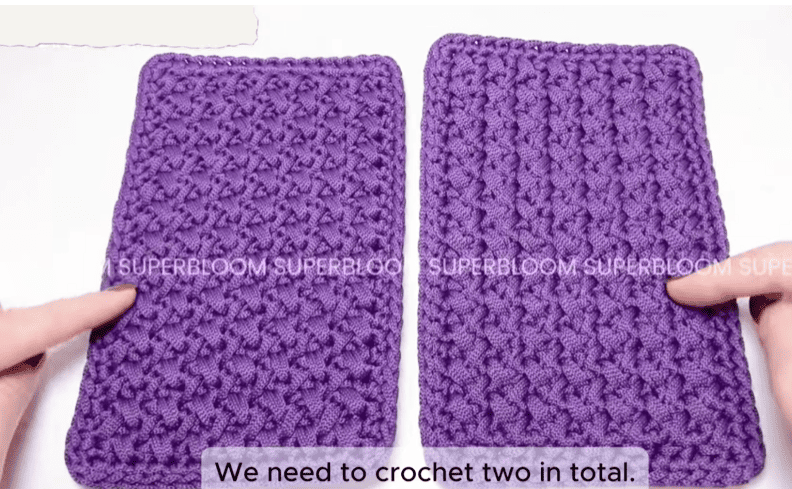
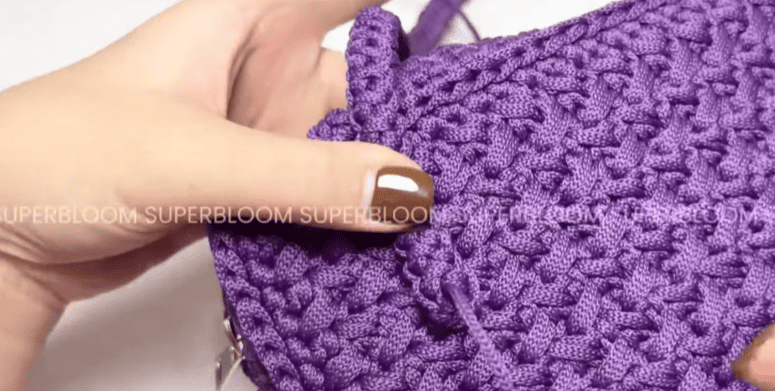
Crochet front & back pieces
| Row | Instructions | Notes (We Tips) |
|---|---|---|
| Base | ch 16 | This will be the foundation chain for the bag bottom. |
| R1 | sc in the 2nd ch from hook, then sc in each ch across (15 sc total). Work each stitch in the purl stitch. | We make sure our tension stays even for a neat, sturdy base. |
| R2–R26 | ch 1, flip over, then (sc, HDC in stitch below) repeat across, and end each row with 1 sc in the last stitch. | We repeat this pattern to build the body texture — the HDC in stitch below gives a subtle diagonal effect. |
| R27 | Work around the edges: 2 sc at each corner, 1 sc in each remaining stitch along the sides. Finish the last stitch with an invisible slip stitch using a yarn needle, then conceal the yarn end. | We ensure the corners are even and secure. Total: 86 stitches around. |
Crochet handle
| Step | Instructions | Notes (We Tips) |
|---|---|---|
| 1 | Leave a 35 cm yarn tail before starting. | We’ll use this yarn tail later for sewing the handle securely onto the bag. |
| 2 | Use the crab stitch (reverse single crochet) to crochet the strap. Keep crocheting until it reaches your desired length. | We adjust the length depending on whether we want. |
| 3 | Leave another 35 cm tail, then cut the yarn and pull through to fasten off. | We’ll use this second tail to sew the other end of the strap to the bag body. |
Crochet side & bottom
| Row / Step | Instructions | Notes (We Tips) |
|---|---|---|
| Base | ch 11 | We start the base for the zipper section. |
| R1 | sc in the 2nd ch from hook, then 10 sc in each purl stitch. | We keep our tension even to form a neat base edge. |
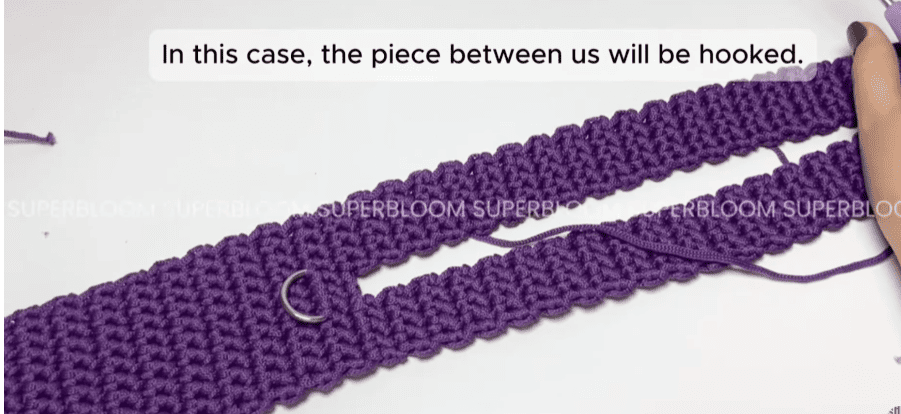
| R2 | ch 1, flip over, 3 sc; place a D-buckle on the front side of the fabric; make 4 sc around the D-buckle , then 3 sc. | We make sure the D-buckle is centered and firmly held in place. |
| R3–R44 | ch 1, flip over, 10 sc in each row. | We crochet straight rows to build up piece section evenly. |
| R45 | ch 1, flip over, 3 sc; place a D-buckle on the back side of the fabric; make 4 sc around the D-buckle , then 3 sc. | We attach the second D-buckle on the opposite side for balance. |
| R46 | ch 1, flip over, 10 sc. | We keep the edges straight and firm. |
| Zipper Part R47–R86 (Left Side) | ch 1, flip over, 4 sc; leave a 25 cm yarn tail, then cut yarn. | We’ll use this tail later for sewing the zipper onto the bag. |
| Zipper Part R47–R86 (Right Side) | On the back side of the D-buckle , start from the 7th stitch of R47, ch 1, flip over, 4 sc; leave a 25 cm yarn tail, then cut yarn. | We ensure both zipper sides match perfectly for a smooth zip closure. |
Sew zipper
| Step | Instructions | Notes (We Tips) |
|---|---|---|
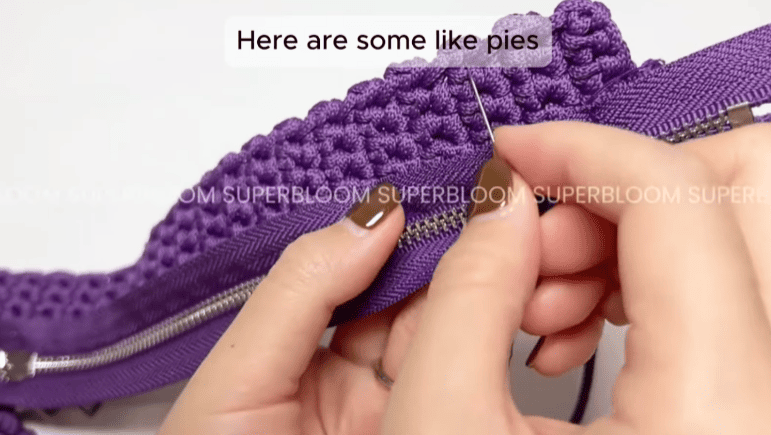
| 1 | Place the zipper on the back side of the D-buckle section. | We make sure the zipper is aligned evenly before sewing. |
| 2 | Ensure the zipper fully covers the crocheted zipper part. | We check that both sides are straight and symmetrical for a neat finish. |
| 3 | Secure the zipper end and fabric with a yarn needle. Start stitching from the small gaps under each stitch — this makes the seam more beautiful. | We keep stitches small and hidden for a clean edge. |
| 4 | When sewing the zipper sides, insert the yarn needle through the zipper part on one side, and through the outer raised ridge of the main fabric on the other. Align your stitches carefully to keep them even and straight. | We pay attention to how the needle enters and exits so the seam aligns perfectly with the raised edge. |
| 5 | Finish sewing by tying a knot on the back side of the fabric. Cut the yarn and weave in the ends neatly. | We make sure the knot is secure and the thread is hidden for a professional look. |
Sew mesh sheet
| Step | Instructions | Notes (We Tips) |
|---|---|---|
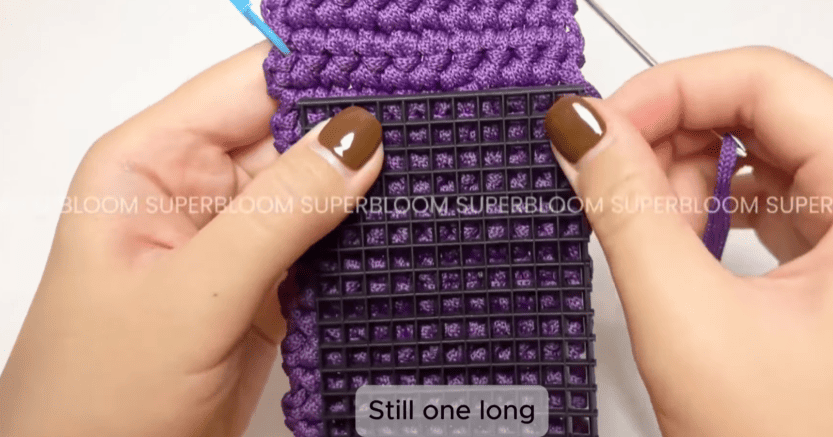
| 1 | From each D-buckle, count 10 rows left and right, and place a marker stitch on each side. | We ensure the markers are evenly spaced; the distance between them should be 17 cm. |
| 2 | Prepare a mesh sheet with dimensions 17 cm × 6 cm. | We double-check measurements for a perfect fit before sewing. |
| 3 | Align the outer edge of the mesh sheet with the corresponding stitches on the bag fabric. Sew stitch by stitch so that each mesh sheet matches a fabric stitch. | We take care to maintain even tension and alignment for a clean look. |
| 4 | Once sewing is complete, tie a knot on the back side, cut the yarn, and conceal all loose ends. | We make sure the knot is secure and threads are hidden for a professional finish. |
Sew black felt fabric sheets
| Step | Instructions | Notes (We Tips) |
|---|---|---|
| 1 | Cut black felt fabric sheets for reinforcement: 30 × 6 cm, and additional pieces for the two small sides of the zipper part and the front and back fabric panels. | We choose felt sheets that match the bag size and thickness to strengthen weak areas. |
| 2 | Place each felt sheet on the corresponding crochet piece. Sew around each sheet: insert one stitch through the felt sheet, then one stitch through the fabric beneath. | We ensure the felt is securely attached and aligns with the fabric’s edges. |
| 3 | Once stitching is complete, tie a knot on the back side, cut the yarn, and conceal all loose ends. | We check that the stitches are even and that no thread is visible on the front for a neat finish. |
Sew front & back piece with side & bottom
| Step | Instructions | Notes (We Tips) |
|---|---|---|
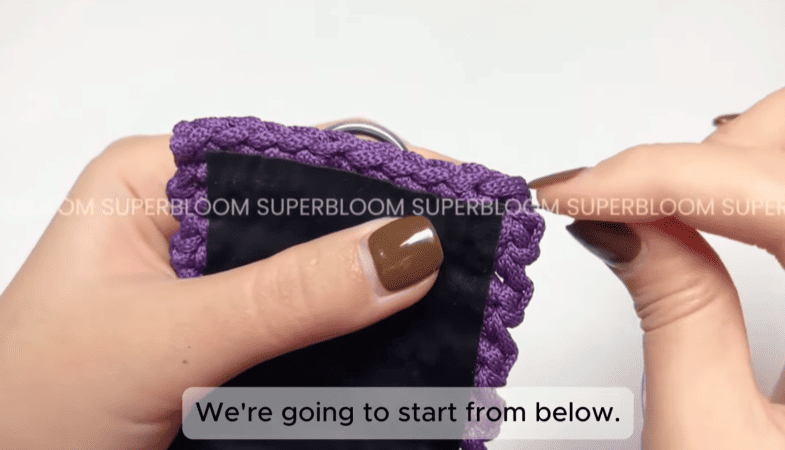
| 1 | Place marker stitches on the four corners of both the front and back fabric . | We ensure all corners are aligned to make assembly easier. |
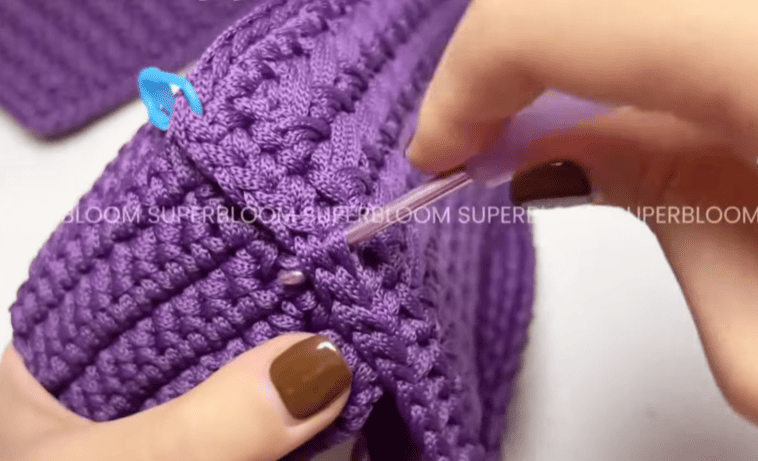
| 2 | Align the front and back pieces with the side & bottom piece to form the camera-shaped bag. | We check the alignment so the bag shape is balanced and symmetrical. |
| 3 | Using slip stitches (sl st), sew stitch by stitch, matching one stitch on the panel to one stitch on the side/bottom pieces. | We keep the tension even for a neat seam. |
| 4 | Finish the last stitch with an invisible slip stitch, then tie a knot on the back side, cut the yarn, and conceal all loose ends. | We make sure the knot is secure and the seam looks clean and professional. |
Sew handle
| Step | Instructions | Notes (We Tips) |
|---|---|---|
| 1 | Find the attachment points: from the bag opening, count 3 rows down, then 3 rows left and right from bag opening. The intersection is where the hand strap will be sewn. | We ensure both sides are symmetrical for a balanced strap. |
| 2 | Using a yarn needle, start stitching from the handle, then insert the needle from the back side of the handle to the bag opening. Continue sewing along the handle to the bag edge. | We always sew from the back side to keep stitches hidden and neat. |
| 3 | Once finished, tie a knot, cut the yarn, and conceal all loose ends. | We make sure the knot is secure for durability. |
| 4 | Repeat the same process for the back side handle. | We ensure both straps are attached evenly and firmly. |
Install strap
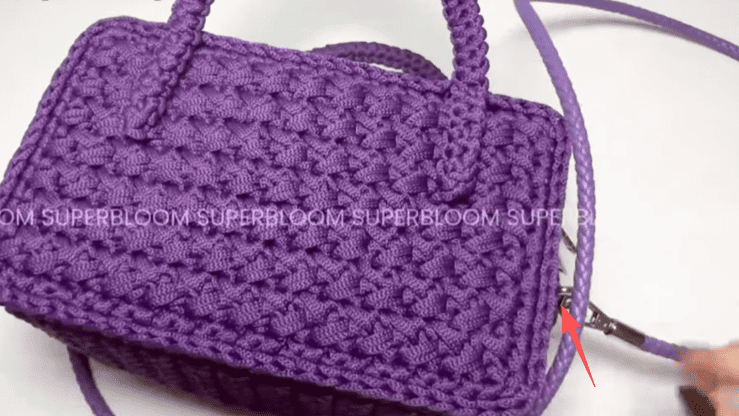
We put the strap on the D buckle of side of bag.
Base stitch for beginners
We’ve all been there! Here are some basic stitch we’ve learned along the way:
How To Crochet Magic Ring ? l Step-By-Step l Video & Text &Photo
Chain Stitch |Step By Step Guide| Text & Photo &Video
Single Crochet-You Want To Know The Most Detailed Information
Half Double Crochet In The Round-The Complete Guide
Double Crochet Stitches For Beginners
Reference sources
1.Learn the most comprehensive guide for single crochet(sc)
Author:Sarah Stearns
Publication date: on June 15, 2021, updated:December 14, 2024
Title: How to single crochet (sc)for beginners
Summary as blow:
- Step-by-Step Single Crochet for Beginners
- Single Crochet into a Foundation Chain
- Single Crochet into another Row
- Single Crochet in the Round
- Increases and Decreases
- Working Single Crochet in Different Loops