


Crochet Raffia Bag: Granny Square Small Bag Tutorial
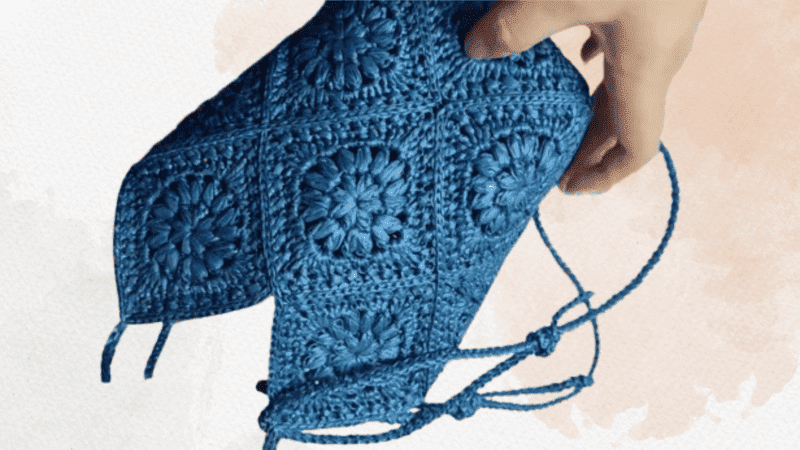
Table of Contents
Crochet raffia bag: When searching for an accessible crochet endeavor that marries aesthetic appeal, environmental mindfulness, and functional elegance, this is the answer you need. This tutorial will guide you through the creation of an eye-catching, Granny Square Small Bag worked entirely in raffia yarn. Marrying the ageless appeal of granny squares with the contemporary texture of raffia, this handbag is both robust and stylish—ideal for elevating daily outfits.
At the conclusion, you will possess the skills to craft the bag, as well as the techniques to tailor every detail to your unique aesthetic. Ready to get started? Let’s begin the journey!
Why we crochet raffia bag
Since their debut, granny squares have earned their place as a beloved motif in the crochet repertory. Transparent in their deceptively low barrier to entry, they’re also modular, lending themselves equally well to the crochet novice and the seasoned artist. Swap the traditional wool for raffia and the inevitable patchwork transforms into a bag that marries lightness to rigidity—good-hearted company for beach strolls, impulse purchases at the farmers’ market, and the occasional informal date with a mimosa in the sun.
A handful of qualities keeps this pattern captivating:
First, a rank beginner can double-speed through the task; the only prerequisite is a granny square under the belt.
Second, that single square’s cousins—color palette, dimension, and strap—shuffle at the crocheter’s discretion, customizing the work to taste, mood, and the specific shorthand of chores that any week can bring.
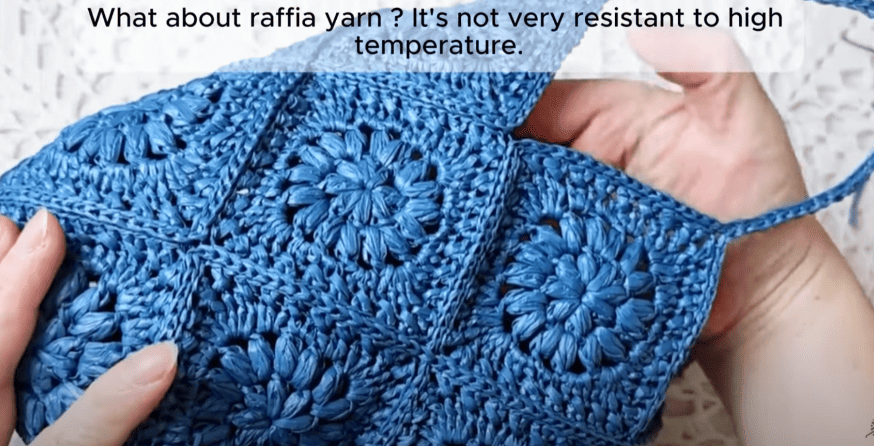
Third, a strand of raffia is more than textural; the waterproof fiber returns to dirt rather than weighing oceans of plastic upon future generations.
Finally, the grass-colored fibers in the motif’s open lazy lace feel as chic as a Man Ray photo, fusing the irrefutable heritage of crochet with sun-dried, laissez-faire glamour.
Base stitch for beginners
We’ve all been there! Here are some basic stitch we’ve learned along the way:
How To Crochet Magic Ring ? l Step-By-Step l Video & Text &Photo
Chain Stitch |Step By Step Guide| Text & Photo &Video
Single Crochet-You Want To Know The Most Detailed Information
Half Double Crochet In The Round-The Complete Guide
Double Crochet Stitches For Beginners
Material kit
💙hook & yarn needle & marker buckle : https://amzn.to/3TXavWn
💙raffia yarn : https://amzn.to/4mjPwbQ
Abbreviation
- ch = Chain stitch
- sc = Single crochet
- sl =Slip stitch
- st(s) =Stitch(es)
- R=Round
- hdc=Half double crochet
- sk=Skip
- Jub st=Jujube stitch
- tr=treble stitch
- dc=Double crochet
- xhdc=Crossed half double crochet
Video
Participate with us in crafting an elegant Granny Square Small Bag using distilled-attentive rational raffia.
Accompanying video tutorials illustrate, stage by stage, the formation of the individual motifs, their seamless assembly, the subsequent elevation of the sides, and the secured anchoring of robust handles.
Collectively, we shall produce a chic, environmentally-sound accessory ideally suited for summer excursions and habitual wear.
Crochet piece
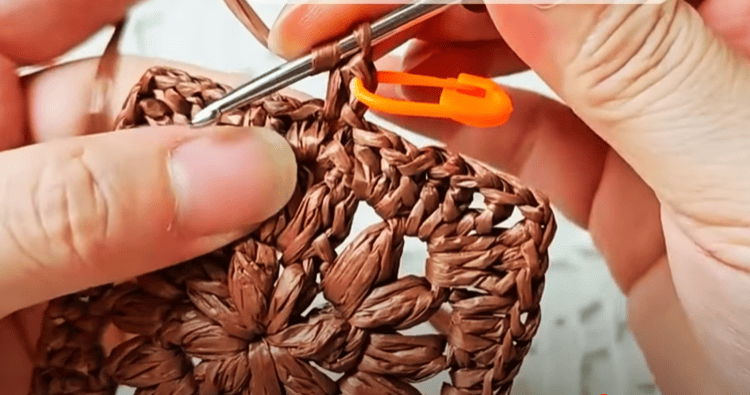
We will employ the same crocheting technique to produce the requisite sixteen miniature flower pieces.
Given the inherent coarseness of raffia, we intervene to mitigate discomfort: a thin film of petroleum jelly is first spread across the dorsal surface of the hand and then a minute transfer is made to the hook itself. This precaution allows the textile to glide more effortlessly and alleviates the abrasiveness commonly associated with the material.
| Round | Instructions |
|---|---|
| R1 | We work (Jub stitch, 2 chains) 7 times, then 1 Jub stitch, 1 chain and slip stitch to close the round. |
| R2 | We slip stitch into the space between two patterns; then work {(Jub stitch, 2 chains, Jub stitch), 2 chains} 15 times, then (Jub stitch, 2 chains, Jub stitch), 1 chain and slip stitch to close. |
| R3 | We slip stitch into the space between two patterns; chain 1, then work {2 single crochet, 3 half double crochet, (2 double crochet, 1 treble crochet, 1 chain, 1 treble crochet, 2 double crochet)} 4 times, then slip stitch to close. |
| R4 | We chain 1, then work crossed half double crochet (xhdc) to the end. For the last stitch, we make an invisible stitch, use a yarn needle, and conceal the yarn end. |
Sew piece and crochet handle
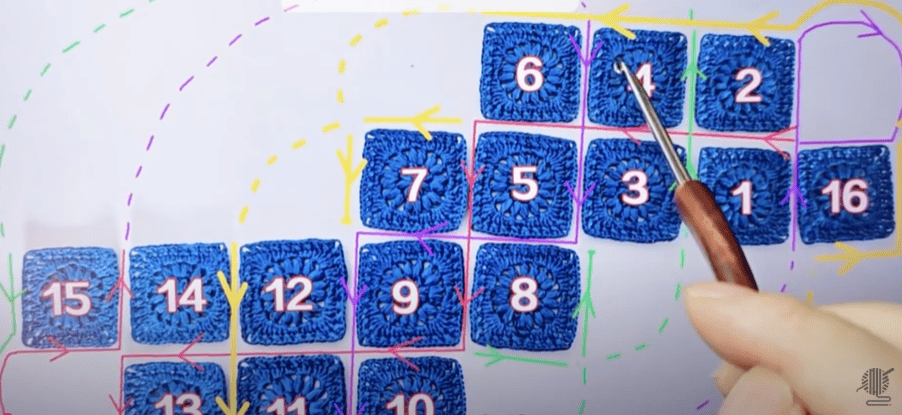
We begin by linking the 16 small crochet motifs according to the numbered sequence illustrated in the accompanying diagram. Because the orientation and attachment of each piece may pose a small challenge, we have prepared a supplementary video tutorial; see Part 2 for a step-by-step visual walkthrough.
To start, the sixteen motifs are arranged face-up on a flat work surface, distributing color and pattern to achieve visual balance. This preliminary step enables us to assess the overall composition and guarantees that the completed bag will display a unified appearance. We suggest laying the squares in a gridded visible section, ensuring that all edges and corners meet the guideline before proceeding with stitching.
After confirming that the arrangement is satisfactory, we begin the assembly. Selecting a pair of adjoining motifs, we sandwich the right sides together, then work a slip stitch,along the adjoining edges, maintaining a consistent yarn tension. This approach produces a sturdy seam that is tight enough to support the piece while preserving the flexibility necessary for a smoothly structured bag.
As we stitch the squares into the main body of the bag, we pay equal attention to the handle. Integrating the handle into our main assembly simplifies alignment, creating a unified appearance and a secure attachment. We choose between crocheting directly onto the exposed top loops of the squares or first creating a discrete, elongated strap that we incorporate as the last row of first-row squares is joined. To guard against stress, we reinforce the join by passing the yarn through three or four extra stitches before continuing.
At each mindful stage, we verify that seams match hash mark to hash mark and that the bag keeps its designed rectangular geometry. Any coil of yarn that might have slipped into sight is tucked or cut. Progress is deliberate, mindful; we move stitch by stitch, row by row, weaving in every end before its tension can bias the next column or row.
With constant care, we convert fragmented squares into a resilient, beautiful bag and an equally resilient handle, the two becoming one. This cohesive belt becomes not merely an accent but an element of the structural design and durability. The correct junction of strap to square plane balances an otherwise heavy bias pull, preventing deformation.
Reference sources
1.Learn the most comprehensive guide for single crochet(sc)
Author:Sarah Stearns
Publication date: on June 15, 2021, updated:December 14, 2024
Title: How to single crochet (sc)for beginners
Summary as blow:
- Step-by-Step Single Crochet for Beginners
- Single Crochet into a Foundation Chain
- Single Crochet into another Row
- Single Crochet in the Round
- Increases and Decreases
- Working Single Crochet in Different Loops


