Hammock Bag Kit
$29.99
The Hammock Bag Kit appeals to us because it bundles every component needed to craft a striking, handmade bag.
By ordering the kit, we eliminate hours spent tracking down supplies; all the yarn, hooks, and clearly written instructions arrive pre-organized.
This project is equally welcoming to novices and seasoned crocheters who wish to refresh their skills while crafting a chic summer tote.
Description
Table of Contents for hammock bag kit
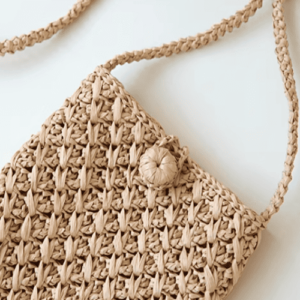
Hammock bag kit : Crocheting a hammock bag is one of the most satisfying projects we have ever tackled. The pattern is relaxed enough for beginners, yet interesting enough for seasoned crafters, so everyone has fun.
As you work each round, you get to try different stitches and play with shaping and assembly. By the time the last yarn end is woven in, you will have a bag that looks great and a new pile of skills tucked into your crochet toolbox.
In this guide well walk you through every stage creating the body, sewing the sides, and slipping on the comfy handles. Grab your hooks and lets make this piece of summertime magic together!
Why we love the hammock bag
The hammock bag feels almost airy, like a gentle summer breeze. Because the open stitches let light pass through, it never gets bulky even when packed.
That makes it our go-to buddy for lazy beach days, quick trips to the farmers market, or any errand where hands-free carrying is a win.
It dresses up a sundress yet still looks cool with shorts and a T-shirt.
Best of all, every bag holds a little piece of our personality, something no store-bought tote can promise.
Hammock bag kit
- Raffia yarn
- 3.5 mm crochet hook
- Yarn needle for sewing pieces together
- Stitch markers to keep track of our rounds
Abbreviations for hammock bag kit
- ch = Chain stitch
- sc = Single crochet
- sl = Slip stitch
- st(s) = Stitch(es)
- hdc = half double crochet
- inc=increase
- sk=skip
- R = Round
Crochet body of hammock bag
| Round | Instructions |
|---|---|
| Foundation | We chain 107 to start the body of our hammock bag. |
| R1 | We work 1 sc, then (1 sc, 1 hdc), skip 1 stitch, and repeat this sequence 52 times. End with 1 sc. |
| R2 | We chain 1, then work 2 sc, (1 sc, 1 hdc, skip 1 stitch), repeat this 51 times, then finish with 2 sc. |
| R3 | Repeat the same steps as R1. |
| R4 | Repeat the same steps as R2. |
| R5 | Repeat the same steps as R1. |
| R6 | Repeat the same steps as R2. |
| R7 | Repeat the same steps as R1. |
| R8 | Repeat the same steps as R2. |
| R9 | Repeat the same steps as R1. |
| R10 | Repeat the same steps as R2. |
| R11 | Repeat the same steps as R1. |
| R12 | Repeat the same steps as R2. |
| R13 | Repeat the same steps as R1. |
| R14 | Repeat the same steps as R2. |
| R15 | Repeat the same steps as R1. |
| R16 | Repeat the same steps as R2. |
| R17 | Repeat the same steps as R1. |
| R18 | Repeat the same steps as R2. |
| R19 | Repeat the same steps as R1. |
| R20 | Repeat the same steps as R2. |
Crochet side of hammock bag
| Round | Instructions |
|---|---|
| Foundation | We start with 25 chains. |
| R1 | We work 1 increase (2 sc in same stitch), then 22 sc, and another increase at the end. |
| R2 | We make 1 increase, then 24 sc, and another increase at the end. |
| R3 | We make 1 increase, then 26 sc, and another increase at the end. |
| R4–R24 | We continue the pattern: 1 increase at the beginning, sc across, 1 increase at the end. Each row grows by 2 stitches. |
| R25 | We work 6 sc, ch 1, 7 sc, ch 1, 8 sc, ch 1, 7 sc, ch 1, 6 sc. |
| R26 | We make 1 increase, then 36 sc, and another increase at the end. |
| R27 | We work 40 sc across evenly. |
The we have three edges to crochet it again
| Edge | Instructions |
|---|---|
| First Edge | We work 4 sc, then 1 increase (2 sc in the same stitch), and repeat this sequence as needed. |
| Second Edge | We crochet 3 sc, 1 sc in each stitch , then 3 sc into the last stitch to shape this edge neatly. |
| Third Edge | We work 1 increase (2 sc in the same stitch), then 4 sc, and repeat this sequence to complete the edge. |
Crochet handle of hammock bag
We need crochet two handles for hammock bag.
| Step | Instructions (We phrasing) |
|---|---|
| Foundation Chain | We chain 67 to create the base foundation. |
| R1 (Start of handle ) | We make 1 inc (2 sc) in the first chain, then sc in each chain until the last stitch. |
| R1 (Semi-Circle Shaping) | In the last chain, we crochet 5 sc to form a smooth semi-circle. |
| R1 (Opposite Side) | We sc in each stitch along the opposite side of the chain, then crochet 3 sc in the last stitch. |
| R2 (Edge Finishing) | We slip stitch in every stitch around to finish and neaten the edge. |
Crochet drawstring of hammock bag
| Step | Instructions |
|---|---|
| 1️⃣ Prepare Yarn | We prepare a 4-meter long strand of yarn and fold it in half to make it stronger and more durable. |
| 2️⃣ Start Chains | At the folded end, we crochet 50 chain stitches (ch 50). This will be one of our drawstrings |
| 3️⃣ Repeat | We repeat the same process to make 3 more pieces, so we’ll have a total of 4 chain drawstrings. |
Sew
In this stage of assembly, the sewn side panels are joined to the main body of the hammock bag; careful matching of seam allowances produces a clean silhouette. A yarn needle glides along the line while the maker maintains slight tension, creating an even row of stitches that will withstand daily wear.
After the body is structurally complete, two lengths of cord are threaded through the top channel, each sliding freely from end to end. This step is tested several times before final sewing, ensuring a snug yet adjustable cinch that secures the bag when packed.
The final operation is the attachment of a flat handle that sits centrally on each side. Once centered and pinned in place, distributing load across the fabric, and three extra passes lock the joint against heavy lifting.
Reference sources
1.Learn the most comprehensive guide for single crochet(sc)
Author:Sarah Stearns
Publication date: on June 15, 2021, updated:December 14, 2024
Title: How to single crochet (sc)for beginners
Summary as blow:
- Step-by-Step Single Crochet for Beginners
- Single Crochet into a Foundation Chain
- Single Crochet into another Row
- Single Crochet in the Round
- Increases and Decreases
- Working Single Crochet in Different Loops