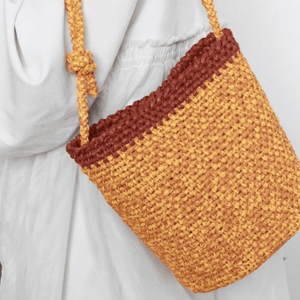
Hexagonal Bucket Bag Kit
$29.99
Why you’re going to love the Hexagonal Bucket Bag Kit: it takes the fuss out of crocheting a bag that’s both chic and super useful.
Every single supply you need is in the kit—no more hunting for the right yarn or the perfect hook.
Description
Table of Contents for hexagonal bucket bag kit
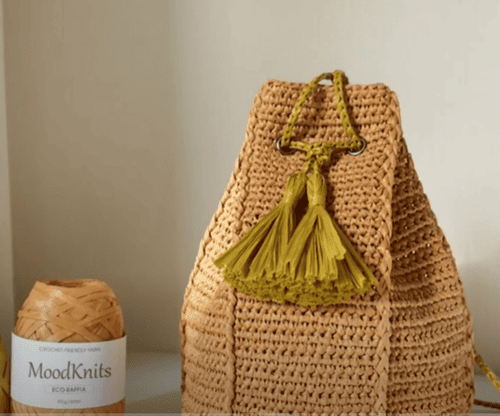
Hexagonal bucket bag kit: are you excited to create a striking hexagonal bucket bag alongside us? This project beautifully fuses contemporary style with everyday utility in one delightful piece of crochet. In this comprehensive guide, we will carefully lead you through each phase, from crafting the solid base to shaping the body to affixing the ideal straps. Whether your hooks have been flying for years or you’re still finding your rhythm, this tutorial ensures the process will be both accessible and enjoyable.
Gather your yarn and hooks, and let’s embark on this creative journey together! 🧶✨
What we adore about the hexagonal bucket bag
The first time we encountered the hexagonal bucket bag, its striking silhouette and adaptable character captivated us. Its roomy interior accommodates daily necessities, while the geometric base lends a fresh, sculpted presence. Lightweight and planet-friendly—especially in raffia or cotton yarn—it invites color play in limitless combinations.
What makes this piece even more appealing is the chance to practice working in spirals and experiment with techniques like front post double crochet (FPDC), all while producing a functional accessory we’re proud to carry.
Hexagonal bucket bag kit
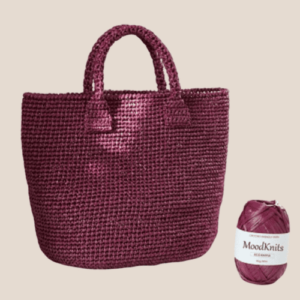
- Raffia yarn: two color
- 3.5 mm crochet hook
- Yarn needle for securing loose ends
- Stitch markers for monitoring round progression
- Twelve buckle sets
Abbreviations
- SC = Single Crochet
- INC = Increase (2SC in 1 stitch)
- DC = Double Crochet
- CH = Chain Stitch
- SL=Slip Stitch
- FPDC = Front Post Double Crochet
Crochet bottom of hexagonal bucket bag kit
| Round | Instructions | Stitch Count |
|---|---|---|
| Rnd1 | 6 (SC, CH) | (12) |
| Rnd2 | 6 (2SC, CH) | (18) |
| Rnd3 | 6 (3SC, CH) | (24) |
| Rnd4 | 6 (4SC, CH) | (30) |
| Rnd5 | 6 (5SC, CH) | (36) |
| Rnd6 | 6 (6SC, CH) | (42) |
| Rnd7 | 6 (7SC, CH) | (48) |
| Rnd8 | 6 (8SC, CH) | (54) |
| Rnd9 | 6 (9SC, CH) | (60) |
| Rnd10 | 6 (10SC, CH) | (66) |
| Rnd11 | 6 (11SC, CH) | (72) |
| Rnd12 | 6 (12SC, CH) | (78) |
| Rnd13 | 6 (13SC, CH) | (84) |
| Rnd14 | 6 (14SC, CH) | (90) |
| Rnd15 | 6 (14SC, INC) | (96) |
Crochet body of hexagonal bucket bag kit
👜 Bag Body (L size)
- Odd rounds: crochet clockwise
- Even rounds: crochet counterclockwise
| Round | Instructions | Stitch Count |
|---|---|---|
| Rnd1-43 | 6 (16SC) | (96) |
| Rnd2-44 | 6 (15SC, FPDC) | (96) |
| Rnd38 | 6 (3SC, CH, 7SC, CH, 3SC, FPDC) | (96) |
👜 Bag Body (S size)
- Odd rounds: crochet clockwise
- Even rounds: crochet counterclockwise
| Round | Instructions | Stitch Count |
|---|---|---|
| Rnd1-37 | 6 (16SC) | (96) |
| Rnd2-38 | 6 (15SC, FPDC) | (96) |
| Rnd34 | 6 (3SC, CH, 7SC, CH, 3SC, FPDC) | (96) |
Crochet drawstring of hexagonal bucket bag kit
Drawstring Lengths
- 180 cm (single shoulder)
- 160 cm (crossbody or handheld)
Insert the drawstring into the 12 buckles
Begin at one end of the bag’s opening and guide the drawstring through the first buckle, moving from the exterior toward the interior.
Progress by interlacing the drawstring through each of the 12 buckles, alternating between passing over one edge and then beneath the next.
Maintain this over-under pattern until the drawstring travels fully around the bag.
Finally, draw both ends of the string toward each other with uniform force to secure the closure and gather the fabric.
Make tassel
Step 1: Expedite creation of tassel strands (20 cm × 30 strands)
Obtain a cardboard strip approximately 20 cm along the vertical axis; an alternative is a ruler of the same length. Encircle the chosen yarn around the strip 30 complete revolutions, each complete turn generating a single future strand. Execute a clean cut along one lateral edge of the cardboard, separating the assembly into 30 individual strands, each measuring approximately 20 cm. Delicately vibrate the cut strands and then comb gently to ensure uniform linearity.
Step 2: Integrate tassel strands with drawstring termination
Place the 30 strands in a folded orientation to determine the midpoint. Deliver the terminal segment of the drawstring through the midpoint loop thus created. Employ a short segment of yarn matching in color to knot the folded strands to the drawstring. Execute a minimum of 2 to 3 complete wraps around the assembly, concluding with a secure knot.
Step 3: Fabricate the neck (tassel ball)
Position approximately 1.5 cm below the juncture of the strands and the drawstring. Employ a second length of matching yarn to encircle the strands in a tight helical configuration, repeating the action until the circumference shows uniform compression. Draw the yarn tight enough to create a pronounced spherical segment (referred to colloquially as the neck) and knot with enough friction to withstand lateral forces. Conceal protruding yarn ends by threading them within the body of the strands using either a needle or a crochet hook.
Step 4: Reinforce and conclude
Utilize a needle and matching yarn to deliver several discrete stitches at the base of the tassel, precisely at the transition to the drawstring, ensuring that the connection exhibits enhanced mechanical durability through localized material interlocking.
Cut the ends of the tassel to achieve uniform strand length.
Optionally, apply low-temperature steam or use a wide-toothed comb to encourage the strands to fall in a straight, cohesive manner.
Reference sources
1.Learn the most comprehensive guide for single crochet(sc)
Author:Sarah Stearns
Publication date: on June 15, 2021, updated:December 14, 2024
Title: How to single crochet (sc)for beginners
Summary as blow:
- Step-by-Step Single Crochet for Beginners
- Single Crochet into a Foundation Chain
- Single Crochet into another Row
- Single Crochet in the Round
- Increases and Decreases
- Working Single Crochet in Different Loops