


Hollow Mobile Phone Bag Crochet-A Complete Guide
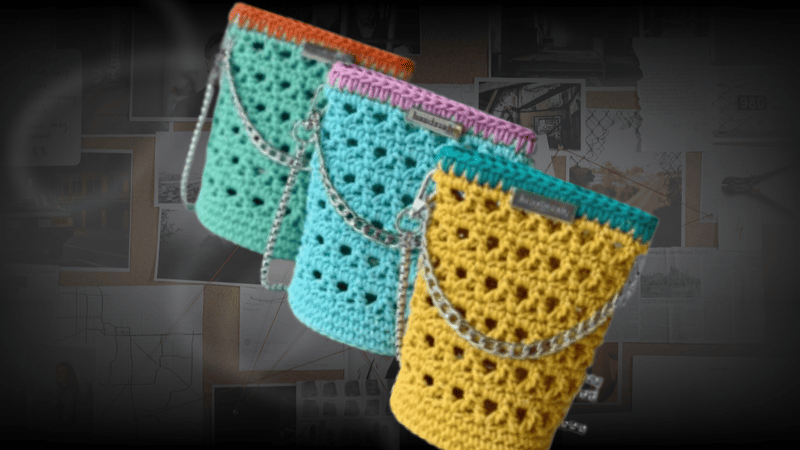
Table of Contents
Hollow mobile phone bag crochet: crochet embodies an enduring fusion of artistry, repose, and utility, and when one turns this craft toward accessory design, the hollow mobile phone bag emerges as both an elegant and pragmatic triumph.
This undertaking is remarkably accessible to novices, affording adaptability in scale, hue, and strap construction, as well as the distinct merit of sustainability.
This guide proceeds to collate essential variables—materials, stitches, and concise tutorials—together with styling suggestions and expert counsel, thus furnishing a comprehensive resource for the creation of a hollow mobile phone bag.
Why Crochet A Hollow Mobile Phone Bag?
Reasons for choosing a hollow mobile phone bag for one’s next crochet endeavour merit thoughtful consideration.
The ineluctable pervasiveness of the smartphone renders a dedicated receptacle virtually obligatory; the crochet iteration further elevates the function by enrobing the device in a lightweight, air-permeable, and visually appealing textile.
Benefits associated with this accessory accrue both aesthetic and practical dividends:
- The hollow form is currently favoured in the accessory milieu, conferring a refined, artisanal signature that appeals to contemporary sensibilities.
- The bag’s dimensions accommodate not only the device itself, but also a few essential cards and a small quantity of miscellaneous items, making it a judicious alternative to bulkier carriers.
Base stitch for beginners
We’ve all been there! Here are some basic stitch we’ve learned along the way:
How To Crochet Magic Ring ? l Step-By-Step l Video & Text &Photo
Chain Stitch |Step By Step Guide| Text & Photo &Video
Single Crochet-You Want To Know The Most Detailed Information
Half Double Crochet In The Round-The Complete Guide
Double Crochet Stitches For Beginners
Video for hollow mobile phone bag crochet
In the following video tutorial, we will demonstrate the methodical construction of an elegant, openwork mobile phone pouch.
Progressing in systematic sequence, the instruction encompasses the requisite stitches, the orchestration of shaping, and the securement of the strap, thus permitting the simultaneous fabrication of a contemporary and utilitarian piece.
Join us as we collaboratively produce a nimble and aesthetically pleasing carrier for mobile devices.
Material kit for hollow mobile phone bag crochet
💙 hook & yarn needle & marker buckle : https://amzn.to/3TXavWn
💙 3.00 polyester rope yarn(200g) : https://amzn.to/4m1JxbP
💙 round bag bottom(24 holes only): https://amzn.to/45zvhBX
💙 bag strap: https://amzn.to/4fRaH3n
Abbreviation
- ch = Chain stitch
- sc = Single crochet
- inc=increase
- sl =Slip stitch
- st(s) =Stitch(es)
- R=Round
- dc=double crochet
- dc2tog=double crochet two together
- long sc=elongated single crochet
Crochet bottom
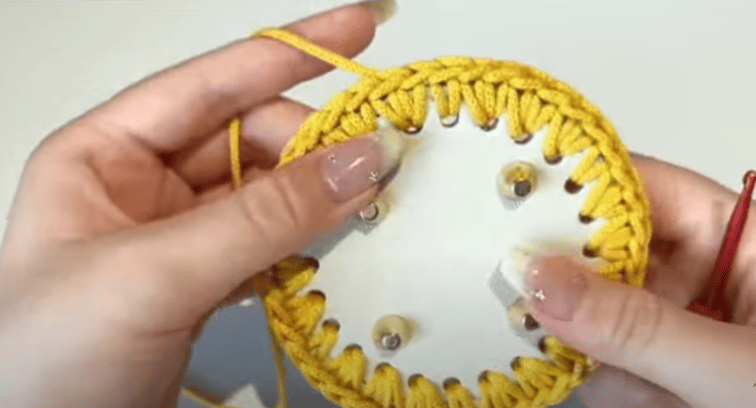
The yarn end is wrapped twice around the bag base, then hidden using invisible slip stitches.
| Round | Stitch Pattern | Total Stitches |
|---|---|---|
| Base | 24 foundation holes | 24 |
| R1 | (3inc, sc) × 6 | 42 |
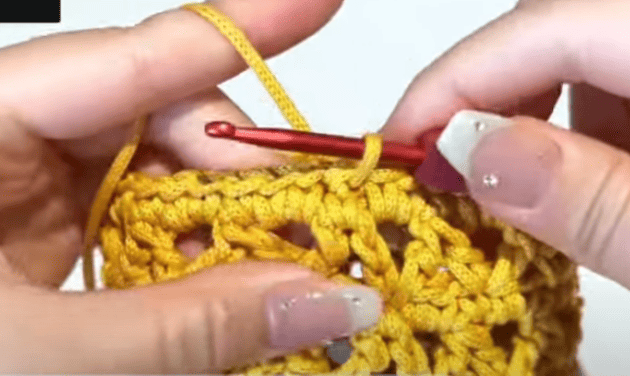
Crochet body
Hollow Mobile Phone Bag Base & Body Stitch Table
| Round | Stitch Pattern Description | Total Stitches |
|---|---|---|
| R2 | 42 sc, worked in each back loop of foundation chain | 42 |
| R3 | 42 sc, one in each stitch | 42 |
| R4 | 42 sc, one in each stitch | 42 |
| R5 | (ch 2, dc2tog) repeat around, end with ch 2 | 42 spaces |
| R6 | 42 sc, one in each stitch | 42 |
| R7 | Repeat R5 | 42 spaces |
| R8 | Repeat R6 | 42 |
| R9 | Repeat R5 | 42 spaces |
| R10 | Repeat R6 | 42 |
| R11 | Repeat R5 | 42 spaces |
| R12 | Repeat R6 | 42 |
| R13 | Repeat R5 | 42 spaces |
| R14 | Repeat R6 | 42 |
| R15 | Repeat R5 | 42 spaces |
| R16 | Repeat R6 | 42 |
| R17 | 42 sc, one in each stitch | 42 |
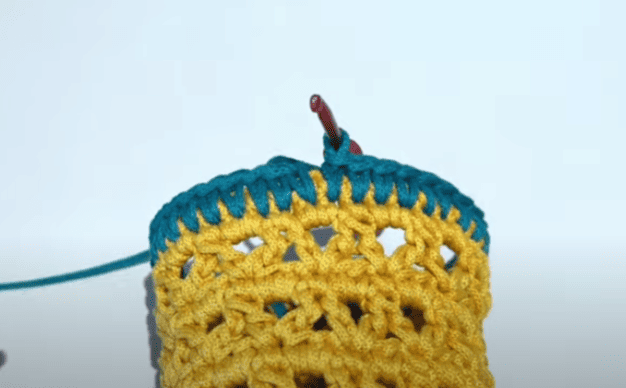
Crochet opening
| Round | Stitch Pattern Description | Total Stitches | Notes |
|---|---|---|---|
| R18 | 42 long single crochet (elongated sc) in each stitch | 42 | Use a different color yarn; elongate stitches into desired stitch below |
Install the handmade label
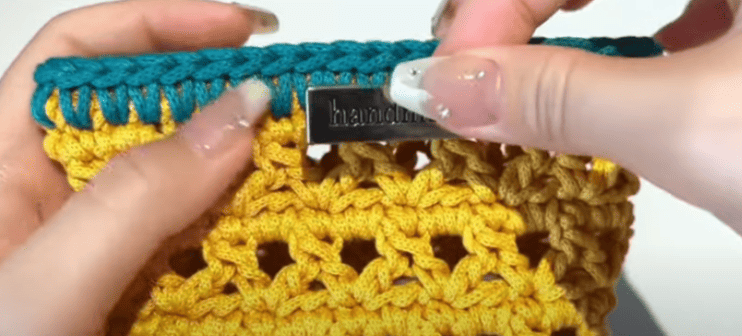
Step 1: Conceal the final slip-stitch ends. Secure all yarn ends arising from the final slip-stitch round, sliding them to the reverse side of the bag so that they are discreetly camouflaged and the exterior remains polished.
Step 2: Locate the midpoint of the bag’s upper edge. Either fold to observe the symmetrical crease or employ a ruler to determine the precise centre of the bag opening.
Step 3: Handmade label. Centre the crafted label directly over the midpoint, ensuring that the text and border are perpendicular to the top edge of the opening and that all sides exhibit equal overhang. Anchor the label momentarily.
Step 4: Insert a needle nose tweezer or a mini alligator clip to grip the label’s reverse side, preventing misalignment during the edging or blind-stitch application, thereby maintaining a crisp adhesive finish.
Install the strap
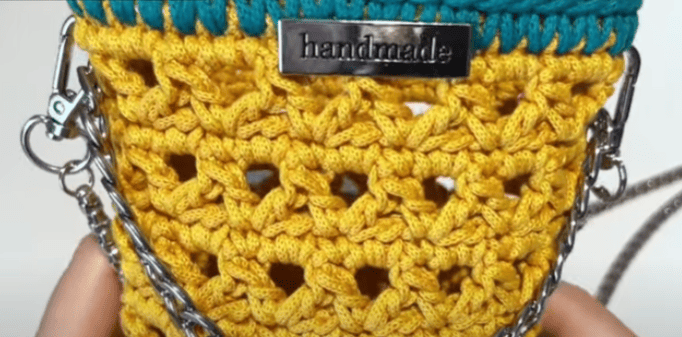
Step 1: Identify the triangular apertures situated laterally at the entrance of the bag
Examine the crochet design along the left and right edges of the bag opening; each side exhibits a downward-triangulated void integrated into the pattern.
Step 2: Affix the strap fittings
Engage the corresponding bag strap fitting—either a clasp or a ring—within the triangular aperture on each side, ensuring that the attachment is firm and stable.
Reference sources
1.Learn the most comprehensive guide for single crochet(sc)
Author:Sarah Stearns
Publication date: on June 15, 2021, updated:December 14, 2024
Title: How to single crochet (sc)for beginners
Summary as blow:
- Step-by-Step Single Crochet for Beginners
- Single Crochet into a Foundation Chain
- Single Crochet into another Row
- Single Crochet in the Round
- Increases and Decreases
- Working Single Crochet in Different Loops


