


How To Crochet Christmas Handbag?-A Complete Step-By-Step Guide
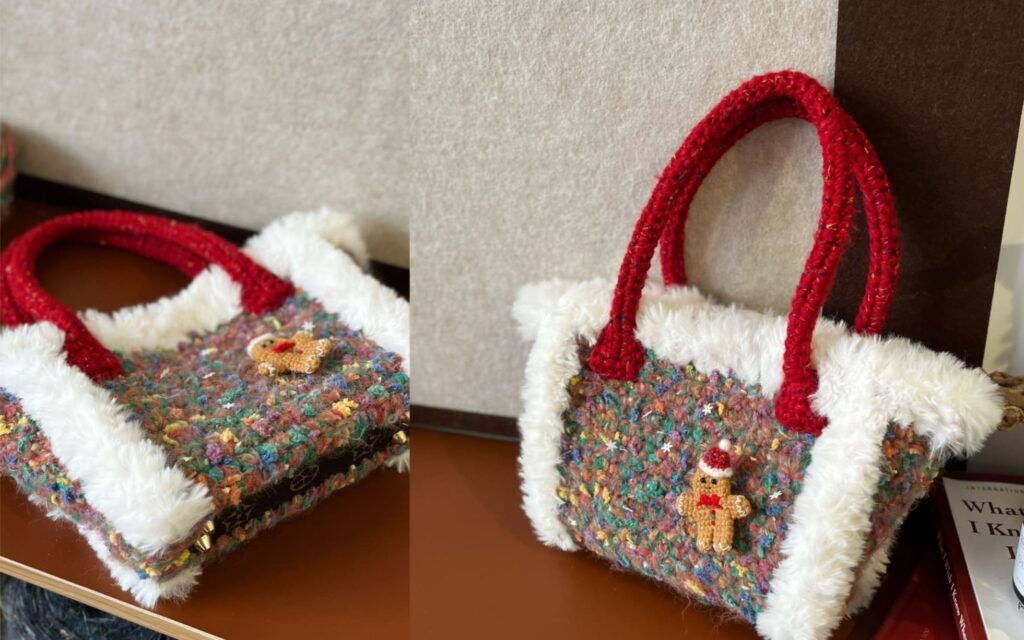
Table of Contents
Christmas handbag tutorial : The holiday season often enchants us with its glow, melodic laughter, and lovingly crafted gifts. As devoted crocheters, we relish the chance to weave our personal imprint into every ornament we make. Among the most delightful possible gifts for the season is a Christmas crocheted handbag, a fusion of ornament and utility that complements
Our article provides all the essential knowledge a crocheted Christmas handbag demands: yarn selection, essential tools, systemized instructions, and imaginative embellishments infused with holiday cheer. Regardless of whether you are newly discovering the rhythm of a chain stitch or an experienced artist seeking an infusion of novelty, these pages will steer you effortlessly toward a work of instant seasonal elegance.
Why crochet a Christmas handbag?
Prerequisites & Celebration In One – The creation is genuinely useful; we can carry our handiwork daily in December and still demonstrate elegance that evokes the season in its entirety.
Endless Personalization – We can revert to classic holiday shades—rich crimson, forest green, soft ivory, glinting metallics—or invent an unexpected seasonal palette welcoming shimmering yarn.
Handmade – Presenting a crocheted handbag as a gift signifies sustained, personal engagement with each stitch, making the object deeply relational for recipients such as family, friends, and educators alike.
Sustainable – Rather than acquiring disposable wrapping, we can repurpose the completed handbag as a durable, stylish carriers for gift deliveries, aligning festive customs with lasting ecological impact.
Artistic Exploration – The undertaking serves as a controlled laboratory for modulating patterns, hybridizing yarn textures, and incorporating further decorated such as small pom-poms, dangling snowflakes, and tonal bells, rendering the finished piece a collectible testament to producer and processes.
Base stitch for beginners
We’ve all been there! Here are some basic stitch we’ve learned along the way:
How To Crochet Magic Ring ? l Step-By-Step l Video & Text &Photo
Chain Stitch |Step By Step Guide| Text & Photo &Video
Single Crochet-You Want To Know The Most Detailed Information
Half Double Crochet In The Round-The Complete Guide
Double Crochet Stitches For Beginners
Video for Christmas handbag tutorial
Let us embark upon a collaborative project in which we will skillfully crochet a festive Christmas handbag from a series of systematic steps.
We shall accompany you in forming the handbag’s foundational base, structuring its body, constructing its handles, and adorning the surface.
Through the meditative rhythm of crochet, we will assembly a distinctive, artisanal accessory that serves equally well as a thoughtful gift, a seasonal statement at holiday gatherings, and a vessel of winter merriment.
Material kit for Christmas handbag tutorial

💙4.0 & 6.0 mm hook & yarn needle & marker buckle : https://amzn.to/3TXavWn
💙 Multifiber fancy yarn: https://amzn.to/3VirXVM
💙 Leather bag bottom : https://amzn.to/476zTRg
💙 Faux fur yarn:https://amzn.to/4oHWLga
💙3.00 polyester rope yarn : https://amzn.to/4m1JxbP
Abbreviation for Christmas handbag tutorial
- ch = Chain stitch
- sc = Single crochet
- sl =Slip stitch
- st(s) =Stitch(es)
- R=Round
- inc=Increase
Crochet body

Commence the crocheting procedure by inserting the hook into each of the sixteen punctures present upon the base of the leather bag.
Maintain consistent tension throughout. Following the aforementioned technique, replicate the crocheting of the bag’s lateral wall on the opposing side of the leather base, ensuring uniform height and stitch density.
| Round | Instruction | Stitch Count |
|---|---|---|
| R1 | 16 sc | 16 |
| R2 | ch, flip over, sc, inc, 12 sc, inc, sc | 18 |
| R3–R6 | ch, flip over, 18 sc | 18 |
| R7 | ch, flip over, sc, inc, 14 sc, inc, sc | 20 |
| R8–R11 | ch, flip over, 20 sc | 20 |
| R12 | ch, flip over, sc, inc, 16 sc, inc, sc | 22 |
| R13–R16 | ch, flip over, 22 sc ch to fix (secure) | 22 |
Crochet side

Commence crocheting into the three provided apertures at the lateral edge of the leather bag base.
Traverse to the opposite edge and replicate the procedure to secure the second lateral edge, thereby finalizing the formation of the bag’s entire side.
| Row | Instruction | Stitch Count |
|---|---|---|
| R1 | inc in each of 3 holes | 6 |
| R2–R6 | ch, flip over, 6 sc | 6 |
| R7 | ch, flip over, sc, inc, 2 sc, inc, sc | 8 |
| R8–R11 | ch, flip over, 8 sc | 8 |
| R12 | ch, flip over, sc, inc, 4 sc, inc, sc | 10 |
| R13–R16 | ch, flip over, 10 sc | 10 |
| — | ch to fix (secure) | — |
Sew body with side together

Anchor the working yarn to the interior lower edge of the bag assembly, inserting the hook through both the bag body panel and the adjacent bag side.
Execute a single crochet: yarn over, draw a loop through both layers, yarn over again, and complete the stitch by drawing the yarn through both remaining loops on the hook.
Progress along the opening edge, maintaining an even tension and ensuring each new stitch aligns directly over a corresponding vertical stitch from the side seam, thus creating a secure, uniform bind-off that stabilizes the bag’s shape.
Crochet opening

Step 1: Ordinarily, each of the four boundaries comprises sixty-four single crochets; an additional single crochet is introduced at each of the four corners, resulting in a cumulative count of sixty-eight single crochets.
Step 2: Subsequent to this step, two complete rounds of single crochet are executed around the aperture of the bag.
Step 3: Upon completion of the rounds, a chain stitch is employed to secure the fabric and prevent any unraveling.
Step 4: The finishing procedure is concluded by meticulously weaving in the remaining yarn ends, ensuring a polished and cohesive appearance at the points of color or join transitions.
Crochet & sew handle

| Step | Instruction | Notes / Stitch Count |
|---|---|---|
| 1 | Leave a 40 cm yarn tail for sewing later | — |
| 2 | Chain 61 | — |
| 3 | R1: Turn, work 60 sc in the back of chain stitches | 60 sc |
| 4 | R2–R4: ch, Flip over, Work 60 sc | 60 sc each round |
| 5 | Chain to fix | Leave a 150 cm yarn tail for sewing |
| 6 | Find a suitable position to attach the handle, sew it in place, and conceal yarn end. | — |

Reference sources
1.Learn the most comprehensive guide for single crochet(sc)
Author:Sarah Stearns
Publication date: on June 15, 2021, updated:December 14, 2024
Title: How to single crochet (sc)for beginners
Summary as blow:
- Step-by-Step Single Crochet for Beginners
- Single Crochet into a Foundation Chain
- Single Crochet into another Row
- Single Crochet in the Round
- Increases and Decreases
- Working Single Crochet in Different Loops


