


Crochet Crossbody Bag: A Complete Guide for Handmade Style Lovers
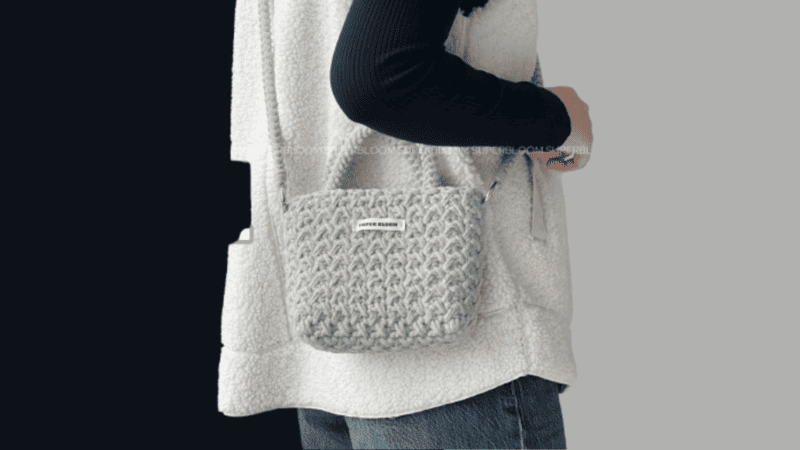
Table of Contents
Crochet crossbody bag: it have always whispered happiness, and our found-joy is in making and carrying our own crochet crossbody bag.
The moment we toss it over our shoulder, it transforms from a clay of yarn to a piece that quietly shouts, “handmade magic!”
This bag holds keys, wallets, and a favorite lipstick, proving that a thoughtful craft can be both lovely and totally useful. Weather a sunny market hip-devo confection, a cinema snack compact, or a fashionable after-dinner kit, it adapts to story whether it’s a flips-flop day or heels night.
So, whether you already love to loop yarn or are still getting to know the chain stitch, settle in.
Why we love crochet crossbody bag
Crossbody bags stand out because they blend style and practicality. They rest comfortably over our shoulders, leaving our hands free—ideal when we’re wandering through airports, picking up groceries, or simply parked at the mall.
Tailored design – We decide on the width, the rainbow accents, the length of the cord, and even whether the body curls into comfy knots or crisply structured squares. No bag feels the same.
Perfect for rookies – Looking at beginner-level crochet patterns? Most are perfect for the casual lover.
Planet-loving – Skipping the store-bought vinyl and zippers puts power in our hands. What we create keeps plastic at bay and gives the planet a high-five.
Wear it everywhere – Whether we’re layered in floaty skirts, cropped teas, denim jackets, or even work blazers, the crochet crossbody drapes effortlessly with boho swagger or with clean, Nordic lines.
Material kit for crochet crossbody bag
💙 6.00mm hook & yarn needle & marker buckle : https://amzn.to/3TXavWn
💙 round yarn :https://amzn.to/3VAK5KF
💙 spring clip :https://amzn.to/45I5cAH
Abbreviation for crochet crossbody bag
- ch = Chain stitch
- sc = Single crochet
- sl =Slip stitch
- st(s) =Stitch(es)
- R=Round
- hdc=half double crochet
Video for for crochet crossbody bag
Let’s crochet a crossbody bag together! In this easy guide, we’ll work through every part—from the very first stitch to the last little detail.
You’ll learn basic techniques that work up to a cute, everyday bag.
We’ll talk about picking the right yarn, making a comfy strap, and adding those special touches that turn a piece of yarn into a cute, one-of-a-kind accessory you can carry with pride.
Crochet bottom

| Row | Instructions | Total Stitches |
|---|---|---|
| Base | 7 chains + 1 chain turning | – |
| R1 | 7 single crochet (sc) in purl stitch | 7 |
| R2–R16 | Chain 1, flip over, (1 sc, 1 hdc) repeat 3 times, 1 sc in chain stitch | 7 |
| R17 | Chain 1, flip over, single crochet in each stitch, add 1 sc in each corner |
Crochet body

| Round | Instructions | Total Stitches |
|---|---|---|
| R1–R16 | Chain 1, (1 sc, 1 hdc) repeat to the end of round | Stays consistent (depends on base count) |
| Finish | Slip stitch to join, fasten off, and conceal yarn end | – |
Crochet handle

| Step | Instruction |
|---|---|
| 1 | Leave a 25 cm yarn tail. |
| 2 | Start with 2 chains, crochet crab stitch for 23 cm. |
| 3 | Cut the yarn, leaving another 25 cm yarn end. |
| 4 | Make two handle following the same steps. |
Sew handle

Confirm the handle position
| Step | Instruction |
|---|---|
| 1 | We count from the left side of the bag base to the third pattern group, then up along to the bag opening; place a stitch marker. |
| 2 | We count from the right side of the bag base to the third pattern group, then up along to the bag opening; place another stitch marker. |
| 3 | We make sure there are 11 stitches between the two stitch markers. |
| 4 | We repeat the same method on the back side of the bag opening to place the stitch markers. |
| We now have confirmed the correct position for sewing the handles. |
Sew handle
Step 1: Position the Handle
Insert the handle from the marked stitch marker corresponding to the bag’s interior. Confirm that the handle sits squarely in the center and is perpendicular to the bag’s side seams, thereby establishing a balanced drape when the bag is suspended.
Step 2: Sew the Handle
Thread a needle appropriate for the yarn you are using, choosing a yarn the same colour as the handle to remain discrete. Employ a concealed repetition stitch that commences from the outer bag body, pierces the handle, and re-enter the bag to complete the act; continue along the handle in evenly spaced intervals. Accent the path with at least four overlapping rows to guarantee enduring anchorage.
Step 3: Finish and Hide Yarn Ends
Clip the working yarn so that a 3-centimeter tail is present. Insert the tail with a tapestry needle through the back loops of the handle for at least 2 intervals to inter the end; this lodging renders it imperceptible when the bag is turned or handled.
Strap

Step 1: Crochet the Straps Employ the handle-chain crochet technique to create two identical straps, each measuring approximately 105 centimeters in overall length. Maintain consistent tension to ensure the finished straps exhibit uniform width and drape.
Step 2: Secure the Spring Clips To each strap’s terminus, affix a spring clip. Employ tight whip stitches—so that each clip remains anchored and free from movement.
Step 3: Attach the Straps to the Bag Secure the spring clips to the bag’s lateral rings or loops, distributing the clips symmetrically along the width of the bag. Verify orientation and tension, adjusting as necessary, to ensure that the bag suspends in a level and balanced position.
Base stitch for beginners
We’ve all been there! Here are some basic stitch we’ve learned along the way:
How To Crochet Magic Ring ? l Step-By-Step l Video & Text &Photo
Chain Stitch |Step By Step Guide| Text & Photo &Video
Single Crochet-You Want To Know The Most Detailed Information
Half Double Crochet In The Round-The Complete Guide
Double Crochet Stitches For Beginners
Reference sources
1.Learn the most comprehensive guide for single crochet(sc)
Author:Sarah Stearns
Publication date: on June 15, 2021, updated:December 14, 2024
Title: How to single crochet (sc)for beginners
Summary as blow:
- Step-by-Step Single Crochet for Beginners
- Single Crochet into a Foundation Chain
- Single Crochet into another Row
- Single Crochet in the Round
- Increases and Decreases
- Working Single Crochet in Different Loops


