


Crochet Wrist Bag: The Ultimate Guide To Making & Styling Your Own
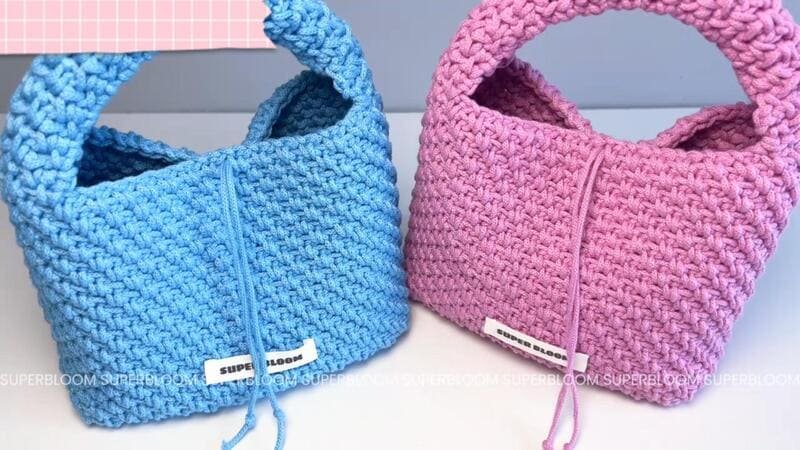
Table of Contents
Crochet wrist bag are presently ruling the intersection of high fashion and accessible DIY.
The crochet wrist bag, within this broad category, stands out for its enviable combination of utility and flair: a compact, adjustable pouch secured by a braided or tubular wrist strap that liberates its wearer from the usual fumbling for keys and cards while illuminating the unmistakable handiwork of an artisan.
The following sections will investigate what defines a crochet wrist bag, examine the social and aesthetic factors behind its rapid ascendance, chart a clear, stitch-by-stitch approach for mastering the technique, and identify styling variations that suit everything from pop-up exhibitions to leisurely afternoon café meetups.
Novice and expert makers alike will discover within these pages both the blueprint and the muse necessary to manifest an exquisite and personalized wrist bag that confidently complements the contemporary wardrobe.
What is a crochet wrist bag?
A crochet wrist bag is characterized as a compact to proportionate . Differentiating itself from more cumbersome tote or crossbody options, this form prioritizes immediate usability along with understated refinement. The wrist bag is equally suited to the impulse errand, the low-light rendezvous, or as a coordinated flourish in more formal settings.
Its appeal resides in the seamless union of pragmatism and aesthetic appeal. The interior is proportioned to accommodate only the indispensable—mobile device, house key, payment card, and a trace of cosmetic—permitting the bag to command attention while retaining a slender profile.
Why choose a crochet wrist bag?
The appeal of crocheted wrist bags can be examined through five compelling dimensions:
Practicality—these compact carriers allow hands to remain free, an asset while commuting, attending events, or managing small fingers, toting infants, or handling other tasks.
Aesthetic flexibility—hand- crocheted versions introduce an artisan dimension to curated wardrobes, presenting an easy opportunity to transcend mass-market accessories.
Accessibility—novice crocheters find success when working in small rounds, building rudimentary stitches while quickly finishing functional items that also bolster skill and confidence.
Base stitch for beginners
We’ve all been there! Here are some basic stitch we’ve learned along the way:
How To Crochet Magic Ring ? l Step-By-Step l Video & Text &Photo
Chain Stitch |Step By Step Guide| Text & Photo &Video
Single Crochet-You Want To Know The Most Detailed Information
Half Double Crochet In The Round-The Complete Guide
Double Crochet Stitches For Beginners
Material kit for crochet wrist bag
- 4.0mm hook & yarn needle & marker buckle : https://amzn.to/3TXavWn
- 2.0mm yarn : https://amzn.to/4naRmxf
Abbreviation for crochet wrist bag
- ch = Chain stitch
- sc = Single crochet
- sl =Slip stitch
- st(s) =Stitch(es)
- R=Round
Video for crochet wrist bag
In the following instructional video, we provide a detailed sequence for crocheting a chic wrist bag. You will observe the formation of the base, the execution of the requisite stitches, the design and attachment of the strap, and the final embellishments.
As we progress, we will fashion a functional and fashionable accessory. Gather your yarn and hook—let us crochet a wrist bag that will quickly become one of your favorite pieces!
Crochet bottom

| Row | Instructions | Total Stitches |
|---|---|---|
| Base | 9 ch + 1 ch turning | – |
| R1 | 9 sc in each purl stitch | 9 |
| R2-R24 | ch, flip over, 9 sc in each chain stitch | 9 |
Crochet body

| Row | Instructions | Total Stitches |
|---|---|---|
| R1 | ch, flip over, (sc, ch) repeat to end | 72 |
| R2 | ch, (ch, sc) repeat to end | 72 |
| R3 | ch, (sc, ch) repeat to end | 72 |
| R4-R25 | Repeat Rows 2–3 (11 times total) | 72 each row |
Crochet handle
| Row | Instructions | Total Stitches |
|---|---|---|
| Start | Begin working on the 9 stitches from bag base to bag opening | 9 |
| R1 | ch, (sc, ch) × 4, sc | 9 |
| R2 | ch, flip over, sc, (sc, ch) × 3, sc, sc | 9 |
| R3 | ch, flip over, sc, (ch, sc) × 3, sc, sc | 9 |
| R4–R27 | Repeat R2 and R3 alternately | 9 each row |
Sew handle with other side

Step 1: We begin by locating the nine present stitches along the side of the receptacle.
Step 2: The completed handle is subsequently positioned over the designated nine stitches, after which the working hook is introduced through the terminal chain of both the handle and the side. Through this alignment, slip stitches are executed to secure 。
Step 3: An additional slip stitch is introduced into the following stitch, providing supplementary reinforcement.
Step 4: The yarn is then severed, and the terminal strand is diligently worked back through adjacent stitches to secure it invisibly, thereby concluding the join in an unobtrusive manner.
Sew handle

Step 1: Measure five stitches inward from the terminal selvedge to the left of the handle and five stitches inward from the terminal selvedge to the right side; insert a removable stitch marker at each of these points.
Step 2: Double the handle length upon itself and position the two markers so that they overlay; thread a hand-sewing needle with a length of matching yarn and commence a running stitch that joins the markers, taking care to couple each stitch of the folded edge with its underneath corresponding stitch.
The resulting seam establishes a gentle inward curvature across the handle.
Step 3:Trim the working yarn, leaving a short tail, and secure it by weaving the tail through several adjacent stitch and purl bumps on the reverse, thereby concealed and finished its yarn end.
Make tie for opening

Step 1: We prepare an approximately sixty-centimetre section of yarn and demonstrate symmetry by folding it precisely at the mid-point.
Step 2: Insert the resulting U-shape into the central posterior axis of the bag’s mouth.
Step 3: Using the crochet hook, draw the two active legs of yarn through to the anterior face of the bag and allow the folded loop to nestle at the recess. Form secure knots at the terminations of the new strands to prevent subsequent slippage.
Reference sources
1.Learn the most comprehensive guide for single crochet(sc)
Author:Sarah Stearns
Publication date: on June 15, 2021, updated:December 14, 2024
Title: How to single crochet (sc)for beginners
Summary as blow:
- Step-by-Step Single Crochet for Beginners
- Single Crochet into a Foundation Chain
- Single Crochet into another Row
- Single Crochet in the Round
- Increases and Decreases
- Working Single Crochet in Different Loops


