


Crochet Phone Pouch – The Ultimate Guide For Beginners Introduction
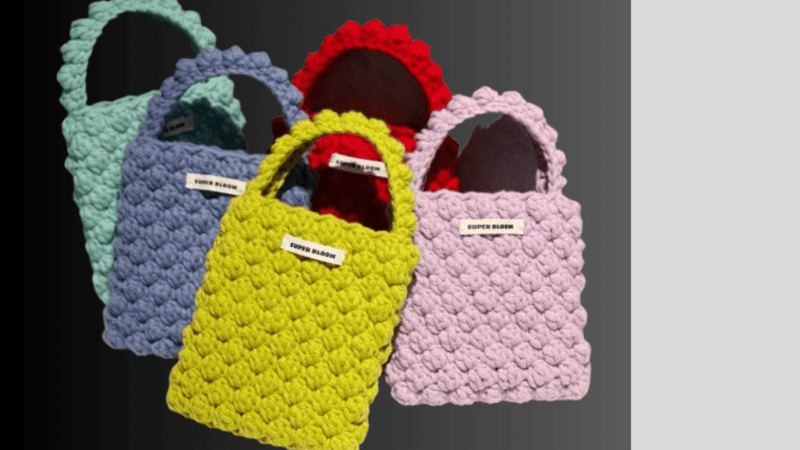
Table of Contents
Crochet phone pouch : Once we familiarize ourselves with the basic grip, the crochet hook invites us to create a project that embodies simplicity, utility, and gratifying speed: the crochet phone pouch.
Its compact size means we do not drown in excess yarn or lose confidence halfway through a marled scarf.
Finished in the duration of a leisurely afternoon, the pouch not only envelopes the screen in cheerful yarn, it also cheers up entire days of wardrobe repetition and, wrapped in a tag or ribbon, becomes a sweet, enduring gift.
An entire pouch in several uninterrupted binge-watch and crochet episodes, a size almost negotiable for evenings, beach days, or each delight of the gift’s actual wrapped-open moment.
In the pages ahead we will canvas the entire process: selecting fibers and needle that feel just right, threading patterns that feel gratifying.
What is a crochet phone pouch?
A crochet phone pouch constitutes a discretely crafted carrier or envelope specifically engineered to safeguard a mobile device.
Constructed through various crochet techniques—from the straightforward single-crochet technique to intricately textured methodologies such as the jujube stitch—this item may incorporate closure elements such as straps.
Why we love it
Mitigation of scratch proximity to the phone’s surface.
A negligible weight alongside the potential for personalisation.
Capacity as a thoughtful, hand-made present.
Suitability as an introductory enterprise for novice crafter.
Base stitch for beginners
We’ve all been there! Here are some basic stitch we’ve learned along the way:
How To Crochet Magic Ring ? l Step-By-Step l Video & Text &Photo
Chain Stitch |Step By Step Guide| Text & Photo &Video
Single Crochet-You Want To Know The Most Detailed Information
Half Double Crochet In The Round-The Complete Guide
Double Crochet Stitches For Beginners
Material kit for crochet phone pouch
💙 5.00mm hook & yarn needle & marker buckle : https://amzn.to/3TXavWn
💙 3.0 mm round yarn : https://amzn.to/4m6L1kX
💙 spring clip :https://amzn.to/45I5cAH
💙chain strap:https://amzn.to/482bz3m
Abbreviation for crochet phone pouch
- ch = Chain stitch
- sc = Single crochet
- sl =Slip stitch
- st(s) =Stitch(es)
- R=Round
- JJS = Jujube Stitch
Video for crochet phone pouch
This tutorial presents an uncomplicated yet fashionable solution for carrying your phone: a crocheted pouch.
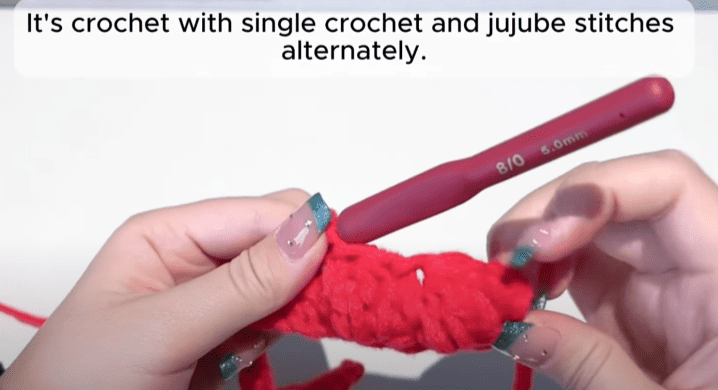
By employing basic stitches—specifically single crochet and the decorative jujube stitch—we ensure accessibility for novices.
Following the accompanying demonstrations, we will progress through each component sequentially: the main body, a coordinating strap, and a secure closing mechanism-spring clip, yielding a distinctive accessory personalized to your tastes. Let’s begin.
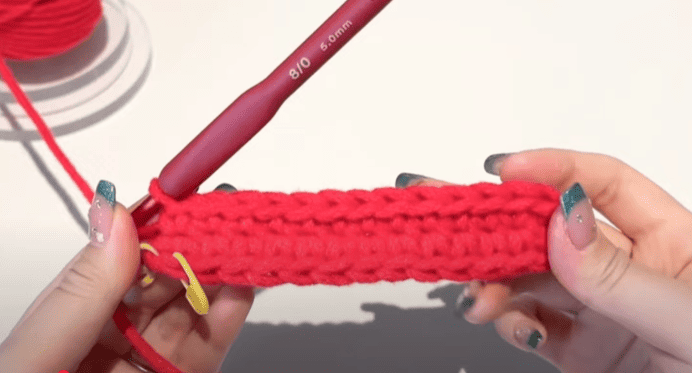
Crochet bottom
| Row | Instructions | Total Stitches |
|---|---|---|
| Base | 13 ch + 1 turning ch | – |
| R1 | 12 sc, 3 sc in last stitch, 12 sc along opposite side of chain, sl . | 28 |
Crochet body
| Row | Instructions | Notes |
|---|---|---|
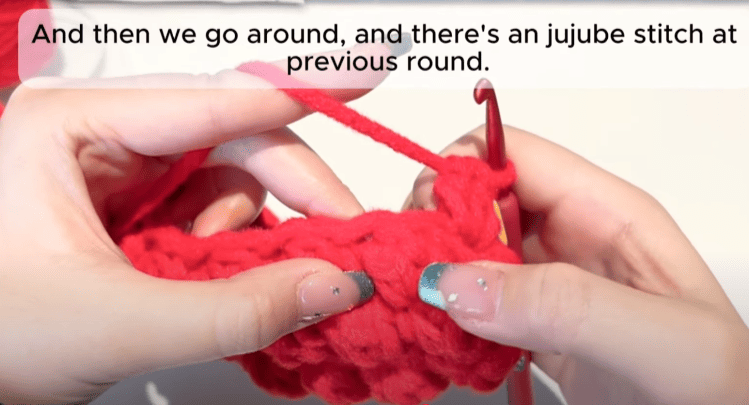
| R1 | Ch, jujube stitch, sc repeat 14 times to end | Creates alternating bumps |
| R2 | Ch, sc, jujube stitch repeat 14 times to end | Shifts texture for even pattern |
| R3 | Repeat Row 1 | |
| R4 | Repeat Row 2 | |
| R5 | Repeat Row 1 | |
| R6 | Repeat Row 2 | |
| R7 | Repeat Row 1 | |
| R8 | Repeat Row 2 | |
| R9 | Repeat Row 1 | |
| R10 | Repeat Row 2 | |
| R11 | Repeat Row 1; finish last stitch using yarn needle for invisible slip stitch | Neat, seamless finish |
Crochet handle
| Step | Instructions | Notes |
|---|---|---|
| 1 | Leave a yarn tail for sewing the handle later | About 40–50 cm |
| 2 | Base: 23 ch + 1 ch turning | Foundation chain |
| R1 | 23 sc in back loop of chain | Creates a sturdy base |
| R2 | Ch, flip over, jujube stitch, sc to end | Alternating texture |
| 3 | Ch to fix, leave a yarn tail | For sewing/finishing |
Sew handle
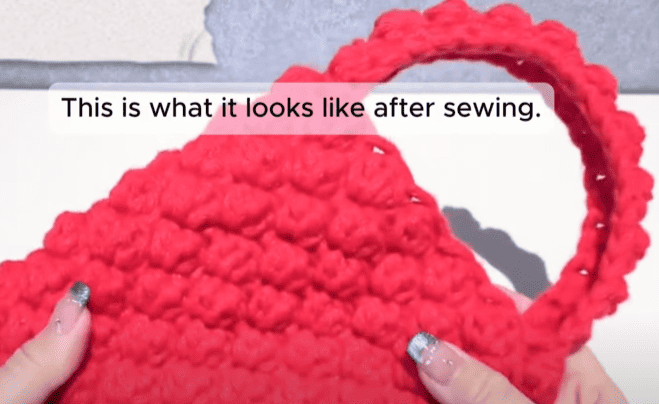
Step 1 — Fold and mark
Begin by folding the bag’s top edge downward until the two sides align perfectly.
Locate the mid-point along the folded side edge of the bag.
Use a stitch marker, a small pin, or a piece of contrasting scrap yarn to indicate this center point.
Note: If the bag features two handles, repeat the marking on the opposite side to maintain symmetry.
Step 2 — Position the Handle
Take the prepared handle and line its mid-point with the previously marked center on the folded side edge of the bag.
Temporarily hold it in place with a pin or clip to prevent shifting.
Note: Check that both orientation and length of the handle are appropriate before proceeding to the next step.
Step 3 — Sew and Reinforce
Thread the yarn tail through a tapestry needle; folding the tail or using two strands in parallel may enhance durability.
Begin sewing, passing the needle through the bag and handle, and make multiple passes in the same area.
Use 6 to 8 stitches for a narrow handle and 8 to 12 for a wider one, spacing stitches evenly along the attachment area.
For additional reinforcement, stitch a small rectangle or an “X” within the handle’s base.
Repeat this back-and-forth motion a minimum of three to four times to guarantee the handle is well-secured.
Caution: Avoid overtightening the stitches to preserve the intended geometry of the bag.
Step 4: Securing and Concealing Yarn Ends
Execute a tight, reliable knot—either a double knot or a figure-eight knot—before cutting the working strand.
Guided by a tapestry needle, draw the yarn end through a minimum of four stitches within the interior of the bag or the base of the handle. Collect any surplus length and trim a few millimeters beyond the exit point to prevent fraying.
Gently tug on the handle several times to verify its stability; any observable shift indicates the need for additional reinforcement.
Note: A microscopic application of fabric adhesive, deposited directly upon the knot, will further mitigate the likelihood of unintended unraveling.
Make strap
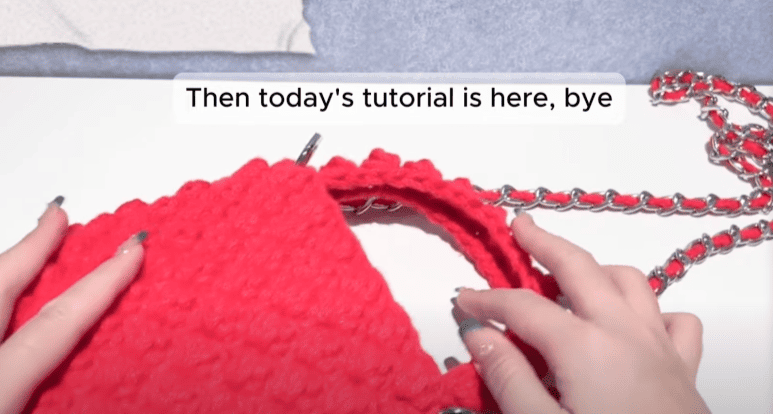
Step 1—Prepare Beginning Yarn Tail
Cut a length of yarn that exceeds the anticipated space for the crochet straps; the excess will later be used for seam closing and for grading the chain securely.
Step 2—Pass the Chain
Take a blunt-end tapestry needle and draw the prepared yarn tail through consecutive open links of the chain. Employ a systematic oscillation: a single down stroking needle goes over one link and immediately the next stroke passes underneath, repeating until the chain is uniformly draped.
Step 3—Equilibriate within the Links
Once the tailor yarn is threaded, manipulate the strand gently by massaging each link so the yarn lies uniformly, simultaneous in width and contour. Conservatively retain a short yarn tip dangling for later anchorage.
Step 4—Anchor at the Chain Terminal
Simultaneously grasp the two parts of the yarn tail and, threading a fresh tapestry needle, weave a compact knot through the terminal small silver ring. Verify that the knot is securely compressed, thereby forestalling the chain’s longitudinal movement at joints.
Step 5—Secure Spring-Clips
Affix a single spring-clip to each of the silver terminal rings, then orient and seal the opposite ends of the clips to the appropriate link at the lateral margin of the bag.
Confirm that the clips are of equal lateral displacement from the handle, thereby maintaining geometric balance. Advisory: gently actuate the chain by lateral tactile inspection so that continuity and hold of all links and clips is duly confirmed.
Reference sources
1.Learn the most comprehensive guide for single crochet(sc)
Author:Sarah Stearns
Publication date: on June 15, 2021, updated:December 14, 2024
Title: How to single crochet (sc)for beginners
Summary as blow:
- Step-by-Step Single Crochet for Beginners
- Single Crochet into a Foundation Chain
- Single Crochet into another Row
- Single Crochet in the Round
- Increases and Decreases
- Working Single Crochet in Different Loops


