


Bird Crochet Pattern The Most Comprehensive Step-By-Step Explanation
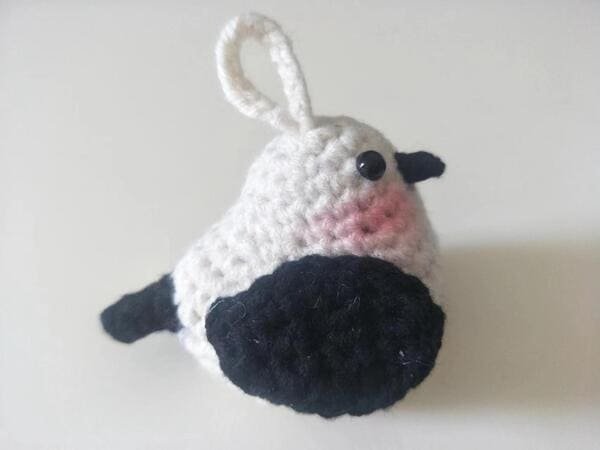
Table of Contents for bird crochet
Material kit of bird crochet
- Hook: 3.0mm
- Stuffing: (polyester fiberfill)
- Yarn(rice white & black)
- Yarn needle
- Marker
List of necessary tools
- Scissors
- Hot melt glue or glue
Abbreviation for bird crochet
These are the required abbreviations for bird crochet
- ch = Chain stitch
- sc = Single crochet
- sl =Slip stitch
- inc = Increase (usually 2 stitches in the same stitch)
- dec =Decrease (typically done by crocheting two stitches together)
- st(s) =Stitch(es)
- mc =Magic circle (or magic ring)
- sp-spaces
Best selling products
-

Raffia Cross Pattern Basket Handbag Kit
$19.99 -

Hexagonal Bucket Bag Kit
$29.99 -

Raffia Handbag Kit
$29.99 -

Hammock Bag Kit
$29.99 -

Wheat Bucket Bag Kit
$19.99
Buy bird crochet kit
Crocheting birds captivates our imaginations in the most charming ways. Be it tiny, realistic birds or colorful and cartoonish; transforming yarn into feathered companions is captivating. These projects are easy to do, but allow us to strive for the make the birds beautiful by showcasing intricate details, and playing with colors and textures.
As a crocheter, and a bird lover, crochet brings ease and joy to your life . It is calming to create but deeply rewarding to finish something that is bursting with character, and personality. Whether it is wings, beaks, or tiny tails, we appreciate the challenge and enjoy seeing the shapes take form with every stitch.
Crochet connects us with nature, something we appreciate as nature lovers. Sinking into the craft allows for observing bird details and carefully imitating them with it. Plus, these crochet birds make heartfelt gifts.
Tips

Every round needs a preparatory crochet chain stitch to level our yarn for the subsequent row evenly.

Despite my attempt at practicing crocheting, I tend to forget intricate stitching patterns.
For this article, marking button is explained as the yellow button which I suggest beginner crocheters to use after they finish their first stitch.
Remember to enable the blue marking button as shown after completing your final stitch.

In= through back loops only=Blo
Out=through front loops only=Flo
In the round 10 we need to use the Flo crochet method for crocheting.
Crochet the body (use rice white yarn )for bird crochet
- R1: 6 sc into mc(6)
- R2:(inc)*6(12)
- R3: (sc,inc)*6(18)
- R4-R5:18sc(18)
- Hand carrying
- R6:(sc,inc)*6,6sc(24)
- R7:(2sc,inc)*6,6sc(30)
- R8:6sc,(sc,inc)*6,12sc(36)
- R9:36sc(36)
- R10:12sc,(6ch,sk6),18sc(36)
- R11:12sc,flo-6sc,18sc(36)
- R12:(4sc,dec)*6(30)
- R13:(3sc,dec)*6(24)
- R14:(2sc,dec)*6(18)
- R15:(sc,dec)*6(12)
- Fiberfill
- R16:dec*6(6)
R1

6 single crochet (sc) into the magic ring.
Magic ring (mc): Magic rings (or level I sub-circles) are produced when a circle or loop is formed by wrapping yarns which are two strands of the fibers that are twisted together or yarn by pulling the fibers. The initial or the center junction of the circle will be like an O gap. You can hold the ring with pointer and thumb on the left hand where you also pull the yarn end to the left.
To learn magic ring click here:How To Crochet Magic Ring ? l Step-By-Step l Video & Text &Photo

We define a slip stitch (sl) as joining collective outer loops where individually, the yarn over and pull techniques are performed where in the first round the hook is inserted into the first yellow V shape stitch. Hook carefully through outer two lap loops will yield what we define as a single loop thus providing a slip stitch.
Following the completion of a slip stitch (sl), we obtain 6 stitches for round 1.
R2

We crochet by doing two stitches into each stitch for six total repetitions.

Following the completion of a slip stitch (sl), we obtain 12 stitches for round 2.
R3

In Round 3, we do one single crochet in the first stitch, then increase in the next chain stitch. We do this six times, and finish the round with 18 stitches.
R4

In Round 4, make one single crochet in each stitch (18 total).
R5

Same as round 4.
Hand carrying

Crochet 15 chain stitch for hand carrying.

Put the hand carrying into the center of magic ring .
Then tie knot on the back of fabric .

Hand carrying is completed.
R6

In Round 6, we alternate between one single crochet and one increase for 6 times. After that, we single crochet in the next 6 stitches which brings us to 24 stitches total.
R7

In Round 7, we perform two single crochets with an increase after. That process is repeated six times.
After that, we do one single crochet in each of the next six stitches which brings us to 30 stitches in total.
R8

In Round 8, we commence with 6 single crochets. Following this, we alternate between single crochets and increases 6 times (1 single crochet then an increase). This is followed by 12 single crochets which completes the round at 36 stitches.
R9

In Round 9, make one single crochet in each stitch (36 total).
R10

In Round 10, we do 12 single crochets, and then we crochet 6 chain stitch and skip the next 6 stitches to form a space or an opening. Next, we do another set of 18 single crochets which brings the total to 36 stitches for that round.

Skip the next 6 stitches to form a space or an opening.
As shown by the yellow arrow, this is where the hook is inserted.

View of round 10.
R11

In Round 11, we begin with 12 single crochets, then make 6 single crochets in front loops only over the chain space of the previous round. Following that, we make 18 single crochets to maintain a total of 36 stitches.
R12

In Round 12, we do four single crochets and a decrease which we repeat six times.
We use invisible dec method to crochet it, please click this article:Single Crochet Decrease -Three Method In More Details Slowly For Beginner | Video&Text&Picture

We have also reduced our total stitch count to 30 stitches.
R13

In Round 13, we do three single crochets and a decrease which we repeat six times.

We have also reduced our total stitch count to 24 stitches.

View of round 13.
R14

In Round 14, we do two single crochets and a decrease which we repeat six times.

We have also reduced our total stitch count to 18 stitches.

View of round 14.
R15

In Round 15, we do two single crochets and a decrease which we repeat six times.

We have also reduced our total stitch count to 12 stitches.
Fiberfill

Now we will fiberfill our bird in a hole. care should be taken to not overfill because bird crochet is shaped evenly.

The fiberfill is completed.
R16
In Round 16, we do decrease which we repeat six times.

We have also reduced our total stitch count to 6 stitches.

Leave 10 cm and cut yarn end , then use hook to bring out the yarn end.

Use the yarn end to close the opening with a yarn needle by picking up a stitch every other stitch.
We also need to make three decrease stitches which totals to three stitches.

Conceal the yarn end.

The body of bird is completed.

Due to the crochet of round 10 & round 11, we can clearly see that there is an opening.
Crochet the tail (use black yarn )for bird crochet
- R1:(2sc,dec,sc,dec)*2(10)
- R2:(3sc,dec)*2(8)
- R3:8sc(8)
- R4:(2sc,dec)2(6)

In Round 1 of shaping, the pattern instructs us to perform: 2 single crochets, a decrease, 1 single crochet, then another decrease and repeat the whole sequence twice for a total of 10 stitches by the end of the round.

In Round 2, we do 3 single crochets and do a single crochet decrease. We do this twice, and we are at 8 stitches.

In Round 3, make one single crochet in each stitch (8 total).

In Round 4, we do 2 single crochets and do a single crochet decrease. We do this twice, and we are at 6 stitches.

Leave 8 cm yarn end, cut yarn end,then use hook to bring out the yarn end.
Use the yarn end to close the opening with a yarn needle by picking up a stitch every other stitch.
We also need to make three decrease stitches which totals to three stitches.

Bottom of bird tail is completed.
Crochet the mouth (use black yarn )for bird crochet
- 2ch-(starting from second to last stitch-sc)

We chain 2, and from the second chain from the hook, we do a single crochet.
This forms a tiny foundation which is mouth.
Crochet the wing (use black yarn )for bird crochet
- R1:2ch-(starting from second to last stitch-inc)
- R2:ch-turn over-inc*2
- R3:ch-turn over-4sc
- R4:ch-turn over-sc,sk1,2sc
- R5:ch-turn over-sk1,2sc
- R6:ch-turn over-2sc
- R7:ch-turn over-sk1,sc
- R8:ch-turn over-sc
- R9:sc…see the middle of the fabric with inc

In Round 1, we do 2 chains and from the second chain starting from the hook we make an increase.

For Round 2, we will make a chain and then turn our work. For this round, we will do 2 increases in both of the single crochets from the previous row.

In Round 3:We chain one, turn our work, then crochet four single crochets.

In Round 4: We chain one, turn our work, then crochet 1sc, space 1, then crochet 2 sc again.

In Round 5: We chain one, turn our work, then space 1, then crochet 2 sc.

In Round 6: We chain one, turn our work, crochet 2 sc .

In Round 7: We chain one, turn our work, space 1,then crochet sc .

In Round 8 :We chain one, turn our work, crochet sc .

In round 9, we work in single crochet .
Until we reach the middle of the fabric,we need crochet inc.

Sew the two wings onto the bird’s body, parallel to the tail.

Glue the eyes on the round 4, leave 3 stitches in the middle, and sew the mouth just below the eyes.
Apply blush on both sides of the mouth.

Use the yarn needle to sew the feet shape for round 13-round 14.

The bird crochet is completed.
Bird crochet captures our attention because of creativity, adorableness, and a pinch of the outdoors in an enjoyable manner.
In every crochet bird project, we are not merely transforming yarn into a project; we are actually giving life to a pint-sized, delightful figure.
The form is pretty basic, yet colors and styles can be brought to life in infinite ways.
With a modification in yarn, stitch placement, or both, we can create realistic, whimsical, or distinctive looking birds.
1.Learn the most comprehensive guide for single crochet(sc)
Author:Sarah Stearns
Publication date: on June 15, 2021, updated:December 14, 2024
Title: How to single crochet (sc)for beginners
Summary as blow:
- Step-by-Step Single Crochet for Beginners
- Single Crochet into a Foundation Chain
- Single Crochet into another Row
- Single Crochet in the Round
- Increases and Decreases
- Working Single Crochet in Different Loops


