


Mixed Color Vegetable Basket Tote Bag Crochet: A Complete Step-by-Step Guide
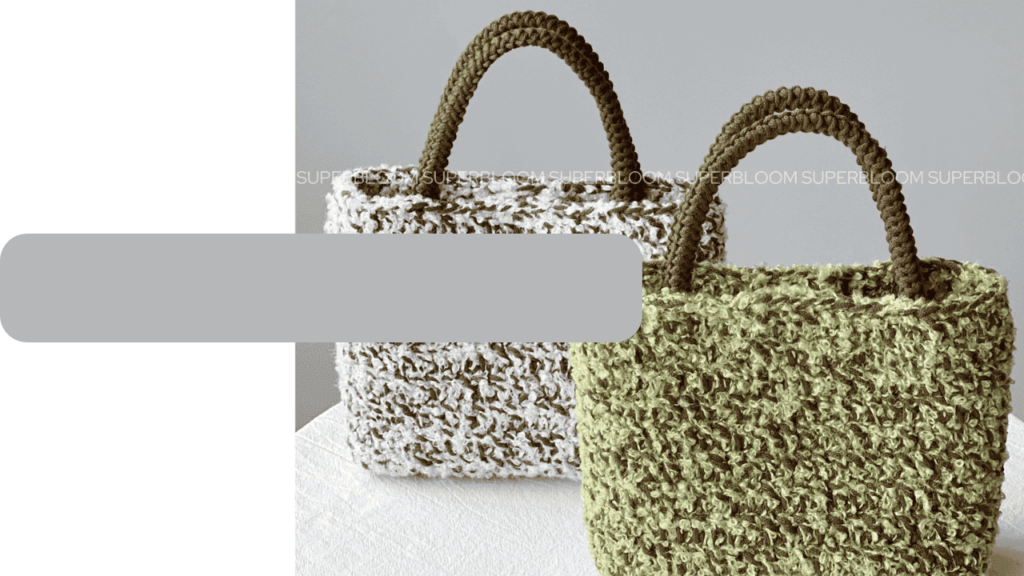
Table of Contents
Mixed Color Vegetable Basket Tote Bag Crochet : Crochet tote bags efficiently merge practicality with aesthetic appeal, thus becoming one of the most rewarding projects for crafters today. They embody environmental responsibility, thanks to their reusable nature, and serve equally well for transporting groceries, farm-fresh vegetables, or daily necessities. In the following segments, we will engage with a lively and colorful creation: the Mixed Color Vegetable Basket Tote Bag Crochet.
Throughout the article, we will progress step by step, carefully stitching side by side while investigating specific techniques, stitch variations, and innovative color pairings that animate the tote basket. Novices and seasoned artisans alike will find value in exercises such as executing color transitions, engineering a resilient base, and shaping purposeful handles. Upon completion, we will possess a generously sized, durable, and visually inviting bag that is equally suited to market trips or daily errands.
Why invest time in crafting a vegetable basket tote bag?
First, the project serves as a genuine eco-friendly alternative. By substituting disposable plastic carriers with a crocheted bag, we reduce single-use waste with every grocery run.
Second, the pattern’s inherent flexibility permits quick size modifications, enabling creation of anything from a compact handbag to an expansive market basket tailored to specific hauling needs.
Third, the random yet harmonized color swaths lend the bag an unmistakable aura of individuality and sincerity—the kind of charm that mass-produced versions invariably lack.
This project allows for hands-on engagement with a variety of instructional techniques, including the execution of color transitions, the raising of the foundational layer, and the reinforcement of the strap for structural integrity.
Base stitch for beginners
We’ve all been there! Here are some basic stitch we’ve learned along the way:
How To Crochet Magic Ring ? l Step-By-Step l Video & Text &Photo
Chain Stitch |Step By Step Guide| Text & Photo &Video
Single Crochet-You Want To Know The Most Detailed Information
Half Double Crochet In The Round-The Complete Guide
Double Crochet Stitches For Beginners
Video for mixed color vegetable basket tote bag crochet
In this instructional video, we will guide you through the process of crocheting a Mixed Color Vegetable Basket Tote Bag.
By following these coordinated steps, you will produce a visually engaging and environmentally considerate tote, ideally suited for transporting groceries, visiting markets, or handling daily tasks.
Material kit for mixed color vegetable basket tote bag crochet
💙5.0 mm hook & yarn needle & marker buckle : https://amzn.to/3TXavWn
💙2mm yarn:https://amzn.to/41JEMvZ (200g)
💙Boucle yarn: https://amzn.to/45DYgTU (200g)
💙Magnetic buckle: https://amzn.to/475spy1
Abbreviation for mixed color vegetable basket tote bag crochet
- ch = Chain stitch
- sc = Single crochet
- sl =Slip stitch
- st(s) =Stitch(es)
- R=Round
- dc=double crochet
Crochet bottom

| Row | Instruction | Stitch Count |
|---|---|---|
| R1 | Chain 8 | 8 ch |
| R2 | Flip, work 7 single crochets (in each purl stitch) | 7 sc |
| R3-R20 | Chain 1, flip over, work 7 single crochets (in each chain stitch) | 7 sc |
| R21 | short side: each 7 sc ; long side :21 c. need crochet twice | 56 sc |
Crochet body
| Round | Instruction | Stitch Count |
|---|---|---|
| R1-R10 | Ch 2, work 56 double crochets around | 56 dc |
At the conclusion of the crocheting process, the last stitch will be secured with a yarn needle via the technique of the invisible join.
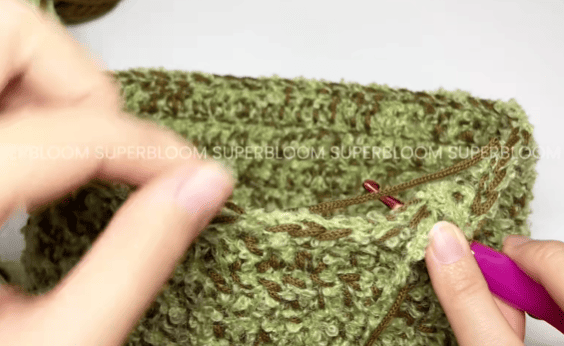
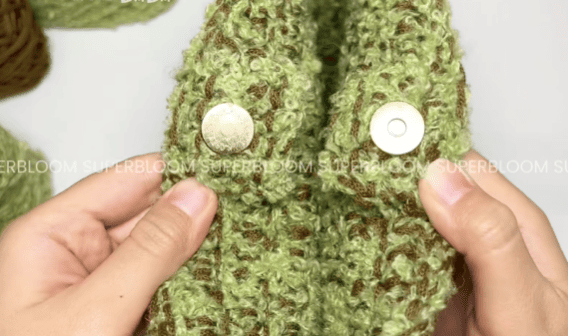
Crochet small gasket for magnetic buckle
| Row | Instruction | Stitch Count |
|---|---|---|
| Foundation | Chain 6 | 6 ch |
| R1 | Flip, work 5 single crochets (in each purl stitch) | 5 sc |
| R2-R4 | Chain 1, flip over, work 5 single crochets (in each chain stitch) | 5 sc |
Using this method, we crochet two identical pieces for the small gasket.
Sew small gasket on the bag
- The male and female magnetic snaps are first affixed to the interiors of the small gasket that accompany them, positioned centrally within the discs.
- A specialized installation tool is then employed to compress the snaps, ensuring that the prongs penetrate sufficiently and that the components seat securely.
- The centre line of the bag opening is identified by counting back to the fifth saddle stitch, a reference mark of the edge stitching methodology.
- The male component’s small gasket is stitched inner of bag , the disc oriented so that the central magnet faces the operator.
- The female is subsequently sewing on the opposing inner of bag , oriented so that its magnet continues the same polar alignment.
- All loose thread ends are subsequently concealed within the seam cavity and trimmed, achieving a coherent exterior .
Crochet & sew handle
Crochet handle
First, we allow a 25-centimeter length of yarn to hang free before proceeding.
Next, we create a foundation of two chain stitches and proceed to work the handle in crab stitch—commonly termed reverse single crochet.
When the handle attains the intended length, we sever the yarn and draw the remaining strand through the final loop, once again permitting a 25-centimeter tail to remain free for later attachment.
Find position for handle
| Step | Instruction |
|---|---|
| 1 | Starting from the stitch with the marker on the previous round, count 4 stitches to the right and place the first marker. |
| 2 | Count 13 stitches to the right, then place the second marker on the 14th stitch. |
| 3 | Count another 13 stitches to the right, and place the third marker on the 14th stitch. |
| 4 | Count 13 stitches again to the right, and place the fourth marker on the 14th stitch. |
| Note | Remove the marker from the previous round. These 4 markers indicate the positions where we will sew the handle. |
Sew handle

Step 1: In the first stage of the assembly process, insert the handle of inner bag , locating its base approximately two rows of fabric below the upper aperture of the bag opening; ensure the handle rests completely within the bag body.
Step 2: employ a hand-sewing needle and durable thread to fasten the handle to the bag, advancing stitch by stitch along the edge of the handle and aligning each new stitch precisely with the precedent one to maintain a uniform appearance.
Step 3: Upon completing the stitching at the proximal end of the handle, pivot the bag and insert the distal end of the handle into the corresponding aperture on the opposed wall, fastening it through an identical drilling and stitching process to secure the end within the internal cavity.
Step 4: Conclude the operation by mirroring the preceding procedure on the second handle, positioning it equidistant from the upper aperture and securing both its proximal and distal ends to the bag with the same stitch-matching technique.
Reference sources
1.Learn the most comprehensive guide for single crochet(sc)
Author:Sarah Stearns
Publication date: on June 15, 2021, updated:December 14, 2024
Title: How to single crochet (sc)for beginners
Summary as blow:
- Step-by-Step Single Crochet for Beginners
- Single Crochet into a Foundation Chain
- Single Crochet into another Row
- Single Crochet in the Round
- Increases and Decreases
- Working Single Crochet in Different Loops


